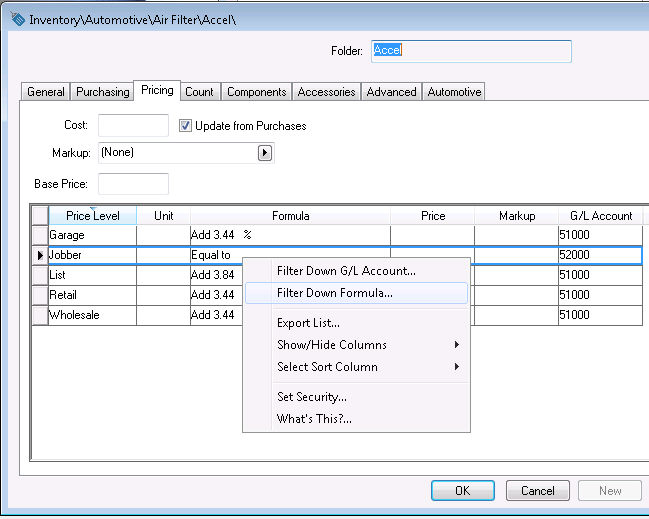
Pricing within EBMS is set using formulas for each price level. Open an automotive inventory item record and click on the Pricing tab as shown below:
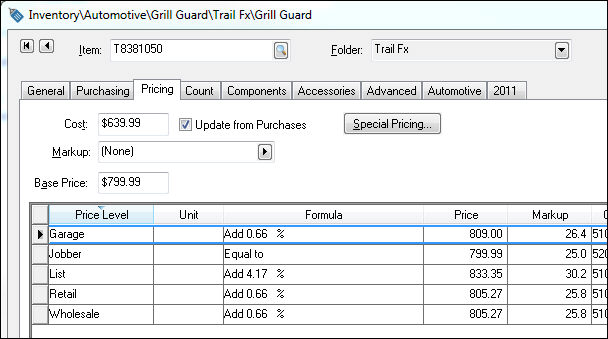
The Price for each Price Level can be set manually but is normally calculated using a Formula. Click on the Formula dropdown to select a formula type.
![]()
![]()
- Add _%
- Add $_
- Add _% and $_
- Add _% with a maximum of $_
- Add _% with a minimum of $_
- Base up to $_, _%$_, _% $_, _% else _%
Select one of the formulas shown above to add a Markup or Margin to the Base Price. The Keystone jobber price is copied to the Base price when a new Keystone item is created.
![]()
The Equal to formula should be used to copy the Base Price (jobber price) as the price level pricing.
![]()
![]()
The Price can also be calculated from the last Cost using the formulas shown above.
![]()
Use the (None) setting to manual set the price rather than using a Formula.
A formula that adds a margin based on the cost range allows the user to apply a single formula to a large range or parts with a large range of costs or jobber prices. The range formulas can be calculated from the cost of the product or the base price (jobber price).
Set the appropriate formula for each price level for each item.
Formulas can be applied to entire groups of items since it is often impractical to set the formula for each individual item. Some common parts groups that contain the same margin formula are as follows:
• Items within a specific inventory folder group: This option allows the user to set ranges and defaults for a specific user-defined group of items or folder groups. For example, a formula can be set for all the items within a user-defined group or subgroup.
Products are grouped within product groups as shown above based on eCatalog's generic description. An accessory group (such as the Air Filter folder group) may have subfolders for each manufacturer. Review the Inventory Folders for Auto Parts section for more details on the standard product groups.
• All products made by the same manufacturer: Margins are often applied based on the discount category for a specific manufacturer. The recommended markup for each product item based on the manufacturer is copied from the eCatalog when the manufacturer subfolder is created. The system allows the user to change the percentage for all the items that are manufactured by individual manufacturers or change the markup for only the items within a specific product group.
• Items in a specific jobber price range or a specific cost range: Margins can be set for an entire group of products based on the jobber price range or the range of costs. For example, the markup may be larger for products with a jobber price that is less than $10 than for items between $10 and $50. The margin for items over $50 or over $200 can be set to be different than the items with a lower jobber price. The same bracketed margin settings can be based on the range of the item cost.
Continue with the following sections for detailed instructions to set the pricing formulas based on the product groups listed above.
IMPORTANT: Make a backup copy of the EBMS data before proceeding with the instructions within this section. Changing formulas within large groups of products may require the user to restore the information to a previous setting if a mistake is made.
Items within a specific inventory folder group
Formulas within the Pricing tab of inventory items can be changed as a group. This group can be limited to a specific folder group or can include all the inventory items within the EBMS software.
Complete the following steps to change a group of items within a category:
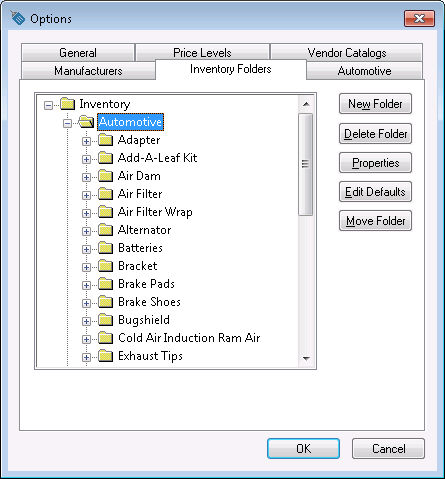
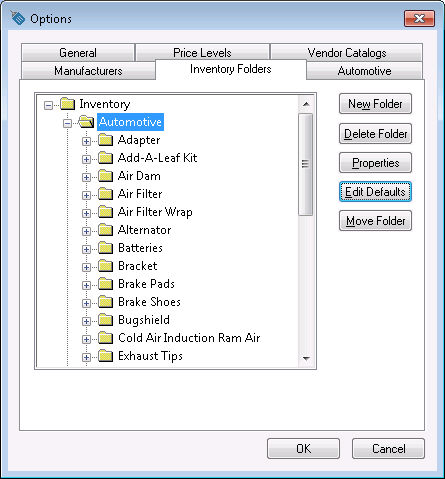
- Select from the main EBMS menu and click on the Product Categories tab as shown below:

- Highlight the root folder group that contains the items that require a price change. For Example, in the example above, highlight the top-level root folder (Products) to change all the inventory items within the system, highlight the Automotive folder to change all of the automotive items within the system, highlight the Air Filter group to change the pricing for only the air filters, or highlight a manufacturer such as K&N Filter to change only the pricing formulas for items in the K&N Filter subfolder.
- Click on the Edit Defaults button.
- Select the defaults Pricing tab as shown below:
- Select the desired Formula for a specific Price Level. For example, if the top-level root inventory folder was selected in step 2, complete the following steps to set the Jobber price level for all inventory items as Equal to as shown above.
- Set the Formula to the desired option (Equal to in the example above).
- Right-click on the Jobber price level line and select Filter Down Formula from the context menu as shown below:
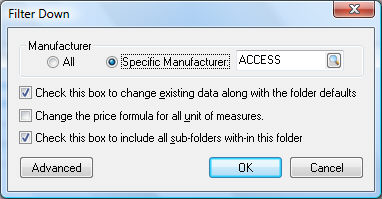
- The following dialog will appear with three options. Set the option settings as described below:
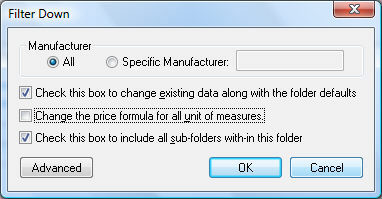
- Select the All manufacturer option to change all items or select a Specific Manufacturer to only affect a certain manufacturer line.
- Enable the first option (Check this box to change existing data along with the folder defaults) to change the formulas within existing inventory items. Only the folder defaults will be affected by the new formula if this option is disabled.
- Enable the second option (Change the price formula for all unit of measures) only to change the formula for all units of measure. This option has no effect if there are no secondary Unit of Measure settings within the Pricing tab. Review the Unit of Measure within the Inventory documentation.
- The last option (Check this box to include all sub-folders within this folder) should be enabled to change the formula for all subfolders. For example, if the top-level root folder is selected, all the folders within the root folder including all subfolders will be changed by this filter down function. If this option is disabled, only the items within the selected folder will be affected by the filter down.
- Click the OK button and the following dialog will open:
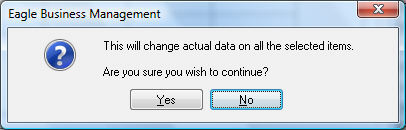
- Warning: This filter down utility can change a large amount of data. This process cannot be aborted or the information reversed. Click Yes to complete the filter down process.
- Repeat steps 6 - 10 for all other unit of measure price levels if the inventory items contain multiple units of measure.
All products made by the same manufacturer
Price margin Formulas often vary based on the manufacturer of the product. If all the products from a certain manufacturer are located within the same folder, follow steps 1 - 11 in the previous section. Complete the following steps if the manufacturer's products are scattered within multiple product groups or folders.
-
Select the folder that contains all the items from a specific manufacturer. For example, multiple product groups within the Automotive folder contain items from a common manufacturer, select the Automotive folder as shown below:
-
Click on the Edit Defaults button and select the Pricing tab.
-
Set the formula for the items for the specific vendor and set the margin values as shown below:
:
-
After the Formula and Percentage is set for a single price level, right-click on the Price Level line that was changed and select Filter Down Formula to open the following dialog:
-
Select the Specific Manufacturer option and then enter the Manufacturer ID code.
-
Enable the first check mark option (change existing data along with the folder defaults) and disable the second option (change the price formula for all unit of measure) unless all the different unit of measure markup formulas are equal. Review Set Query Options for instructions to use the advanced query option that appears as an Advanced button.
-
Repeat steps 3 through 6 for each Price Level.
Review the Edit Defaults, Filter Down Data, and Globally Change Data section of the main EBMS manual for more details on filtering down information.
Items in a specific jobber price range or a specific cost range
Complete the following steps to create price margins based on the Cost or jobber (Base) price of the item. This feature allows the user to increase the margin for lower cost items without setting margins individually or product groups. The following steps need to be duplicated for each group that contains different sets of bracketed pricing.
-
Select the folder that will inherit the specific group of bracketed pricing. For example, by selecting the Inventory folder, the user will set all the inventory items with the same bracketed pricing. Select Automotive to set the pricing for only the Automotive folders or select the product group or manufacturer subgroup.
-
Click on the Edit Defaults button and select the Pricing tab.
-
The first step is to determine if the price margin is calculated from the Cost or the jobber (Base) price of the item. Select the appropriate formula template.

-
Determine the margins percentages for up to 4 value brackets as shown in the example below:
Review the following example that is based on the Cost of the inventory item. The Retail A and Retail B pricing is based on the bracketed formula. In the example shown below, the Retail A price is marked up by 75% since the Cost is less than $2 (the 2nd bracket). If the Cost were greater than $100, the price would be marked up by 30%. This example also contains a rounding table, so the markup is not exactly 75%.
The following example is based on the Base Price. In the example shown below, the Retail A price is marked up by 50% since the Base Price is less than $3 (the first bracket). If the Base Price were greater than $99.99, the price would equal the Base Price.
Review Inventory Folders for Auto Parts for more details on creating auto parts folders and subfolders.
Review Pricing Overview within the inventory manual for more details on formulas.