In this article: How to Add a Report | How to Export a Report | List of Expense Reports | List of Financial Reports | List of Inventory Reports | List of Job Costing Reports | List of Labor Reports | List of Management and Miscellaneous Reports | List of Sales Reports
Navigating the Reports Menu
All the reports available within EBMS can be accessed within the Reports menu. Select File > Reports from the main EBMS menu to open the following reports menu window. The report category groups (folders and subfolders) are found on the left side. Highlight a folder to populate the right side with individual report names.
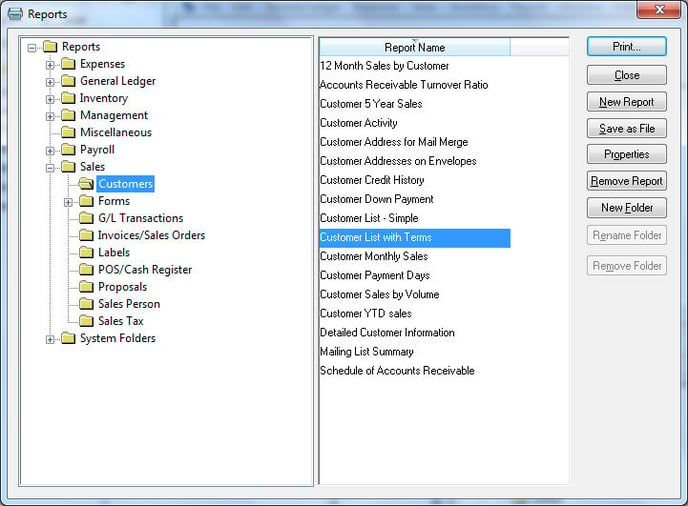
Reports are organized by the description of the module. For example, reports concerning customers come from the EBMS Sales module, so they are listed under the Reports > Sales folder. Click on the plus symbol (+) to expand any subfolder group of reports.
Right-click on any report name and select What's This from the context menu to view a brief description of the report.
User-defined reports can be organized within specific print button menus found on individual screens throughout EBMS. Review the Print Buttons and Menus section for more details on adding commonly used reports to specific windows.
Adding Reports or Report Folders
EBMS includes many reports and report folder groups; additional reports and folders can be added according to the user's preferences. Custom reports can be purchased from Koble Systems or created by the user using Seagate Crystal Reports. Review Report and Form Customization for more details.

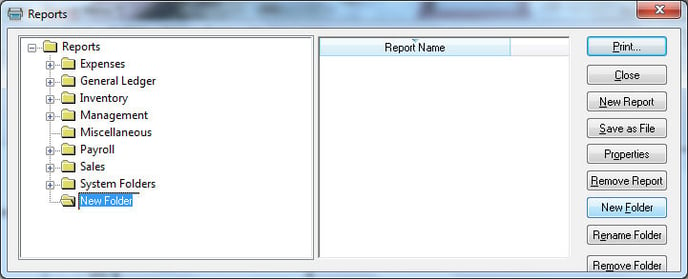
User-defined report folders can be added by clicking on the New Folder button. Type in the name of the new folder to identify the new group.
Highlight a report folder and click on the Rename Folder or Remove Folder buttons to rename or remove report folders. The original report folder groups cannot be renamed or removed by the user, so these button options will only be available for user-created folders.
All EBMS reports are contained within a reports database and the New Report step is required to place the new or changed reports within the file.
Highlight the appropriate folder within the print dialog and click on the New Report button to insert a new report into the selected folder. The following window will open:

Select a report and click on the Open button to insert the report into the EBMS system. The report file identified with a .RPT extension will remain in the custom directory and can be deleted if necessary but may be useful as a system copy of the report. If this file is altered, the report must again be added to the menu in order to update the EBMS report system. The following option window will open to complete the report addition step:

The Report Path identifies the file name of the report. The file name must be unique to add a report to EBMS and must be identical to the original file if an existing report is to be updated or replaced.
The Displayed Report Name is the description that is displayed within the report menu. The user can change this entry in order to specifically describe the report. This name should be changed to reflect a changed or altered report so the name is not identical to the original.
The user lists are used to set the security options for the report. See the Setting Report Security section for more details on report security.
Click the OK button to insert the report.
Export a Report
- Open the Reports menu by selecting File > Reports from the main EBMS menu.

-
Highlight the desired report and click the Save as File button as shown below:
-
Click Save to create a Crystal Reports file (*.RPT) within the user's personal folder. Select a different file type under Save as type to save the report in a different format, but some formatting may be lost in a different file type.
Report Properties
Highlight a report name and click on the Properties buttons to view or change the properties of a report. See image below.

Report properties to view or edit include Report Path, Displayed Report Name, and users allowed or not allowed to print the report. Change permission levels for specific reports from the Properties window.
Remove Report
Click on the Remove Report button to remove a report from the Reports menu.
This will prompt the message: "Are you sure you want to remove this report?" Click Yes to remove the selected report from the list or No to cancel. Use this option with caution.
Report Lists by Main Folders
The report names and category folder configuration shown below may differ slightly from the user's version of EBMS, since the report folder system is very customizable and based on the user's module configuration. For example, Job Costing reports may not be available if the optional Job Costing module is not installed on the user's system. Reports for optional modules will be italicized in the lists below.
(Please note that the report lists below are provided for reference and may not match exactly with the folder system in your File > Reports setup in EBMS.)
Reports > Expenses
| Module | Category Folder | Subfolder | Report Name |
| Expenses | Bank Accounts | Account Reconciliation | |
| Expenses | Bank Accounts | Bank Account Register by Date | |
| Expenses | Bank Accounts | Detailed Bank Account Register | |
| Expenses | Bank Accounts | Positive Pay for CSV Export | |
| Expenses | Bank Accounts | Running Bank Account Register | |
| Expenses | Forms | Check 8.5 x 11 | |
| Expenses | Forms | Plain Paper | Check Voucher List |
| Expenses | Forms | Plain Paper | Purchase Order (Plain Paper) |
| Expenses | Forms | Plain Paper | Purchase Order Receiving Checklist |
| Expenses | Forms | Purchase Order with Linear Measurement | |
| Expenses | G/L Transactions | Expense Journal | |
| Expenses | G/L Transactions | Unposted Expense Transaction Summary | |
| Expenses | G/L Transactions | Unposted Expense Transactions | |
| Expenses | G/L Transactions | Unposted Expense Transactions by Set | |
| Expenses | G/L Transactions | Unposted Expense Transactions by Source | |
| Expenses | Invoices/Purchase Orders | Accounts Payable Aging | |
| Expenses | Invoices/Purchase Orders | ACH Payment Report | |
| Expenses | Invoices/Purchase Orders | Check Payment | |
| Expenses | Invoices/Purchase Orders | Expense Invoice Payments | |
| Expenses | Invoices/Purchase Orders | G/L Transactions on Outstanding A/P Invoices | |
| Expenses | Invoices/Purchase Orders | Invoice Expense | |
| Expenses | Invoices/Purchase Orders | Invoice List (Vendor) | |
| Expenses | Invoices/Purchase Orders | Invoices by Date | |
| Expenses | Invoices/Purchase Orders | Prepayment List | |
| Expenses | Invoices/Purchase Orders | Purchase Orders by ETA | |
| Expenses | Invoices/Purchase Orders | Purchase Orders by Vendor | |
| Expenses | Invoices/Purchase Orders | Sales Order Containing Items Received | |
| Expenses | Invoices/Purchase Orders | Sales Orders Containing Items Purchased | |
| Expenses | Labels | Inventory Labels from Invoice (1.25 x 1) | |
| Expenses | Labels | Inventory Labels from Invoice (1.5 x 1) | |
| Expenses | Labels | Inventory Labels from Invoice (2 x 1) | |
| Expenses | Labels | Inventory Labels from Invoice (3 x 1) | |
| Expenses | Labels | Inventory Sheet Labels from Invoice (2 x 10) | |
| Expenses | Labels | Inventory Sheet Labels from Invoice (3 x 10) | |
| Expenses | Labels | Product Labels from Invoice with Link (3 x 1.75) | |
| Expenses | Labels | RMA Label | |
| Expenses | Labels | Vendor Address Labels (2 x 10) | |
| Expenses | Labels | Vendor Address Labels (3 x 10) | |
| Expenses | Vendors | Detailed Vendor Information | |
| Expenses | Vendors | Schedule of Accounts Payable | |
| Expenses | Vendors | Vendor List w/ Terms (Landscape) | |
| Expenses | Vendors | Vendor Activity | |
| Expenses | Vendors | Vendor Address on Envelope | |
| Expenses | Vendors | Vendor Down Payment | |
| Expenses | Vendors | Vendor List - Simple | |
| Expenses | Vendors | Vendor Purchases by Volume | |
| Expenses | Vendors | Vendor YTD Purchases |
Reports > Financials
| Module | Category Folder | Subfolder | Report Name |
| Financials | 1099 Reports | 1096 Form (Preprinted) | |
| Financials | 1099 Reports | 1099 INT CSV Export | |
| Financials | 1099 Reports | 1099 Interest Form (Preprinted) | |
| Financials | 1099 Reports | 1099 MISC CSV Export | |
| Financials | 1099 Reports | 1099 Misc Form (Preprinted) | |
| Financials | 1099 Reports | 1099 NEC CSV Export | |
| Financials | 1099 Reports | 1099 NEC Form (Preprinted) | |
| Financials | 1099 Reports | 1099 Payments | |
| Financials | 1099 Reports | 1099-R Form (Preprinted) | |
| Financials | Balance Statements | Balance Sheet | |
| Financials | Balance Statements | Balance Sheet 12 Month Comparison | |
| Financials | Balance Statements | Balance Sheet 8 Year Comparison | |
| Financials | Balance Statements | Cash Flow Statement | |
| Financials | Balance Statements | Cash Projection | |
| Financials | Balance Statements | Department Totals | |
| Financials | Balance Statements | Fund Balance Detail | |
| Financials | Balance Statements | Fund Balance Summary | |
| Financials | Balance Statements | General Ledger Trial Balance Summary | |
| Financials | Balance Statements | GL Trial Balance | |
| Financials | Budget | Budget Detail | |
| Financials | Budget | Budget Detail - 12 Month | |
| Financials | Budget | Budget Detail - 12 Month by Profit Center | |
| Financials | Budget | Budget Detail by Profit Center | |
| Financials | Budget | Budget to Actual Comparison Monthly | |
| Financials | Budget | Budget to Actual Configurable | |
| Financials | Budget | Budget to Actual Configurable by Profit Center | |
| Financials | Budget | Configurable P&L by Profit Center w/ Budget & Avg | |
| Financials | Budget | Configurable P&L with Budget & Average | |
| Financials | Cash Statements | Cash Balance Sheet | |
| Financials | Cash Statements | Cash Profit & Loss Statement | |
| Financials | Cash Statements | Cash Trial Balance | |
| Financials | Depreciation | Assets | Accumulated Depreciation |
| Financials | Depreciation | Assets | Accumulated Depreciation Reconciliation |
| Financials | Depreciation | Assets | Asset Purchases |
| Financials | Depreciation | Assets | Asset Schedule List |
| Financials | Depreciation | Assets | Depreciable Asset Reconciliation |
| Financials | Depreciation | Assets | Disposed Asset |
| Financials | Depreciation | Assets | Scheduled Depreciation |
| Financials | Depreciation | Assets | Section 179 Depreciation |
| Financials | Depreciation | G/L Transactions | Depreciation Journal |
| Financials | Depreciation | G/L Transactions | Unposted Depreciation Transaction Summary |
| Financials | Depreciation | G/L Transactions | Unposted Depreciation Transactions |
| Financials | Depreciation | G/L Transactions | Unposted Depreciation Transactions by Set |
| Financials | Depreciation | G/L Transactions | Unposted Depreciation Transactions by Source |
| Financials | Depreciation | Methods | Method List |
| Financials | Lists | Chart of Accounts | |
| Financials | Lists | Chart of Accounts by Classification | |
| Financials | Lists | Chart of Accounts by Department | |
| Financials | Lists | General Ledger Classification List | |
| Financials | Lists | General Ledger Department List | |
| Financials | Lists | Profit Center List | |
| Financials | Profit & Loss | P&L by Fund | Monthly Profit & Loss by Fund |
| Financials | Profit & Loss | P&L by Profit Center | 12 Month Profit & Loss by Profit Center |
| Financials | Profit & Loss | P&L by Profit Center | Configurable P&L by Profit Center w/ Budget & Avg |
| Financials | Profit & Loss | P&L by Profit Center | Configurable Profit & Loss by Profit Center |
| Financials | Profit & Loss | P&L by Profit Center | Monthly Profit & Loss by Profit Center |
| Financials | Profit & Loss | P&L by Profit Center | Profit & Loss Summary by Profit Center |
| Financials | Profit & Loss | P&L by Profit Center | Quarterly Profit & Loss by Profit Center |
| Financials | Profit & Loss | Standard P&L | 12 Month Profit & Loss Detail |
| Financials | Profit & Loss | Standard P&L | Annual Profit & Loss 8 Year Comparison |
| Financials | Profit & Loss | Standard P&L | Annual Profit & Loss Statement |
| Financials | Profit & Loss | Standard P&L | Configurable P&L with Budget & Average |
| Financials | Profit & Loss | Standard P&L | Configurable Profit & Loss Detail |
| Financials | Profit & Loss | Standard P&L | Monthly Profit & Loss Detail |
| Financials | Profit & Loss | Standard P&L | Quarterly Profit & Loss Statement |
| Financials | Profit & Loss | Standard P&L | Summarized Profit & Loss Statement |
| Financials | Profit Centers | G/L Allocation | |
| Financials | Profit Centers | G/L Codes by Profit Center | |
| Financials | Profit Centers | Monthly Profit & Loss by Profit Center | |
| Financials | Profit Centers | Profit & Loss Summary by Profit Center | |
| Financials | Profit Centers | Profit Center List | |
| Financials | Profit Centers | Profit Centers by G/L Codes | |
| Financials | Summaries | Cash Projection | |
| Financials | Summaries | General Ledger Verification of Subsidiary Ledgers | |
| Financials | Summaries | Monthly Sales Graph | |
| Financials | Summaries | Monthly Totals | |
| Financials | Transactions | Detailed G/L Transactions | |
| Financials | Transactions | G/L Detailed Transactions by ID | |
| Financials | Transactions | G/L Detailed Transactions by Set | |
| Financials | Transactions | G/L Detailed Transactions by Source | |
| Financials | Transactions | G/L Detailed Transactions by User | |
| Financials | Transactions | G/L Detailed Transactions Summarized by Date | |
| Financials | Transactions | G/L Transactions by G/L Code with Balance | |
| Financials | Transactions | G/L Transactions Summary | |
| Financials | Transactions | G/L Transactions Summary by User | |
| Financials | Transactions | General Ledger Journal | |
| Financials | Transactions | G/L Transaction Detail by Process Date | |
| Financials | Transactions | Retained Earnings Transaction Detail | |
| Financials | Transactions | Unposted G/L Transaction Summary | |
| Financials | Transactions | Unposted G/L Transactions | |
| Financials | Transactions | Unposted G/L Transactions by Set | |
| Financials | Transactions | Unposted G/L Transactions by Source |
Reports > Inventory (or Reports > Products)
| Module | Category Folder | Subfolder | Report Name |
| Inventory | Costs/Prices | Base Price vs Cost Comparison | |
| Inventory | Costs/Prices | Inventory Cost List - By Vendor | |
| Inventory | Costs/Prices | Inventory Cost List by Item | |
| Inventory | Costs/Prices | Inventory Price Sheet (Item) | |
| Inventory | Costs/Prices | Inventory Price Sheet w/ Part Numbers | |
| Inventory | Costs/Prices | Price Sheet with Unit of Measure | |
| Inventory | Counts/Values | Inventory Activity | |
| Inventory | Counts/Values | Inventory Adjustments | |
| Inventory | Counts/Values | Inventory Aging | |
| Inventory | Counts/Values | Inventory Count | |
| Inventory | Counts/Values | Inventory Count List by Location | |
| Inventory | Counts/Values | Inventory Dead Stock | |
| Inventory | Counts/Values | Inventory Needed For Sales Orders | |
| Inventory | Counts/Values | Inventory Order Sheet (Inventory Item) | |
| Inventory | Counts/Values | Inventory Order Sheet (Vendor) | |
| Inventory | Counts/Values | Inventory Value | |
| Inventory | Counts/Values | Inventory Value (Periodic Method) | |
| Inventory | Counts/Values | Inventory Value by Manufacturer | |
| Inventory | Counts/Values | Inventory Value Detail | |
| Inventory | Counts/Values | Physical Inventory Worksheet | |
| Inventory | G/L Transactions | Inventory Journal | |
| Inventory | G/L Transactions | Product Classification Change History | |
| Inventory | G/L Transactions | Unposted Inventory Transaction Summary | |
| Inventory | G/L Transactions | Unposted Inventory Transactions | |
| Inventory | G/L Transactions | Unposted Inventory Transactions by Set | |
| Inventory | G/L Transactions | Unposted Inventory Transactions by Source | |
| Inventory | Labels | Sheet Labels | Inventory Item and Bin Sheet Labels (2 x 10) |
| Inventory | Labels | Sheet Labels | Inventory Item and Bin Sheet Labels (3 x 10) |
| Inventory | Labels | Specialty Printer Labels | Inventory Item and Bin Labels (1.25 x 1) |
| Inventory | Labels | Specialty Printer Labels | Inventory Item and Bin Labels (2 x 1) |
| Inventory | Labels | Specialty Printer Labels | Inventory Item and Bin Labels (3 x 1) |
| Inventory | Labels | Specialty Printer Labels | Inventory Label from Item (1.5 x 1) |
| Inventory | Labels | Specialty Printer Labels | Inventory Price Labels (1.125 x 2) |
| Inventory | Labels | Specialty Printer Labels | Inventory Price Labels Multiple (1.125 x 2) |
| Inventory | Lists | Inventory Components | |
| Inventory | Lists | Inventory Item List | |
| Inventory | Lists | Inventory Item List w/ Barcode | |
| Inventory | Lists | Inventory Manufacturers | |
| Inventory | Lists | Vendor Part Numbers | |
| Inventory | Lot Tracking | Lot Number History | |
| Inventory | Lot Tracking | Lot Number List | |
| Inventory | Lot Tracking | Lot Sales by Customer | |
| Inventory | Manufacturing | Inventory Manufactured by Date | |
| Inventory | Manufacturing | Manufactured Finished Goods | |
| Inventory | Manufacturing | Manufactured Items by Date | |
| Inventory | Manufacturing | Manufacturing Batch Detail | |
| Inventory | Manufacturing | Manufacturing Batch Summary by Date | |
| Inventory | Manufacturing | Manufacturing Summary | |
| Inventory | Manufacturing | Manufacturing Work Order | |
| Inventory | Manufacturing | Materials Required for Manufacturing | |
| Inventory | Sales/Purchases | Inventory Activity | |
| Inventory | Sales/Purchases | Inventory Item Lost Sales | |
| Inventory | Sales/Purchases | Inventory Margins | |
| Inventory | Sales/Purchases | Inventory Profit by Date | |
| Inventory | Sales/Purchases | Inventory Profit by Manufacturer | |
| Inventory | Sales/Purchases | Inventory Purchase Comparison | |
| Inventory | Sales/Purchases | Inventory Purchases by Invoice Date | |
| Inventory | Sales/Purchases | Inventory Purchases by Vendor | |
| Inventory | Sales/Purchases | Inventory Purchases by Volume | |
| Inventory | Sales/Purchases | Inventory Purchasing Detail | |
| Inventory | Sales/Purchases | Inventory Returns | |
| Inventory | Sales/Purchases | Inventory Sales | |
| Inventory | Sales/Purchases | Inventory Sales by Customer | |
| Inventory | Sales/Purchases | Inventory Sales by Invoice | |
| Inventory | Sales/Purchases | Inventory Sales by Shipping Customer | |
| Inventory | Sales/Purchases | Inventory Sales by Volume | |
| Inventory | Sales/Purchases | Inventory Sales Comparison | |
| Inventory | Sales/Purchases | Lot Sales by Customer | |
| Inventory | Sales/Purchases | Purchase Orders by ETA | |
| Inventory | Sales/Purchases | Purchases Total | |
| Inventory | Sales/Purchases | Sales Total | |
| Inventory | Serialized Items | Serialized Item Added Cost Batch Details | |
| Inventory | Serialized Items | Serialized Item List | |
| Inventory | Serialized Items | Serialized Item List for Warehouse | |
| Inventory | Serialized Items | Serialized Item Sales | |
| Inventory | Serialized Items | Serialized Item Value by Date | |
| Inventory | Serialized Items | Serialized Items by Customer | |
| Inventory | Warehouse | Inventory Activity for Warehouse | |
| Inventory | Warehouse | Inventory Adjustments for Warehouse | |
| Inventory | Warehouse | Inventory Aging | |
| Inventory | Warehouse | Inventory Count List for Warehouse | |
| Inventory | Warehouse | Inventory Monthly Purchases for Warehouse | |
| Inventory | Warehouse | Inventory Monthly Sales for Warehouse | |
| Inventory | Warehouse | Inventory Order Sheet by Item for Warehouse | |
| Inventory | Warehouse | Inventory Order Sheet by Vendor for Warehouse | |
| Inventory | Warehouse | Inventory Purchases by Invoice Date for Warehouse | |
| Inventory | Warehouse | Inventory Sales by Invoice | |
| Inventory | Warehouse | Inventory Turnover Ratio by Warehouse | |
| Inventory | Warehouse | Inventory Sales by Invoice | |
| Inventory | Warehouse | Inventory Turnover Ratio by Warehouse | |
| Inventory | Warehouse | Inventory Value for Warehouse | |
| Inventory | Warehouse | Inventory Warehouse Dead Stock | |
| Inventory | Warehouse | Physical Inventory Worksheet by Warehouse | |
| Inventory | Warehouse | Product Components with Available Quantity | |
| Inventory | Warehouse | Product G/L Verification by Warehouse | |
| Inventory | Warehouse | Product Purchases by Volume for Warehouse | |
| Inventory | Warehouse | Product Sales by Volume for Warehouse | |
| Inventory | Warehouse | Warehouse List with Barcode | |
| Inventory | Warehouse | Warehouse Transfer Tickets | |
| Inventory | Web | Website Inventory Item List |
Reports > Job Costing (Optional Module)
| Module | Category Folder | Report Name |
| Job Costing | Billing | AIA Document |
| Job Costing | Billing | Job Receivables Statement |
| Job Costing | Billing | Progressive Billing Form |
| Job Costing | Billing | Time & Material Billing |
| Job Costing | Costs/Profits | Annual Job Cost Summary by Stage |
| Job Costing | Costs/Profits | Job Budget to Actual Variance by Job |
| Job Costing | Costs/Profits | Job Budget to Actual Variance by Stage |
| Job Costing | Costs/Profits | Job Cost G/L Transaction Detail |
| Job Costing | Costs/Profits | Job Profit |
| Job Costing | Costs/Profits | Job Profit & Loss by G/L Code |
| Job Costing | G/L Transactions | Direct Job Cost vs Overhead Ratio |
| Job Costing | G/L Transactions | Direct Job Cost vs Overhead Ratio (Profit Center) |
| Job Costing | G/L Transactions | Job Cost G/L Transaction Detail |
| Job Costing | G/L Transactions | Job Costing Journal |
| Job Costing | G/L Transactions | Job Profit & Loss by G/L Code |
| Job Costing | G/L Transactions | Unposted Job Costing Transactions |
| Job Costing | Jobs | Job Cost Management |
| Job Costing | Jobs | Job Information |
| Job Costing | Jobs | Job Site List |
| Job Costing | Jobs | Jobs |
| Job Costing | Labor | Job Labor |
| Job Costing | Labor | Job Labor Summary |
| Job Costing | Labor | Worker Job Labor Summary |
| Job Costing | Purchases/Transfers | Expense Invoices by Job |
| Job Costing | Purchases/Transfers | Inventory Transfer |
| Job Costing | Purchases/Transfers | Inventory Transfer Status |
| Job Costing | Retainage | Job Retainage Activity |
| Job Costing | Retainage | Jobs Retainage Reconciliation |
| Job Costing | Stages | Job Budget to Actual Variance by Job |
| Job Costing | Stages | Job Budget to Actual Variance by Stage |
| Job Costing | Stages | Job Cost G/L Transaction Detail |
| Job Costing | Stages | Job Stage Labor |
| Job Costing | Stages | Job Stage List |
| Job Costing | Stages | Job Status |
| Job Costing | Stages | Master Stage List |
| Job Costing | Work in Process | Job Cost Management |
| Job Costing | Work in Process | Work in Process |
| Job Costing | Work in Process | Work in Process Work Sheet |
Reports > Labor
| Module | Category Folder | Subfolder | Report Name |
| Labor | Forms | Direct Deposit Notice | |
| Labor | Forms | Individual Direct Deposit Notice | |
| Labor | Forms | Payroll Check 8.5 x 11 | |
| Labor | Forms | Payroll Check Stubs | |
| Labor | G/L Transactions | Payroll Journal | |
| Labor | G/L Transactions | Payroll Transaction Details | |
| Labor | G/L Transactions | Unposted Payroll Transaction Summary | |
| Labor | G/L Transactions | Unposted Payroll Transactions | |
| Labor | G/L Transactions | Unposted Payroll Transactions by Set | |
| Labor | G/L Transactions | Unposted Payroll Transactions by Source | |
| Labor | Labels | Employee Address Labels (2 x 10) | |
| Labor | Labels | Employee Address Labels (3 x 10) | |
| Labor | Pay Periods | Gross Pay | |
| Labor | Pay Periods | Payroll Check Register | |
| Labor | Pay Periods | Payroll Pay Period Summary | |
| Labor | Pay Periods | Prevailing Wages for Job & Pay Period | |
| Labor | Pay Periods | Prevailing Wages for Pay Period | |
| Labor | Piecework | Employee Piecework Rates | |
| Labor | Piecework | Piecework by Employee & Pay Period | |
| Labor | Piecework | Piecework by Employee & Work Code | |
| Labor | Tasks | Billable Time | Bonus by Billed Tasks |
| Labor | Tasks | Billable Time | Employee Task Summary by Customer |
| Labor | Tasks | Billable Time | Invoice and Task Billable Hours |
| Labor | Tasks | Billable Time | Labor Tracking Details |
| Labor | Tasks | Billable Time | Task Summary by Customer |
| Labor | Tasks | Billable Time | Task Summary by Employee |
| Labor | Tasks | Customer | Customer Support Log |
| Labor | Tasks | Forms | Dual Column Work Order |
| Labor | Tasks | Forms | Work Order |
| Labor | Tasks | Labels | Task Label (2.5 x 4) |
| Labor | Tasks | Schedule | Employee Task List with Contact Info |
| Labor | Tasks | Schedule | Employee Task Schedule |
| Labor | Tasks | Schedule | Employee Weekly Schedule Summary |
| Labor | Tasks | Schedule | Task Duration by Employee |
| Labor | Taxes | 940 Summary | |
| Labor | Taxes | 941 Employer's Quarterly Tax Return | |
| Labor | Taxes | 941 Summary | |
| Labor | Taxes | 943 Employers Annual Tax Return | |
| Labor | Taxes | PA Form UC-2 | |
| Labor | Taxes | PA Form UC-2A | |
| Labor | Taxes | PA UC2-2A for CSV Export | |
| Labor | Taxes | Payroll Register | |
| Labor | Taxes | State Unemployment Report | |
| Labor | Taxes | Tax / Deduction List | |
| Labor | Taxes | Tax Rates | |
| Labor | Taxes | Taxes by Worker and Pay Date | |
| Labor | Time Cards | Employee Daily Hours | |
| Labor | Time Cards | Employee Pay and Deduction Summary | |
| Labor | Time Cards | Payroll Time Card Summary | |
| Labor | Time Cards | Timecard Summary for Payroll Service | |
| Labor | Time Cards | Worker Timecard by Date | |
| Labor | Time Cards | Workman's Compensation | |
| Labor | Work Codes | Work Code History | |
| Labor | Work Codes | Work Code List | |
| Labor | Work Codes | Work Code Summary by Employee | |
| Labor | Workers | Average Hourly Pay | |
| Labor | Workers | Detailed Employee List | |
| Labor | Workers | Detailed Employee Pay Rates | |
| Labor | Workers | Employee Address on Envelope | |
| Labor | Workers | Employee Average Hours | |
| Labor | Workers | Employee Benefit Hours | |
| Labor | Workers | Employee Card with Barcode | |
| Labor | Workers | Employee Daily Hours | |
| Labor | Workers | Employee Earnings Record | |
| Labor | Workers | Employee Information List | |
| Labor | Workers | Employee List | |
| Labor | Workers | Employee Pay Raise Details | |
| Labor | Workers | Employee Payroll Expense Summary | |
| Labor | Workers | Employees Clocked In | |
| Labor | Workers | Hour Rate History Log | |
| Labor | Workers | New Hire Reporting Form | |
| Labor | Workers | Worker Timecard by Date | |
| Labor | Year End | 943 Employers Annual Tax Return | |
| Labor | Year End | Employee Earnings Record | |
| Labor | Year End | Form W-2 | |
| Labor | Year End | Form W-2 (Plain Paper) - Employee Copies | |
| Labor | Year End | Form W-2 (Plain Paper) - Employer Copies | |
| Labor | Year End | Form W-3 |
Reports > Management and Reports > Miscellaneous
| Type Folder | Category Folder | Report Name |
| Management | End of Day Review | Accounts Receivable Invoice Activity |
| Management | End of Day Review | Cash Drawer Reconciliation for Receipt Printers |
| Management | End of Day Review | Cash Reconciliation |
| Management | End of Day Review | Inventory Sales with Zero Costs |
| Management | End of Day Review | Sales Orders by Date |
| Miscellaneous | Available Report Prompts | |
| Miscellaneous | EBMS Log Information | |
| Miscellaneous | Function Barcodes | |
| Miscellaneous | Preprinted Form Alignment Test | |
| Miscellaneous | Prompt Return Values |
Reports > Sales
| Module | Category Folder | Subfolder | Report Name |
| Sales | Customers | 12 Month Sales by Customer | |
| Sales | Customers | Accounts Receivable Turnover Ratio | |
| Sales | Customers | Customer 5 Year Sales | |
| Sales | Customers | Customer Activity | |
| Sales | Customers | Customer Address for Mail Merge | |
| Sales | Customers | Customer Addresses on Envelopes | |
| Sales | Customers | Customer Credit History | |
| Sales | Customers | Customer Down Payment | |
| Sales | Customers | Customer List - Simple | |
| Sales | Customers | Customer List with Terms | |
| Sales | Customers | Customer Monthly Sales | |
| Sales | Customers | Customer Payment Days | |
| Sales | Customers | Customer Sales by G/L Account | |
| Sales | Customers | Customer Sales by Volume | |
| Sales | Customers | Customer Sales by Volume (Multiple Years) | |
| Sales | Customers | Customer Sales Tax Exemptions | |
| Sales | Customers | Customer YTD Sales | |
| Sales | Customers | Detailed Customer Information | |
| Sales | Customers | Mailing List Summary | |
| Sales | Customers | Schedule of Accounts Receivable | |
| Sales | Forms | Contribution Receipt | |
| Sales | Forms | Customer Statement (No FC Calc) | |
| Sales | Forms | Customer Statement with Invoices | |
| Sales | Forms | Customer Statement with Invoices (No FC Calc) | |
| Sales | Forms | Deposit Slip | |
| Sales | Forms | Invoice/Sales Order with Service Serial No. | |
| Sales | Forms | Work Order from Invoice/S.O. with Serial No. | |
| Sales | Forms | Plain Paper | Activity Based Statement (Plain Paper) |
| Sales | Forms | Plain Paper | Bill of Lading |
| Sales | Forms | Plain Paper | Customer Statement (Plain Paper) |
| Sales | Forms | Plain Paper | Invoice (Plain Paper) |
| Sales | Forms | Plain Paper | Invoice Receipt (Condensed) (Epson) |
| Sales | Forms | Plain Paper | Invoice Receipt (Generic Text) |
| Sales | Forms | Plain Paper | Packing List |
| Sales | Forms | Plain Paper | Payment Receipt (Epson) |
| Sales | Forms | Plain Paper | Payment Receipt (Plain Paper) |
| Sales | Forms | Plain Paper | Pick Sheet |
| Sales | Forms | Plain Paper | Post Card Notification |
| Sales | Forms | Plain Paper | Proposal (Plain Paper) |
| Sales | Forms | Plain Paper | Proposal Contract (Plain Paper) |
| Sales | Forms | Plain Paper | Sales Order (Plain Paper) |
| Sales | Forms | Plain Paper | Work Order from Sales Order / Invoice |
| Sales | Forms | Preprinted | Customer Statement 8.5 x 11 (Preprinted) |
| Sales | G/L Transactions | Accounts Receivable Cash Receipts | |
| Sales | G/L Transactions | Bank Account Deposits | |
| Sales | G/L Transactions | Cash Reconciliation | |
| Sales | G/L Transactions | Register Totals | |
| Sales | G/L Transactions | Sales Activity Summary by G/L Account | |
| Sales | G/L Transactions | Sales Journal | |
| Sales | G/L Transactions | Unposted Sales Transaction Summary | |
| Sales | G/L Transactions | Unposted Sales Transactions | |
| Sales | G/L Transactions | Unposted Sales Transactions by Set | |
| Sales | G/L Transactions | Unposted Sales Transactions by Source | |
| Sales | Invoices/Sales Orders | Accounts Receivable Aging | |
| Sales | Invoices/Sales Orders | Accounts Receivable Invoice Activity | |
| Sales | Invoices/Sales Orders | Inventory Sales by Invoice | |
| Sales | Invoices/Sales Orders | Invoice List by Customer | |
| Sales | Invoices/Sales Orders | Invoice List by Shipping Customer | |
| Sales | Invoices/Sales Orders | Invoice Monthly Summary by Inventory Item | |
| Sales | Invoices/Sales Orders | Invoices by Number | |
| Sales | Invoices/Sales Orders | Invoices/Sales Orders by Date | |
| Sales | Invoices/Sales Orders | Profits by Invoice | |
| Sales | Invoices/Sales Orders | Sales Order by Customer | |
| Sales | Invoices/Sales Orders | Sales Orders Aging by Entry Date | |
| Sales | Invoices/Sales Orders | Sales Orders by Date | |
| Sales | Invoices/Sales Orders | Sales Volume by Week Day and Time | |
| Sales | Invoices/Sales Orders | Shipping Schedule | |
| Sales | Invoices/Sales Orders | Shipping Schedule with Purchase ETA | |
| Sales | Labels | Address Labels (3 x 10) by Purchases | |
| Sales | Labels | Customer Address Labels (2 x 10) | |
| Sales | Labels | Customer Address Labels (3 x 1) | |
| Sales | Labels | Customer Address Labels (3 x 10) | |
| Sales | Labels | Shipping Label | |
| Sales | Labels | Statement Labels (2 x 10) | |
| Sales | Labels | Statement Labels (3 x 1) | |
| Sales | Labels | Statement Labels (3 x 10) | |
| Sales | POS/Cash Register | Accounts Receivable Invoice Activity | |
| Sales | POS/Cash Register | Cash Drawer Reconciliation for Receipt Printers | |
| Sales | POS/Cash Register | Cash Reconciliation | |
| Sales | POS/Cash Register | Credit Card AVS/CVV Approved Actions | |
| Sales | POS/Cash Register | End of Day Credit Card Statement | |
| Sales | POS/Cash Register | Sales Activity Summary by G/L Account | |
| Sales | POS/Cash Register | Sales Volume by Week Day and Time | |
| Sales | Proposals | Call Back by Sales Person | |
| Sales | Proposals | Proposal List | |
| Sales | Proposals | Unaccepted Proposals | |
| Sales | Sales Person | Commission Detail for Salesperson | |
| Sales | Sales Person | Commission Summary for Salesperson | |
| Sales | Sales Person | Commission Transactions by Customer | |
| Sales | Sales Person | Invoice Profit by Salesperson | |
| Sales | Sales Person | Invoices with Commission Pending | |
| Sales | Sales Person | Sales by Product and Sales Person | |
| Sales | Sales Person | Sales Person Summary | |
| Sales | Sales Tax | Customer Sales Tax Exemptions | |
| Sales | Sales Tax | Sales by Ship To State | |
| Sales | Sales Tax | Sales Tax - Accrual | |
| Sales | Sales Tax | Sales Tax Detail (Automatic) | |
| Sales | Sales Tax | Sales Tax Detail (Manual) | |
| Sales | Sales Tax | Sales Tax List |