Manual Check Entry for Vendor Payments
EBMS contains tools that generate payments directly from the software. Allowing the software to generate the check or other payment rather than manually entering the payment transaction is preferred because of increased accuracy.
EBMS gives the user two options to enter manual payments:
-
Use the Vendor Payments dialog if the invoices have been entered and processed within EBMS. Complete the following steps:
-
Open the Vendor Payments dialog by selecting Expenses > Vendor Payments from the main EBMS menu.
-
Select invoice(s) that are paid manually. Note that the vendor payment dialog is the only option if multiple invoices are manually paid using a single payment.
-
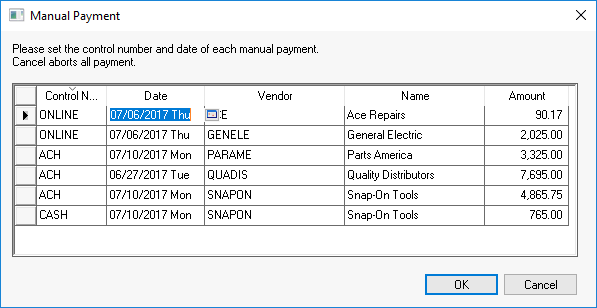
Select Process > Manual Payment option to open the following dialog:

-
Set the Control Number and the payment Date of the manual payment as shown above.
-
Complete the following steps to record a manual payment at the same time the expense or invoice is entered.
-
Go to Expenses > Invoices and P.O.s and the following invoice window will open:

-
Enter or select the desired Vendor ID.
-
Enter the Invoice number of the vendor bill that you wish to pay.
-
Enter the invoice Date.
-
Select Manual as the Payment method rather than Charge or Urgent.
-
Select Bank Account from which check was written.
-
Enter the check number of the handwritten check in the Control Number field. Enter DEBIT or EFT text if the payment does not involve a numeric check number.
-
Ignore Terms fields.
-
Enter other optional invoice fields such as P.O. #, Ship Via, and Description.
-
Enter the amount of the handwritten check in Total field.
-
Enter the invoice detail the same way a standard invoice would be entered. Review the Entering a New Vendor Invoice section for more details.
Select Process from the invoice Process menu. This invoice will not be listed in the Vendor Payments window since it already has been paid. No additional steps are needed to process or close this invoice.