It is recommended that vendor invoices be entered into the computer as they are received, rather than waiting until you wish to pay them. When invoices are entered as a Charge or an Urgent invoice, they are saved as an outstanding (unpaid) invoice. The Vendor Payments window conveniently displays invoices that are not paid. This window is used to mark the invoices that need to be paid and then print the computer-generated checks.
To select invoices to be paid, perform the following steps:
-
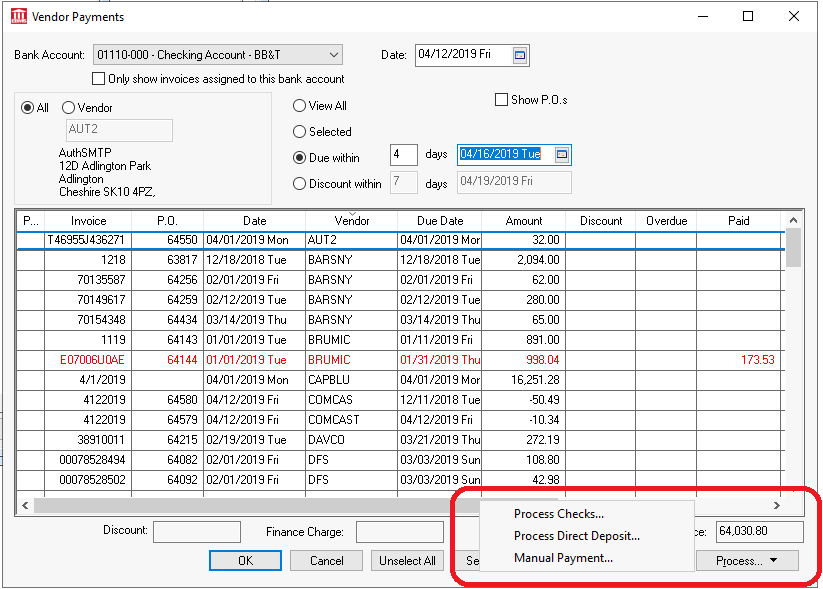
Select Vendor Payments from the Expenses menu and the following window will open:
-
Select the Bank Account from which the invoices should be paid. Click on the down arrow to show the list of available accounts. To add a bank account, review the Adding a Bank Account.
-
Enable the Only show invoices assigned to this bank account option to hide any invoices that have the bank account set to another Bank Account. Any invoice with a bank account setting that differs from the Bank Account option within this screen will be displayed in a red color. Review Entering a New Vendor Invoice section for more details on setting the bank account within the invoice.
-
The payment Date field will default to today's date. This date is used as the check date when checks are printed. Change the date to the desired payment date if you want use a different date.
-
The next step is to list the invoices in the window. This can be done a variety of ways, using both the vendor option (All or Vendor) and the list option (View All, Selected, Due within, or Discount within).
a. To list all outstanding invoices, set the vendor option to ALL and set the list option to View All. By doing this, all the outstanding invoices are listed.
b. To list all the invoices for a specific vendor, set the vendor option to Vendor and enter the desired vendor ID. The Vendor ID will default to the ID on the invoice that is highlighted. Set the list option to View All and only the invoices for the selected vendor will be listed on the window.
c. To list all invoices due within a time period, set the vendor option to ALL and the list option to Query. Set the "Due within ___ days" value to list all invoices that are due within the specified number of days. For example, to list all invoices that are due within the next 5 days, enter the number 5. Enter the "Discount within ___ days" setting to list any invoices that need to be paid to receive the vendor's discount within the number of days entered. To pay all invoices that are due in the next week or need to be paid in the next week to receive the vendor's discount, enter the number 7 in both the Due within and the Discount within fields.
d. Columns within this window can be resized or hidden to conveniently view the information in a user-defined format. Review Column Appearance for instructions on resizing columns or hiding columns. The invoice lists can also be sorted by invoice number, invoice date, vendor, discount date, due date, or invoice amount. To sort the list by any of these columns, click on the column title. If the list is sorted in descending order, click on the column title the second time and the list will sort in ascending order.
-
The next step is to select the invoices that are to be paid. Select an invoice by clicking on the Pay column. If a check mark appears in the Pay column (the first column), the invoice line is selected to be paid. If the Pay field is blank, the invoice will not be paid until it is selected at a later time. An invoice can be selected with the keyboard by pressing the tab key until the first Pay field is highlighted and then pressing the space bar to switch the check mark on or off. All the invoices can be turned on by clicking the Select All button or can be turned off by clicking the Unselect All button.
NOTE: When an invoice is checked to be paid, it will be selected until it is paid or unselected. Selections are not lost when the invoice is hidden. For example, if you check all the invoices and then selected a vendor to view a smaller list of invoices, all other invoices continue to be selected even when they are hidden.
-
The Amount column displays the total of the invoice and does not include discounts or overdue charges.
-
If you wish to pay the entire invoice, continue to the next step without making any other changes to the invoice. To change the discount amount, overdue amount, or make a partial payment, edit the appropriate columns as described below.
-
The vendor Discount amount will automatically be calculated and displayed in the Discount column when an invoice is selected. The user can edit this amount before generating a check but be aware that if the discount is manually entered or changed, the original discount terms within the invoice are zeroed. Review the Discounts and Finance Charges section for more details on vendor and customer discounts and finance charges.
-
Vendor overdue charges can be entered in the Overdue column at any time.
-
The Paid column records partial payments that have already been made on this invoice.
-
The Payment column displays the amount of the invoice that will be paid. When an invoice is selected, the invoice Balance amount will be copied into the Payment column indicating that the entire invoice will be paid. If you wish to only pay part of an invoice, change the Payment amount to the total that you wish to pay.
-
The Balance column = Invoice Total Amount + Discount + Overdue Charges - Amount Paid. The column displays the balance due on the vendor invoice.
-
If you wish to make down payments on purchase orders, click the Show P.O.s switch ON. If this option is on, the purchase orders (unprocessed invoices) will appear with the list of outstanding invoices. If a purchase order is selected the payment will be applied as a down payment to that P.O. Review the Invoice or Purchase Order Down Payment section for more details on down payments.
-
-
Set the vendor option to All and the list option to Selected to list all invoices that are to be paid. The Balance total on the bottom right of the window will reflect the total cash requirements to pay all the selected invoices. To add or remove invoices from this list, repeat the steps listed above.
-
The button on the lower right corner of the Vendor Payments window will be labeled Process Checks if the Bank Account is set to an account set with a type of Checking. If the Bank Account is set to a cash account, savings account, or credit card account, the button will be labeled Process. Go to Expenses > Bank Accounts window to set the type of a bank account.
-
Click on the Process button on the lower right corner of the screen circled in the image above. Select one of the 3 process options:
-
Process Checks: This option should be selected to pay vendor invoices using a paper check. Review the Printing Checks section for more details.
-
Process Direct Payments: Payments can be paid directly to a vendor using the direct payment method. Review the Processing Direct Payments ACH section for more details.
-
Manual Payment: The manual payment option opens a payment dialog that allows the user to set the Control Number and the payment date. See example below:
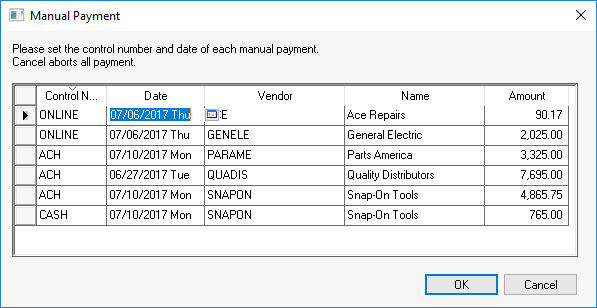
Note that the manual payment option does NOT generate checks or an ACH file. This option is only used to record payments that have been manually paid using another process. Review the Manual Check Entry section for more details.
-