A vendor's product catalog file must be in dBASE (*.DBF) format and must be saved in the company's data directory before continuing with this section. Review Data Import and Export Utility for more details.
Complete the following steps to map the columns of the vendor catalog file to the main EBMS product catalog file:
-
Select Inventory > Options from the EBMS menu and click on the Vendor Catalogs tab as shown below:

-
Click on the New button to open the catalog dialog:

-
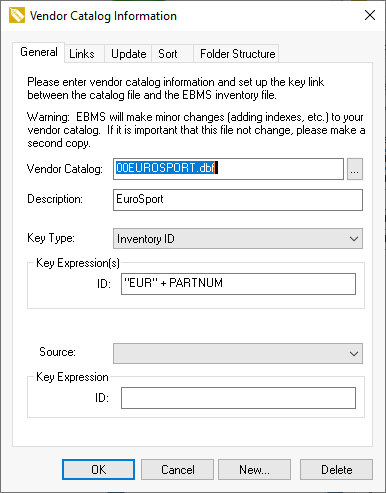
Enter the Vendor Catalog name or click on the lookup button to the right of the field to select the database from the file list.
-
Enter a brief Description of the product catalog.
-
Select the appropriate Key Type. This setting determines how product information within the catalog file is related to the EBMS inventory items. The key must be unique for every product in the catalog. The following options are available:
-
Manufacturer + Manufacturer Part Number: This option links the vendor catalog field names entered in the Key Expression field to the manufacturer and part number in the fields on the product record General tab. This option should be used if the manufacturer of the products distributes the product catalog that is being created.
-
UPC Code: This setting should be used only if the UPC Code is the only unique product ID in the vendor's catalog.
-
Inventory ID: This option should be used if the EBMS inventory ID is the same as the vendor's part number in the catalog. The inventory ID within EBMS can also be created by a dBase formula within the ID expression.
-
Vendor + Vendor Part Number: This option links the vendor catalog filed names entered in the Key Expression to the Vendor and Part Number in the product record Purchasing tab. This option should be used if the distributor rather than the manufacturer is distributing the product catalog.
-
-
Enter the Key Expression(s). The vendor catalog field name containing the part number or ID should be typed in the expression field without quotes or any other punctuation. These expressions will normally contain field names but may contain static text or dBase formulas. All static text must be enclosed with double quotes. For example, if the entire product catalog is from a single manufacturer or distributor, the manufacturer or distributor ID should be entered as "FORD" including the double quotes.
Reminder: The combination of all the Key Expression information must be unique for every product that is imported into EBMS. -
Select a Source if a conversion is needed between manufacture IDs used by the supplier and the Manufacture IDs within EBMS. This optional setting allows the user to map alternative manufacturer IDs with the EBMS Manufacturer IDs used by other suppliers or sources. Review the Manufacturer Settings section to learn how to set up manufacturer Source files.
-
Enter the Key Expression(s). The vendor catalog field name containing the manufacturer IDs of the Source should be typed in the expression field without quotes or any other punctuation.
-
Click Next to continue to the following links page.

-
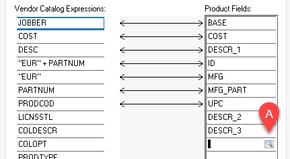
The fields within the product Vendor Catalog Expressions must be associated to the Product Fields found in EBMS. Click on the Vendor Catalog Expressions on the left and drag them (by suppressing the left mouse button) to the appropriate Product Fields on the right. A connecting line will show to indicate the associations between the two files.
-
Complete the following steps to add to the EBMS Product Fields list:
-
Click on the lookup button to add Product Fields.
-
Select the desired File as shown below:
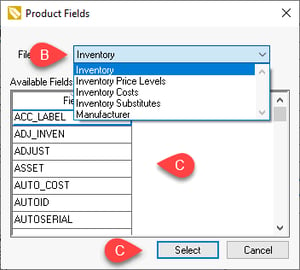
Most fields are located within the Inventory file. Select one of the following sub-tables:-
Inventory Price Levels: Used to set a price directly from the vendor catalog
-
Inventory Costs: Used to set the inventory item's Purchasing settings from the vendor catalog.
-
Inventory Substitutes: Used to set the item's Substitute Product settings from a vendor catalog.
-
Manufacturer: Used to set Manufacturer Settings from a vendor catalog.
-
-
Select the desired Product Field and click Select to add to the field list. Repeat these steps to add multiple fields.
-
-
Verify that the following important Product Fields are linked properly for a complete search especially if the Search Catalog when entering a Product ID or UPC option is enabled:
-
ID: The ID is the product code used to identify the product. This code equals the Key Type set in step #5.
-
MFG: The manufacturer part number can be used to search product within the EBMS lookup and accessing vendor catalog parts based on the associated Vendor Catalog Expression.
-
UPC: The UPC code or other barcode can also be used to search products in EBMS and the vendor catalog.
-
-
Add or manipulate data or fields, if necessary, at this point in the process. Review Add or Manipulate Data or Fields for instructions to add or manipulate data using formulas and static text.
-
Right-click on the connecting line and select Delete Link to remove a link. This association will determine what information is copied from the vendor's catalog file into EBMS when a new item is created in inventory.
-
Enable the Search Catalog when entering a Product ID or UPC option if users should be prompted to import a product when entering the ID on a Sales Order or any other document.
-
Select Update from additional Vendor Catalog when importing when there are multiple catalogs for the same product and information on a catalog positioned lower in the list has information that should be imported as well. A supplier may provide pricing, but a manufacturer may provide a better description. Click Next to continue.
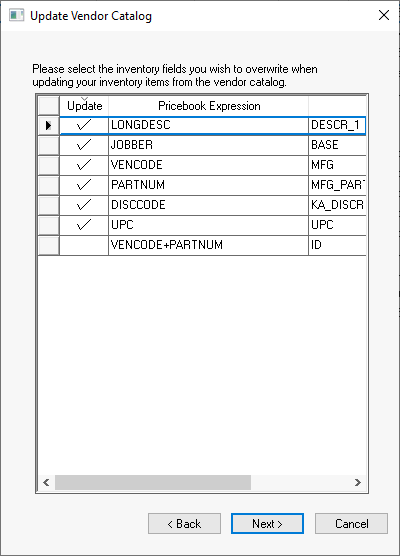
Select the information that is to be copied to EBMS during the update procedure by checking the Update column for the expression. Click Next to continue.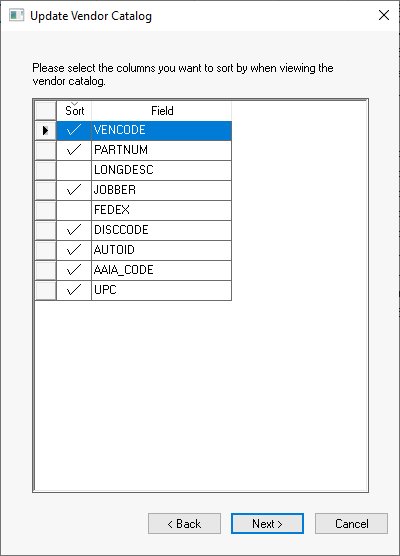
-
Any column checked on this page can be used to sort the products within the vendor's catalog. Removing the check marks of fields or columns that will not be used for sorting will enhance performance of the list. Review Viewing and Sorting Items for more details on the sort options. Click Next to continue.

-
The optional Folder Structure settings are used to place vendor catalog parts into a predetermined category folder. These setting can eliminate the prompt to identify the folder when a new item is added to the product catalog. These settings are required when the Bulk Import feature is used. Review Folder Structure for more details. Review Inventory Folders for Auto Parts for an alternative method to identify category folders for auto parts and accessory catalogs.
-
Click Finish to complete. Prioritize the catalogs so that a part located in multiple catalogs is located within the primary file. The primary catalog should be located above the secondary file. Right-click, cut, and paste, or use the Move Up and Move Down buttons to change the priority order.
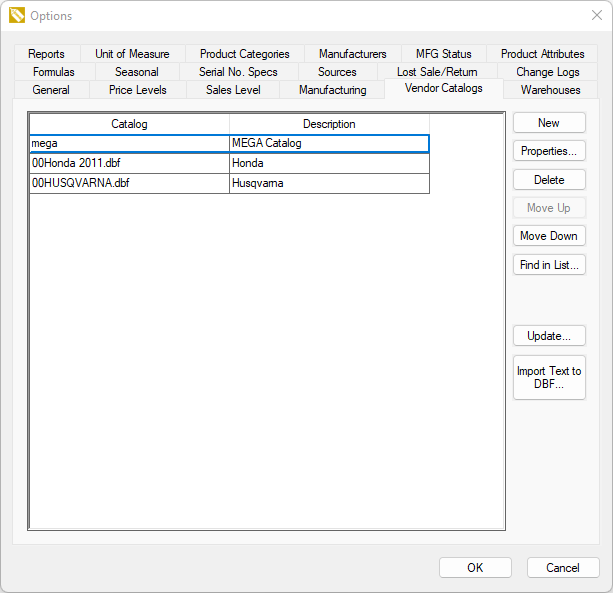
You can change the values set by this wizard by going to Inventory > Options > Vendor Catalog, selecting a product catalog from the table, and clicking on the Properties button. Note the tabs labeled General, Links, Update, Sort, and Folder Structure for settings as shown below.
The Delete will not only delete the catalog but attached table files.