There are various EBMS settings and configurations required to use the MyInventory scanner effectively. This section reviews these configuration details and makes recommended settings.
The MyEBMS > MyInventory software should already be installed onto the scanner, communication established with EBMS, and any app users properly licensed and selected.
Review MyEBMS Apps for MyInventory scanner setup instructions.
EBMS Scanner Configuration
This section explains how to set defaults for the EBMS Scanner Software for stock management, sales, Inventory, Warehousing, Report, and Jobs functions.
Select from the main EBMS menu to open the following dialog: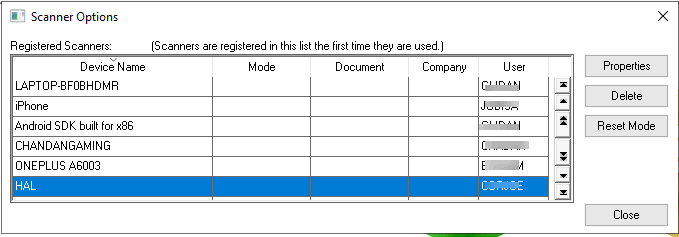
Select the scanner to configure and click on Properties. The General tab is used only with the legacy mobile scanner and has no effect on the MyInventory Scanner. These settings can be ignored.
Select the Properties > Reports tab to configure label report options as shown below: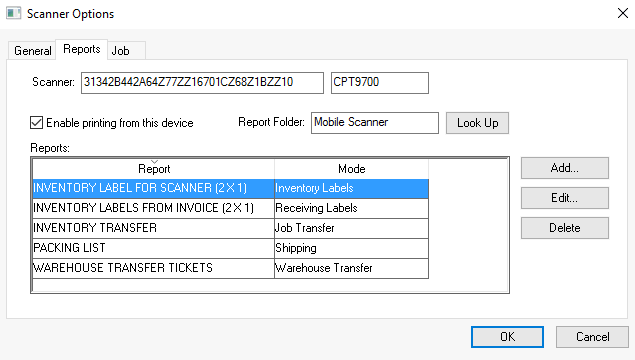
-
-
Enable the printing from this device option only if form or label printing are generated by this scanner. Note that a scanner or phone can print documents to a network printer.
-
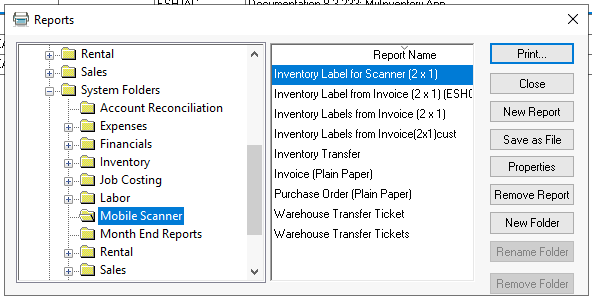
Select the System Folders > Mobile Scanner as the Report Folder setting.
-
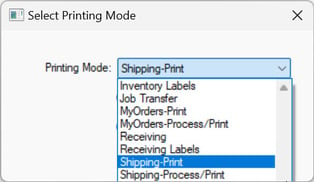
Select Add or Edit to select a printing mode and form.
-
Select one of the label forms in File > from the EBMS header menu as listed below:
-
Inventory Labels: Select an inventory label from File > .
-
Job Transfer: Select a form from File > Reports > Job Costing > Purchases/Transfer.
-
MyOrders-Print: Select an order or invoice form from File > and Preprinted folder.
-
MyOrders-Process/Print: Select an order or invoice form from File > and Preprinted folder.
-
Receiving: Select a purchase order or shipping form from the File > .
-
Receiving Labels: Select one of the Inventory Labels from Invoice within File >
-
Shipping-Print: Select an order or invoice form from File > and Preprinted folder.
-
Shipping-Process/Print: Select an order or invoice form from File > and Preprinted folder.
-
Warehouse Transfer: Select a Warehouse Transfer Ticket form from File > .
-
-
Select the target printer.
-
Select from the device's printers: Review MyEBMS Printing to connect portable printers to a MyInventory device.
-
Print to the report's default printer: Review Printing a Report for instructions to set the default printer within a report. IMPORTANT: The printer selected must be one installed on the EBMS data server. It cannot be a redirected printer.
-
-
Click OK to select the proper report form associated with the selected Printing Mode.
-
Select the desired report. Set the default settings from the report's system menu to direct the report to the proper printer, prompts, and other defaults.
Click OK to save. Repeat for other scanner records.
-
Review Scanner Hardware for a list of compatible scanners and the hardware configuration instructions.
Configure the Default Report Settings
All printer configuration and default prompts are set within EBMS. Complete the following steps to identify and configure the printer for each form set in the previous scanner configuration:
-
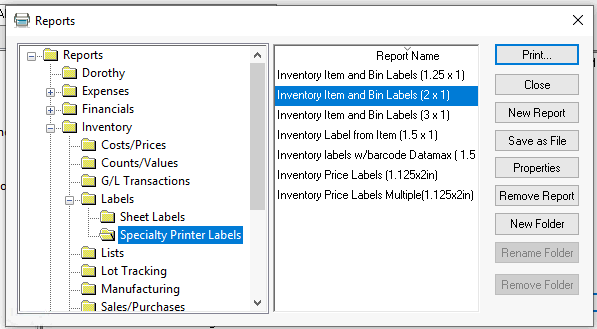
Open the reports menu by selecting from the main EBMS menu as shown below:
-
Open the as shown above. It is recommended that a copy of the original form be placed in a folder created specifically for MyEBMS. Create one if it does not already exist.
-
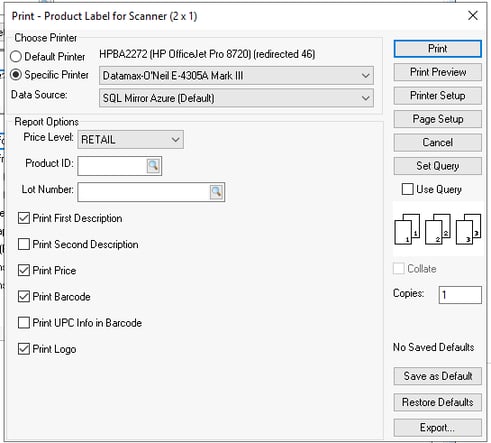
Highlight the form that was configured within the MyInventory Scanner device setting as described in the previous section and click Print to open the report prompt dialog.
-
Configure the printer and prompts similar to a printing process and click Save as Default. IMPORTANT: The printer selected must be one installed on the EBMS data server. It cannot be a redirected printer.
-
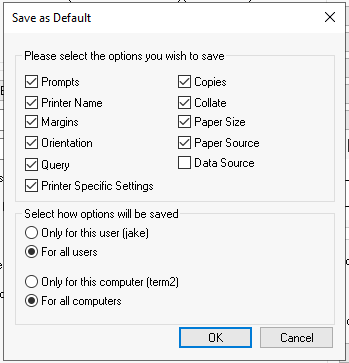
Enable the default options including the Printer Specific Settings option.
-
Change the option to For all users if the form should always be printed to the same printer with the same defaults no matter who logs into the scanning device (Recommended).
-
Select the For all computers option so that the scanner device is always sent to the default printer with the default settings.
-
Click OK to save. Repeat these steps for all additional forms associated with scanners.
Scanner Security
A user can be restricted from making various changes using a barcode scanner. Review the following step to restrict the user:
-
Product Items cannot be added to a sales or expense invoice.
-
Orders cannot be processed.
-
The Ordered quantity can be changed on a sales or expense invoice.
-
Inventory Counts cannot be adjusted.
-
New warehouse transfers can be created.