A job's budget is an important element of job costing, especially with contract jobs. The budget is the guideline that is used to compare job costs. This feature should be used for jobs that include quoted items or price contracts. The contracted billing price of the job is entered at the same time as the budget. All budget totals are found and entered within the Budgets tab of the job. If the budget and contract have already been entered into a proposal, leave this section and review the Applying an Existing Proposal or Job Budget section; otherwise continue with this section.
The Proposal dialog can be used to create any of the following budgets:
-
One or more description lines with a quote total associated with the description.
-
Sets of materials list lines with quote calculations based on square footage or other calculations
-
Materials lists with Track Count and No Count products

-
Combination of all the above.
All job stages and Progress-billing detail should be entered into the job before entering a budget. Review the Entering Job Stages section for details on entering the job stages and the Entering Billing Items for a Progress Billing Invoice section for more on entering Progress Billing items.
Open the job and go to the Budget tab. The Budget list should be blank because the job is new.
- Click on the New button to the right of the Budget list. This will launch the new budget or proposal as shown below:
-
Select the first option, Create a new blank proposal. For details on the second option review the Creating Change Orders section. Select the 3rd option if the quote has already been created. Review the following Applying an Existing Proposal or Job Budget section for details. Select the Make a copy of an existing proposal option to copy a proposal from another job. Click the Next button to continue.
-
The following dialog will appear if the Progress-billing option is enabled. The Progress-billing option is found on the General tab of the job window. Continue with step 4 if this page does not appear.
-
Select Yes for the question "Does this new proposal apply to the progress billing of this job?" if the Progress-billing values should be updated from the new quote. Select the No option only if this is a time & material change order. Click the Next button. (Review the Progress Billing section of this documentation for details on progress billing.)
-
Set the auto-format options listed below:
-
The Create proposal lines from job stages option should be toggled ON. This option will create a quote line for each job stage, making it convenient to enter budget costs for each job stage.
-
The Enter Billing Amounts by options should be selected according to the method used to enter the budget billing amounts. Individual budget costs are always entered into a quote on a line-by-line basis. The contracted price amount can be entered in three different ways:
-
A single contract price can be entered for the entire Job as shown above. This option will prorate the contract total to each stage according to the amount of the budgeted cost of each stage.
-
A contract price can be entered for each Folder or group of stages. The total will be distributed to each stage within the folder according to the stage's budgeted costs. This option is useful when a contract price is based on a group of stages.
-
A contract price may be entered for each individual Stage in a similar manner as the budgeted cost.
-
-
-
The All Stages option should be selected to copy all stages to the quote; otherwise only a portion of the stages will be copied into the quote window. Click Next to open the last page of the wizard.
-
The wizard automatically assigns a proposal number. Enter a description of the proposal.
-
Enter the Revenue G/L account. The revenue account will be copied to the detail line. The account can be changed for specific lines within the budget list of the proposal.
-
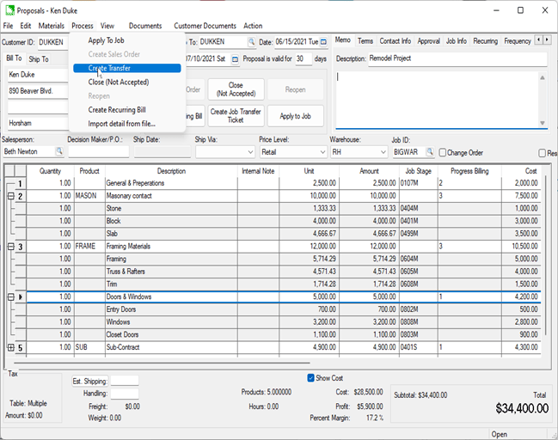
Click Finish to open the budget or proposal window. The Job Proposal window will be opened as shown below.

The contact list will be grouped based on the Enter Billing by option selected in the new proposal utility. The example above grouped all the stage lines into a single billing line. -
Hide any unnecessary columns such as inventory ID, unit of measure, etc. The columns that should be visible are the Quantity, Description, Unit, Amount, Job Stage, Cost, and Total Hours. The Progress Billing column may be visible if the job does is configured with progress billing. The Taxable Group, G/L Account may be visible based on the job settings. Review the Column Appearance section of the main documentation for detailed instructions on hiding columns.
-
Enter contact amount into the Unit column of the budget list. If the Progress-billing option within the job is toggled ON, a Progress-billing column will be present on the Proposal window. If this column is present a progress billing ID must be entered on each line with the contract amount Click on the lookup button to list all available Progress-billing Ids. Review the Entering the Billing Items for a Progress Billing Invoice section for instructions on entering progress-billing ID's within a job.
-
Expand the stage list by clicking on the expand list [+] button.
-
Enter the budgeted cost of each stage into the Cost column. In the example above, the billing amount is entered on the header line and is distributed to the individual stages. The cost must be entered on each detail line and is totaled to the header.
-
If this stage involves budgeted hours, then enter the hours in the Total Hours column. The Total Hours amount will not be able to be entered if the stage classification does not allow expenses from a payroll source. Review the Job Stage Classifications for more details on setting stage classifications.
-
Enter the contract billing price in the Unit column of every heading line or group. Repeat the detail line instructions for each stage detail line within the proposal.
-
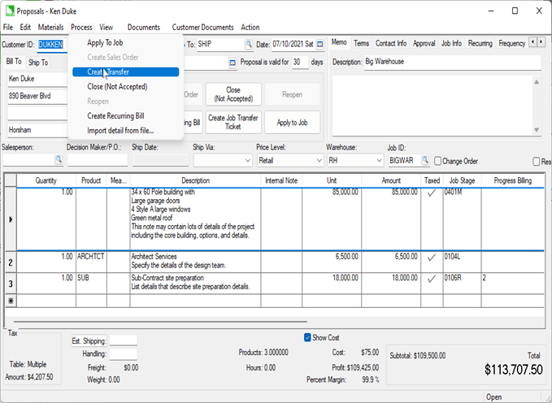
A inventory transfer ticket can be created directly from the job budget/proposal list. Select Process > Create Transfer from the proposal menu to create a transfer ticket that contains all the inventory items that contain an inventory code and are not classified as Service. Review the Materials List within a Proposal for information on managing materials.
-
A proposal or budget must be applied to a job by selecting Process > Apply to Job from the proposal menu before the budgets are applied to the job.
-
The Apply to Job wizard gives the user an option to create a sales order for billing (if the job is not a progress billing job) and also allows the user to create an inventory transfer ticket (if the proposal contains inventory items). Review the Invoicing Contract Billings section for more details on using the Create a sales order option or the Inventory Transfers section for more details on the Create an inventory transfer ticket option.
-
Click next and enter the Acceptance Date and Accepted By entries and click the Finish button.
A budget can also be applied to a job by highlighting the budget and clicking on the Apply to Job button on the Budget tab of the job.
An overhead percentage can be added to the budgeted costs on the proposal. Review Adding Overhead to the Budget Total for steps to increase the budgeted costs to cover overhead costs.
Review the Creating a Sales Proposal section of the sales manual for more details on creating proposals.