When a timecard is copied, only the timecard details are copied. The Pay Period is changed to the new pay period and all the dates on the timecard are changed according to the pay period change. Tax and deduction amounts, timecard status, and net pay amounts are not copied, but need to be recalculated the same way a new timecard is processed. Timecards can be copied two different ways, which will be explained below.
Copying Salaried Employee Timecards
To automate the timecard entry for a salaried employee, enter a typical 40-hour week timecard and then copy it from one week to the next using the copy timecard function. Salaried timecards are copied from the previous pay period when the pay period is created.
- To create a new pay period, go to Labor > Set Pay Period from the EBMS menu. Click on the New button and the following window will open:
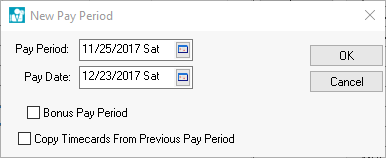
- Enter the new Pay Period date (the ending day of the period) and Pay Date (the day the checks will be printed). Review the Opening New Pay Period section for more details on setting or creating new pay periods. Click on Copying TImecards from Previous Pay Period and the window should change as shown:
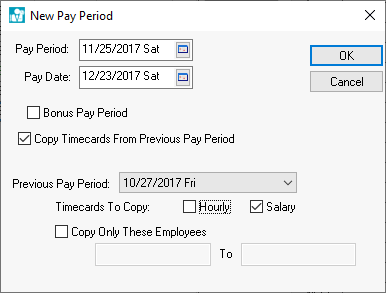
To copy all salaried employees timecards, complete the following steps:
-
Set the Previous Pay Period date to the pay period that the salaried timecard exists. Note that a timecard must be entered for an employee before it can be copied. Review the Entering Salaried Employee Timecards for instructions on creating a timecard for a salaried employee.
-
For the Timecards To Copy section, enable the Salary option. Turn the Hourly switch OFF to copy only salaried employee timecards.
-
To copy only a range of employee timecards, turn the Copy Only these Employees switch and enter the range of employees to be copied.
-
To copy individual salaried employee timecards, keep reading this article for steps.
Copying an Entire Batch of Timecards
You must copy entire batches of timecards at the time a new pay period is created. If the pay period already exists, you cannot copy a range of timecards to it. If the new pay period has been created but no timecards have been entered, delete the pay period and recreate it using the copy option.
To delete a pay period that does not contain any timecards, go to Labor > Pay Periods, select the pay period you wish to delete, and click the Delete button.
Proceed with the following steps to copy timecards and create a new pay period:
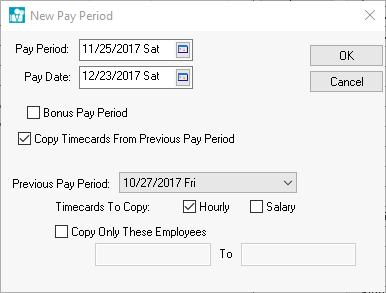
- Go to Labor > Set Pay Period from the EBMS menu, click the New button and the following window will appear:

-
Enter the new pay period dates. See Opening New Pay Period section for more details on setting or creating new pay periods. Check the Copy Timecards from Previous Pay Period switch with a mouse and the window should change as shown below:
To copy a range of timecards, complete the following steps:
-
Set the Previous Pay Period date to the pay period in which the timecards that you wish to copy reside.
-
Turn the Hourly switch ON if you wish to copy any hourly paid employee’s timecards and check the Salary switch ON if you wish to copy any salaried employee’s timecards. Check both options to copy over all timecards.
-
To copy all timecards within a Pay Period, turn the Copy Only These Employees switch OFF. To copy a range of employee timecards, turn the switch ON. Enter the range of employees that you wish to copy. It is not possible to copy multiple ranges or timecards within a pay period. To copy individual timecards, see the next section for details.
Copying Individual Timecards
The pay period in which the new timecards will be placed must be established before the timecards can be copied. To copy individual timecards, take the following steps:
-
Open the timecard screen by selecting Labor > Timecard Entry.
-
Select File > Copy Timecard selection on the timecard menu and the following dialog will open:

-
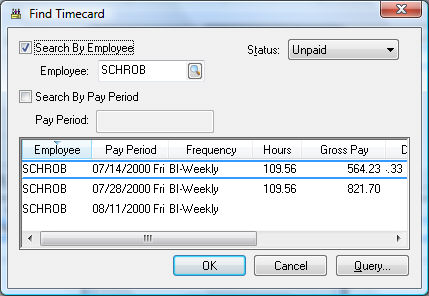
Enter the Pay Period and Worker ID code. To select a specific timecard from a list, click on the Find Timecard button and the following list will open:
-
To select a timecard for a specific employee, switch the Search by Employee option box and select the appropriate worker by clicking on the magnifying glass icon to the right of the Employee field. Check the Search by Pay Period switch to limit the list to a specific Pay Period. Highlight the desired timecard and click OK.
-
On the Copy Timecards page, copy the Pay Period and the Worker ID for the New Timecard. To create a new pay period, click on the New Pay Period button. Review the Open New Pay Period section for more details.
-
When a paid timecard is copied the new timecard will not be marked paid, nor will the taxes be calculated. Go to Labor > Worker Payments to complete the payroll process.
Click OK to copy or Cancel to abort.