The display configuration is set within the dispatcher's worker record.
The MyDispatch app requires the user to configure the PIN code, managed workers, work groups, and query options within the App Settings tab of the worker record. Complete the following steps to configure the MyDispatch settings for each dispatcher user:
-
Select from the main EBMS menu.
-
Double-click on a worker in the list to open a specific worker's record and click on the App Settings tab as shown below. (This tab will only appear if there are connected apps.)
-
Enter a PIN number used to track time within Time Track.
-
Enable the Allow option to give the Worker the ability to access the MyDispatch app.
-
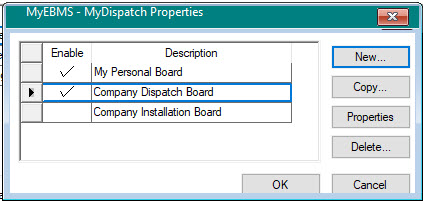
Highlight the MYDISPATCH record and click Properties to open the following dialog. The MyDispatch feature must be added if this option is not listed in the Apps list.
-
MyDispatch contains My Personal Board for my personal dispatch needs. Click Properties to configure dispatching for a board that is not accessed or changed by others.
-
Additional company dispatch boards can be added to give the user the option to change from one dispatch board to another. These company dispatch boards can be shared with others in the organization that are running MyDispatch. Click New to create an additional company dispatch board.
-
Add a board title on the top of the new MyDispatch Board dialog.
-
-
The following board settings apply to both the My Personal Board and company boards. Tasks and workstations can be organized or managed using either or both of the following methods:
-
Organize work orders by technician or worker: Enter a list of Managed Workers that are being dispatched by the current user.
-
Organize by a bay, activity, or station: Enter the Managed Workgroups scheduled using MyDispatch. Review Work Code Groups for more details on this type of grouping.
-
-
Identify query task lists that are displayed at the bottom of the app. Task lists such as unassigned, unscheduled, overdue, waiting on parts, or various other lists used to schedule can be used defined to show Tasks can be easily be dragged from the list into the schedule. Complete the following steps to configure a task query:
-
Enter the query description that briefly describes the list.
-
Use the Inactive option to disable a view without deleting the query list settings.
-
Select the desired Query/View setting. This is an important setting to determine the format used to display the tasks. Select one of the following options:
-
Due today (overdue and due today): Display all the tasks that are due or overdue. This setting is based on the Due Date field within the task.
-
Past: List all tasks that have an End Date within the task that is in the past. Review Scheduling Tasks for more details on the Due Date, End Date, and Start Date within a task.
-
Unscheduled: List all unscheduled tasks. Review Scheduling Tasks for more details on scheduling within EBMS.
-
Waiting for Parts: This option is used to list tasks that were put on hold until parts arrive.
-
Unassigned: List tasks that do not have a worker assigned to the task.
-
Query: This custom option is the best means to query a list of tasks based on any other information within a task. This powerful option can be used to tailor the view query based on any information within the task. Complete the following steps to configure an advanced Query:
-
Set the Query/View setting to Query or any other query if you wish to modify an existing query setting.
-
Highlight this display record with the Query setting and click on the Set Query button on the right side. Review the Set Query Options within the main documentation for instructions on these settings. Practical Advanced Formula/Query Examples:
-
Tomorrow's Tasks .not. completed .and. start_date = today()+1
-
Tomorrow's Appointments app_confirm .and. .not. completed .and. start_date = today()+1
-
-
-
-
The Set Query button can be used to set a user defined query settings based on the advanced query options within EBMS. Review the Set Query Options advanced section for instructions on these settings. Note that the Query/View setting will be changed to Query if a user-defined query is entered.
-
-
Repeat these settings for each additional query. Click OK to save settings for the worker.
-
Enable the boards that are being used. Disable boards to remove them from the MyDispatch app. Repeat the steps listed above for additional boards.