Recording Labor and Completing the Task
Entering Time
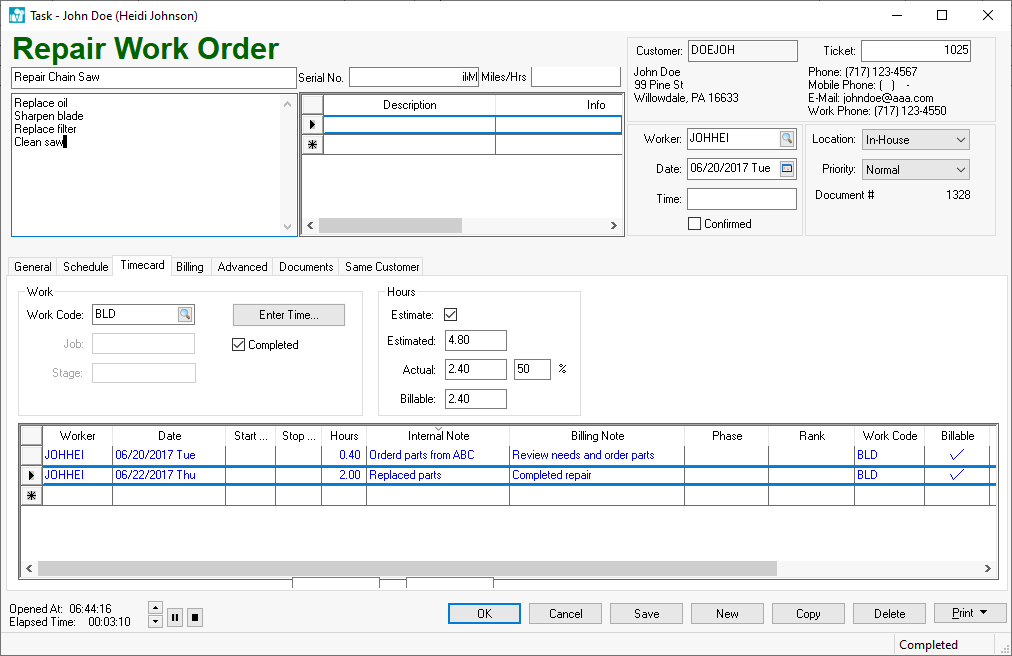
The amount of time and a description of the project should be recorded within the Timecard tab of the task as shown below:
The Hours settings consist of the following:
-
Estimate option: Review the Estimated, Billable, and Actual Time section for details on the Estimate option and the Estimated settings.
-
Actual and Billable hours: The Hours entry in the time entry table may affect the Billable Time which may adjust values on the billing invoice. Review the Time and Materials (T&M) Tasks vs. Contract Tasks section for more details on how the Billable Time is affected by the Actual Time.
The Date will default to the current date, but this date should reflect the date the work was performed.
The Hours value can be set using any of the following methods:
-
Entered by the technician or other user.
-
Calculated by populating the Start Time and Stop Time.
-
Using the Task Timer located at the bottom of the task:

The stop button will copy the Elapsed Time to the Time entry within Time tab. The pause button
  will cause the timer to pause until the play button
  is clicked. Use the directional arrows
 to add or reduce minutes within the timer. The task timer starts when a task is opened with the exception of tasks with a base type of Phone. Review the Creating Task Types and Defaults section for more details on the phone type.
 -
Populated using the MyTime App: Review Tracking Labor and Completing Tasks in MyTime for more details on this app.
The Timecard lines are color coded as yellow if either the Start Time or Stop Time are not set.

Review Timecard Color Codes for a complete list of color codes.
Documenting the activity for a task is valuable for billing and future reference. Enter work summary notes for the customer in the Billing Note column and internal notes that should not be communicated to the customer in the Internal Note column. EBMS contains an optional tool to copy the Billing Note content to the billing invoice.
The task's pipeline Phase and Rank setting are recorded each time an employee's time is recorded. This information allows the user to track the number of days between phases or the amount of employee time spent on each phase. Review Project Pipeline Phases for details on pipeline settings.
Using the Enter Time button
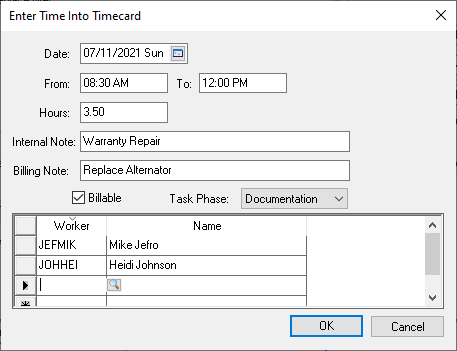
Click the Enter Time button to enter time for a group of employees.
Enter the Date when the time was rendered.
Enter the From and To time. The From time will default from the time the task was opened. The To time will default to the time the Enter button was clicked.
The user can enter the total Hours or adjust the times to calculate the hours.
Record Internal Note describing the activity and record notes for the worker in the Billing Note entry.
The Billable option will default based on the task's Timecard > Work Code. Review Billable Time section for more details on this option.
Change the optional Task Phase. Review Project Pipeline Phases for task phase setting details.
The user can remove Workers by hitting the ctrl + delete keys.
The user can also add Workers to the list.
Click the OK button to insert a time line for each employee listed with the times populated within the dialog.
Associating timecard time to a task
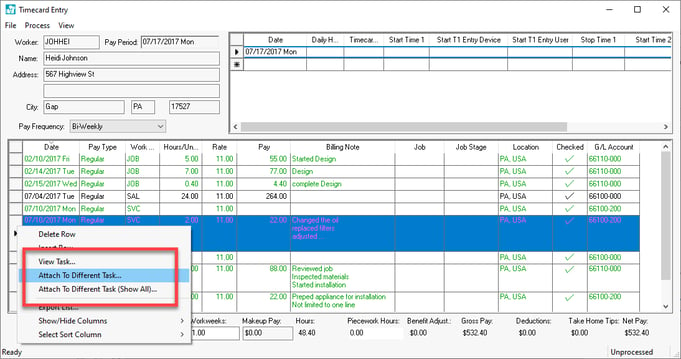
The most common method of adding time to the task is to enter labor into the timecard tab of the task. An alternative method is to associate time within the timecard to a task. Right-click on the timecard line and select either of the following task tools from the context menu as shown below:
-
View Task: This option is used to view a task that is already associated with a timecard detail line.
-
Attach to Different Task...: This tool is used to associate the highlighted timecard line with a different task. Only available unassigned tasks are available to select.
-
Attach to Different Task (Show All)...: All tasks are listed with this option.
Review Timecard Color Codes for information on the green and blue timecard line color codes.
Completing a task
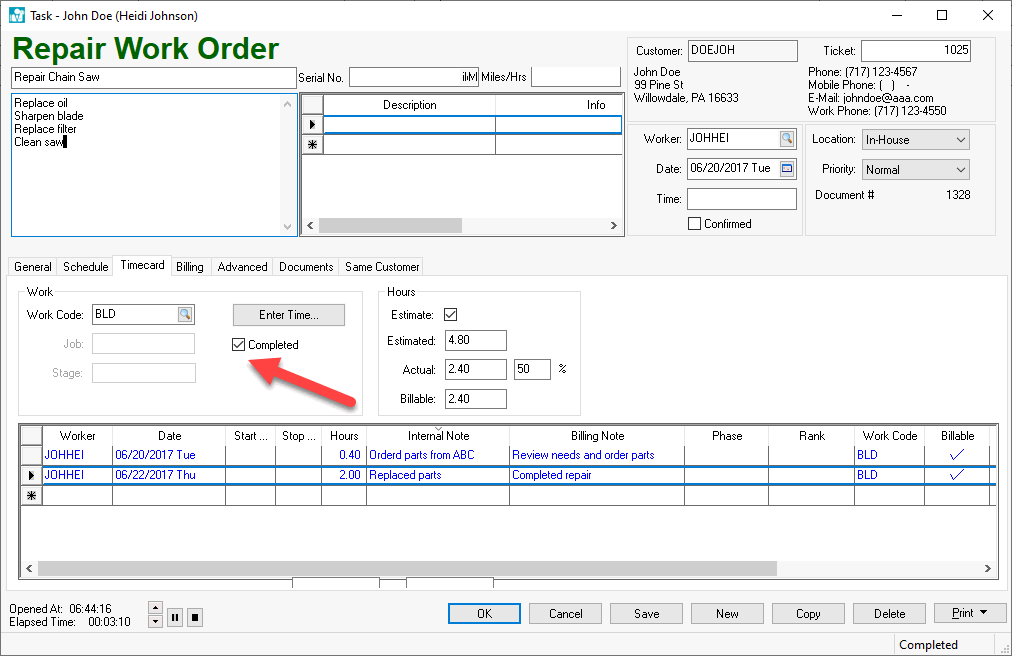
A task is marked completed by enabling the Completed option within the Timecard tab as shown below:
The completed option affects the status of the task. Review the Task Status Settings section for more details on task status options.
The completed switch is frequently enabled by the technician or the secretary that is entering the technicians’ time. A separate approval step is recommended if a manager reviews the total time spent on a task before the billing occurs. Review Approving Tasks and Assigning a Manager for more details.