This chapter explains the process of creating and processing an extra pay period for bonus pay. The tools explained in this section may be useful in a variety of circumstances but this section will explain them in the context of a special bonus pay period. Complete the following steps to complete a bonus pay period:
-
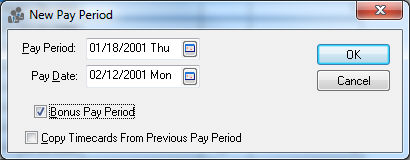
Create a pay period with a unique pay period date. Enable the Bonus Pay Period option as shown below:

For example, if the normal weekly payroll pay period date ends Saturday with a pay date of the following Thursday, a bonus pay period date of Monday with a pay date from the same week would be recommended. Review the Processing Payroll > Open New Pay Period section for more details in creating a new pay period.
Reminder: The pay date dictates when the tax liabilities must be paid.
NOTE: The pay period dates of the pay period following the bonus pay period will not automatically default to the correct pay period date. It is advisable to open the next new standard period after the bonus pay period is created and verify the correct dates. -
Verify that the Employee pay rate list contains a bonus pay type. Go the Pay tab of the employee and verify that a Bonus pay type is listed in the pay rate list.
-
Review the Workers > Changing Workers Information section for details on adding a pay type to the employee’s pay rate table. Review the Getting Started > Pay Types section for more information if a bonus pay type does not exist. A bonus pay type should have a Dollar base and a Benefit type.
Tip: Go to , enter the bonus pay type in the pay rate list, and filter down the pay type to all employees. -
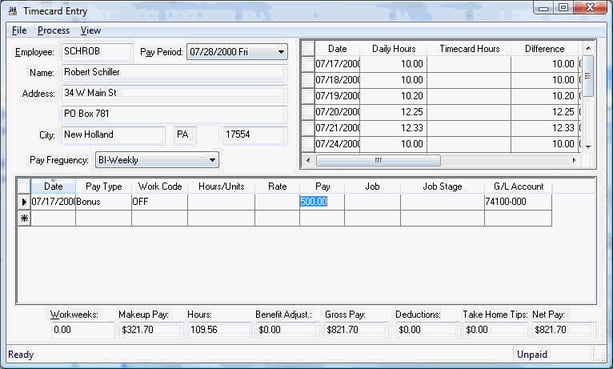
Enter the bonus pay within a new timecard as shown below:

-
Enter the bonus pay period date on the single bonus line of the timecard.
-
Set the Pay Type to the bonus pay type.
-
Enter a Work Code that contains the bonus pay’s general ledger expense account. This can be defaulted within the Employee’s pay rate table properties.
-
Enter the bonus pay amount within the pay column.
-
Calculate taxes and deductions using the advanced process options.
-
Go to , select the timecards and click on Process Payments.
-
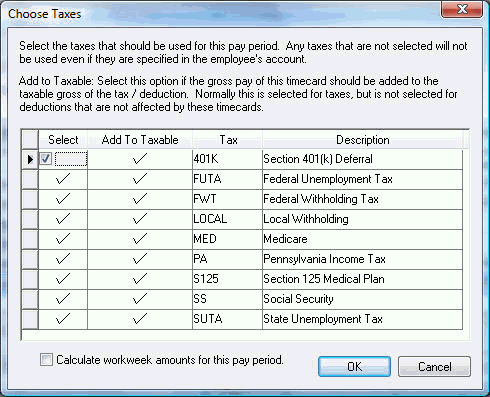
Select the Calculate Taxes (Advanced) option from the Process button menu and the following dialog will open:

The advanced calculate taxes process allows the user to alter the way the employee’s taxes and deductions are processed. The Select column identifies all the taxes and deductions that will be deducted from the gross bonus pay. The Add to Taxable switch allows the user to ignore the deduction but add the gross pay to the taxable amount of the tax or deduction. Turning both check marks ON will process the tax or deduction in the same manner as a typical calculation.
Suggestions
- All taxes that contain a flat rate should have both the Select and Add to Table options ON.
-
If the user prefers to not deduct (Select option is OFF) a table based tax from the timecard such as FWT (Federal Withholding Tax) the Add to Taxable should be turned ON for proper tax reporting.
-
The Select option may be turned OFF for deductions that the user wishes to ignore when processing a bonus paycheck. Deductions such as housing, medical, and other period based deductions may be ignored during an extra pay period. The Add to Taxable switch should remain ON if the gross pay must be added to the taxable amount for the deduction.
-
Calculate workweek amounts for this pay period option MUST be turned OFF since this pay period is not part of a standard pay period. This step is very important since the workweek amounts should not be incremented in a non-standard pay period such as an extra bonus pay process. Review the Processing Payroll - Advanced > Processing Workweeks section.
Use CAUTION when changing these settings since it may adversely affect tax liability reporting and other payroll documents such as W2s etc. Contact your accountant to identify the proper settings for each tax or deduction.
Process checks using the normal payroll process procedure. Review the Processing Payroll > Process Payments section for more details.
