Jump to: General tab | Pay tab | Personal tab | Advanced tab | Tax tabs | Timecards tab | Messages tab | App Settings tab
The main employee window is used to record information about each employee such as name, address, and tax information. The employee window is also very useful in viewing history such as timecards and tax history. If you wish to edit or view information for a specific employee, select Workers from the Labor menu and the Worker list will appear:

If you wish to create a new employee, review Entering New Workers. For more details about sorting, searching, or changing the list review the Search / Lookup Lists article.
To select a worker record to view or edit, double-click on the worker ID to directly open the worker record or highlight the worker in the list and click the Select button. This will open individual record for that worker. This example record will be for the fictional employee, John Cooper.

Worker Record General Tab
Click on the General tab to view, add, or edit the following fields:
- Worker: The Worker ID code for the selected worker will appear in the upper left-hand corner of the Workers window and the employee’s name will appear on the window header (in this example, the header says Workers\Officers\John Cooper).
To change the Worker ID, right-click on the Worker field with your mouse to open the context menu. Select Change ID, which will start a lengthy process of changing this worker's code throughout the EBMS system.
It is possible to load a different worker record by clicking on the magnifying glass icon to the right of the Worker entry field and selecting a new record from the list. - Category: Click on the down arrow button to the right of the current Category name and select a new folder or subfolder to change the category folder for the open worker record. (Click OK to save any changes.)
- The Last Name, First Name, Address, and Contact Information may be changed at any time, but the changes will not be reflected on existing timecards.
- Login Name: The login or username associates a user's security settings to a worker. Review Worker Added Timecard Entries for instructions to set up access to a worker timecard based on a user login.
- Type: Enter an optional Type label for each worker, which will allow you to print out reports by type or query employees in type groupings.
If you want to group all the employees who work in a specific warehouse, you could enter "SouthWH" into the Type field and then query by this entry. The Type field is very useful when employees are part of more than one group. Use the type field if you wish to group a specific employee within two or more different groups. By entering a group of keywords or group names within the Type field separated by a comma or space, the user can then query the employee by any type or combination of types.
To use our initial example, a maintenance technician who works in the south warehouse could have a Type that looks like this: SouthWH, maintenance, technical. This allows this record to be queried by location (SouthWH), by work type (maintenance), or by employee type (technical). Grouping employees only by using folders is limited, since each employee can only appear once in a folder, but Type can include multiple groups. - Locality: Enter the residence county of the employee.
- Municipality: Enter the municipality or town in which the employee resides.
- Inactive: Use this checkbox option to make a worker record inactive. Making a record inactive is best practice, as opposed to deleting, because worker history and information will still be retained for the company's employment records, but the record can be removed from current lists and reports.
- Workers' Comp. Classification: Set the Workers' Compensation Classification. Go to Labor > Labor Options > Workers' Comp tab to view, edit, or add available classifications for Workers' Compensation rates. Review the Workers' Compensation article for more details.
- Note: You can use the Note textbox to enter miscellaneous worker information. The length of this note entry field is not limited, and a scroll feature is available if more information is entered than what can be displayed on a single page.
Worker Record Pay Tab
Click on the Pay tab to view, add, or edit the following fields:

- The Hourly or Salary pay type should be set to reflect whether the worker is paid by the hour or is a salaried employee.
- Enter the appropriate Hourly Pay or Salary Pay. Ignore the Salary Pay setting for any workers who are not paid by the hour. The Hourly Pay rate may be applicable for salaried employees, if they are paid extra for benefits or other pay types.
- The Previous Pay settings are optional values that can be used to record pay raises in the future. Fill Out Last Evaluation, Rate, and Last Raise as needed. A new employee will not have these fields filled out yet.
- Pay Frequency should be set to the length of the company's normal payroll period, such as Weekly or Bi-Weekly. Frequency options include Daily, Weekly, Bi-Weekly, Semi-Monthly, Monthly, Bi-Monthly, Quarterly, Semi-Annually, and Annually.
- Verify that the Method matches the payment method for this employee. Review the following documentation for more details on this important setting:
-
-
Check: Configuring Payroll Forms
-
Direct Deposit: Direct Deposit > Worker Configuration
-
Payroll Service: 3rd Party Payroll Service
-
-
The Is subject to minimum wage option should be enabled (checked) under normal circumstances. This option is especially important if piecework pay is used.
-
Any Pay Type must be added to the Pay Rates list before it can be used within the employee’s timecard. Complete the following steps to add a rate to the Pay Rates list:
-
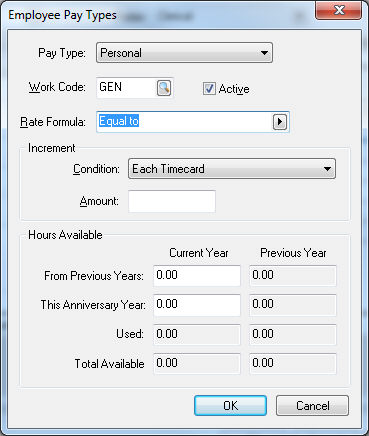
Click on the New Rate button and the following dialog should appear:
-
Select the additional Pay Type for this employee. New pay types must be created in the Pay Types tab within the payroll Options window. Review the Pay Types section for details on how to create new pay types.
-
Enter the default Work Code associated with this pay type. Populating this field can save on redundant data entry if the employee’s work code is consistent. Let the work code field blank if you do not wish to default a work code for this employee. Review the Work Codes section for details on the function of a work code.
-
The Rate Formula is only useful when pay types are Hour-based. The Rate Formula is calculated from the employee Hourly Pay rate amount. Select the formula template by clicking on the right arrow and choose one of the available templates.
Select Equal to formula whenever the pay rate is equal to the hourly rate. This is the standard formula for regular pay.
Select Add ___ % formula and enter the formula value of 50 to create the formula Add 50 %. This formula would be appropriate for an overtime pay type since the rate would be the pay rate + 50 %, or time and a half.
Select Add $___ formula and enter the formula value of 1 to create formula Add $1. This formula would add $1.00 to the hourly pay rate whenever this pay type is used. -
Complete Increment and Hours Available if the pay type is a benefit pay such as vacation, holiday, or sick days. Review the Benefit Pay section for details regarding benefit pay.
-
Click OK to save Pay Type. Repeat the steps listed above for each of the employee’s pay type. If you wish to add or change a pay type for an entire group of employees, review the Setting Employee Defaults section for details.
Click the Properties button to edit or view existing Pay Types.
Click Delete to remove a pay type from the employee’s pay type list. A pay type cannot be deleted, but may be made inactive, if pay history is present. Make an option active or inactive by highlighting the Pay Rates item in the list, clicking on the Properties button, and checking or unchecking the Active option on the Worker Pay Types window.
-
-
Click on a Pay Rate line and then the View History button to view the worker's pay history.
The Worker Pay History window displays the annual total of hours and gross pay for each pay type. To view the details source of totals, double click on the pay type or click on the Source button.Click Close to return to the Pay tab.
Worker Record Personal Tab
Click on the Personal tab of the worker record as shown below:

-
Hire Date: Enter the date the worker was hired. Review Change Logging for information on tracking the creating or changing of information within a record.
NOTE: The employee’s anniversary date, which is used to reset benefit pay and other settings is determined by this hire date. If the anniversary date needs to be different than the hire date because of part-time status changes, place the original hire date in the employee note area, and change the hire date to the desired anniversary date. -
Enter the Termination Date when the employee is terminated or is no longer employed by the company. Leave blank until applicable.
-
Enter the Employee's Social Security number in the standard numerical SSN format (000-00-0000).
-
Enter the employee’s Birth Date in a MM/DD/YYYY format.
-
Select the employee’s marital status as Single or Married by clicking the down arrow. If the status is changed the following message will appear:
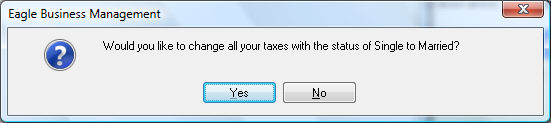
Click Yes to change marital status for all taxes. If a different status is used for any taxes, go to the Employee Taxes tab and change exemptions to desired setting. -
Set the employee’s sex as Male or Female.
-
If the employee is claiming Head of Household status for tax purposes, click the switch ON.
-
Enter the number of Exemptions the employee is claiming for tax purposes. The employee is included in the number of exemptions. For example, if an employee is married with one child, the employee would normally claim 3 exemptions. If the employee is single, the standard exemption is 1. If this number is changed the following message will appear:
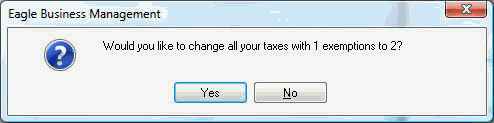
Click Yes to change exemptions for all taxes. If a different number of exemptions are used for any taxes, go to the Employee Taxes tab and change exemptions to desired amount. -
Select the Employee Type for W-2 purposes. (Options can include: HSH - Household Worker, MIL - Military Worker, STANDARD - Standard Worker, STAT - Statutory Worker.)
-
If the employee is Deceased or if they have Legal Representation, click the appropriate switch. These settings will be displayed on the payroll W-2 form.
Worker Record Advanced Tab
- Click on the Advanced tab as shown below:

- Enter the Makeup Pay General Ledger account as an expense account to record any makeup pay to be paid to an employee. Review the Minimum Wage and Makeup Pay section for more details.
- Set the Payroll Payable General Ledger account, which requires an account with a Payroll Payable classification. If no account is available, go to and add a liability G/L account with a Classification of Payroll Payable.
- Set the Default Tax Location to the worker's normal place of work. Review the Taxes for Multiple Locations section for more details.
- The Credit Workweek Amount is the minimum dollar amount an employee needs to work to become eligible for state benefits such as Workers’ Compensation. This total should be set within the default folder before new employees are added. If this total changes for all employees, filter down the new default amounts to all existing employees.
- The Clock In/out Parameters are options when clocking employees in and out of work using an electronic time clock on the Entering or Auditing Clock In/Out Employee Times. Review the Worker Clock In/Out Parameters section for more details.
- The employee’s Daily Hours can be entered into this tab on a daily basis for timecard defaults or Clock In/Out parameters. Review the Worker Clock In/Out Parameters section for more details on entering and processing Daily Hours. If the employee’s hours are not similar from one payroll to the next, employees do not clock in and out, or if this employee does not need to have daily hours recorded, the Daily Hours information entries can be ignored.
Worker Record Worker Taxes tab
For information on the Worker Taxes tab review Configuring Worker Taxes.
All taxes or deductions that are deducted from a worker's pay must be entered within the Worker Taxes tab. This can include federal, state, or local taxes or other costs that are deducted from the worker's pay. All taxes and deductions that are calculated by the payroll process but are not deducted from the worker's pay should be configured within the Company Taxes tab.
Worker Record Company Taxes tab
Set up the common company taxes, such as state unemployment (SUTA) and federal unemployment taxes (FUTA) and the company portions of FICA taxes and Medicare taxes. Often these taxes and deductions will be set up in worker category defaults, rather than the worker record.
For information on the Company Taxes tab review Taxes and Deductions > Configuring Company Taxes.
Worker Record Timecards tab
To view all of the employee’s past timecards from the Timecards tab, set the Status option to ALL. If you wish to only view Unpaid or Paid timecards set the appropriate Status option.
To view or edit a timecard, open the document by double-clicking on a timecard from the list. Click on the Pay Period column heading to sort the timecard list by pay period date.
For more information on the Timecards tab, review the Worker History section.
Worker Record Messages tab
The Messages tab is used to setup messages for individual employees. The message feature can be used to display reminders within the timecard screen. Review Custom Messages for instructions to create messages.
Worker Record App Settings
Review Time and Attendance > Microsoft Store App > User Configuration for details on the PIN, Work Code, and other Time Track settings on the top of the App Settings tab.
Review the MyEBMS Apps for more details on the Apps table at the bottom of the App Settings tab.
Click OK to save employee information.