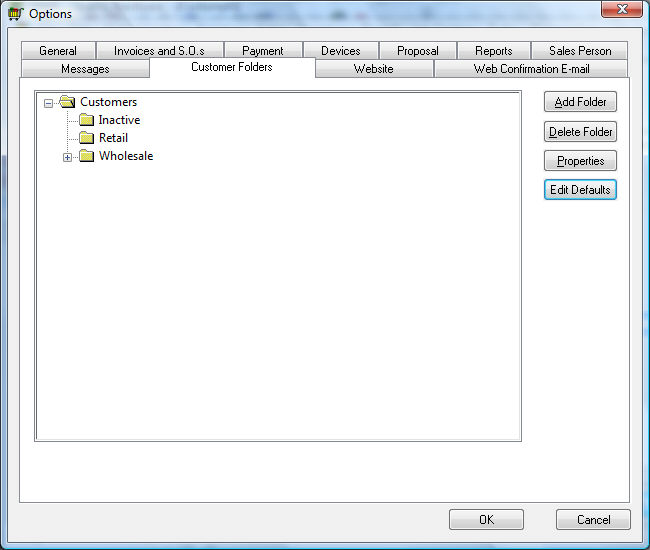
All of these features are done in the Folders tab of the Options window. These folder tabs are available in option dialog in the Financials module as well as Expenses, Sales, Inventory, Labor and others. For example, open the Sales > Options > Customer Folders and click on the Edit Defaults button.
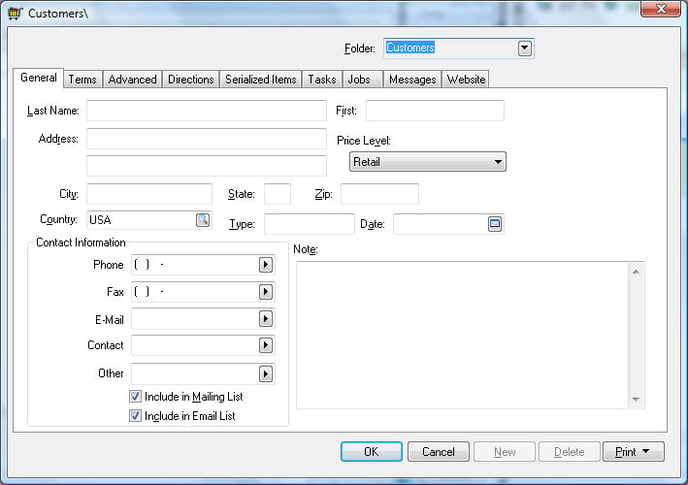
Notice that a window opens that is very similar to the customer entry window. This is NOT the proper window to enter a new customer but rather to enter default values for new customers entered into the selected folder.
Editing Defaults
If a majority of your customers reside in the USA, it would be an advantage to have the country entry already filled in with USA each time a new customer is entered. You may want to enter a default type for the customer for a particular folder. It can be very useful to set the contact entry labels to the ones most often used in your application. See the Customer entry section for detailed descriptions of each entry field. Note that you can set defaults for each folder. It is recommended that you highlight the root folder and set the most common defaults and then copy these defaults to all the other folders in your list. See the next paragraph for details on copying the defaults from the root folder to all the subfolders. After you have copied from the root folder to all the others, you may want to highlight another subfolder and change values that are folder specific.
Filtering Down Defaults to Subfolders
Click the Edit Defaults button. A window will open as shown below:
Position the cursor on the entry that you wish to copy down to subfolders. Right-click on the field or hit the list key on the keyboard and a menu will appear on the window. If it is possible to copy the value of this entry to subfolders, a Filter Down selection will appear on the menu. Click on Filter Down or press F with the keyboard and a dialog window will open.
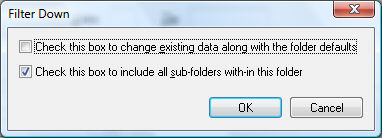
Keep the top switch off and make sure the bottom switch is turned on. By pressing OK, the contents of this entry will be copied to all subfolders. If the root folder is highlighted, it will copy to all the folders and if a subfolder is highlighted, it will copy only to the folders under the highlighted folder. This procedure must be done for each entry that you want to Filter Down. Note that you can filter down on entries located in any one of the tabs on your window.
Globally Editing Data
It is important that this feature is used with caution because a large amount of data can be changed very quickly.
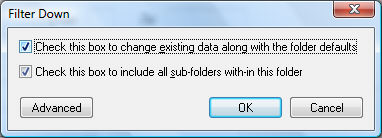
Follow the same steps that are listed in the Filtering Down Defaults To Subfolders section above. Rather than keeping the top switch off to copy only to subfolders, turn the switch on. If you click OK, the system will copy the contents of the current entry not only to the default windows of subfolders, but will change the data in the specific entry for all the records in the folder.
EXAMPLE To change or set the Type for all the customers already entered in the system, follow these steps: These 6 steps can be used to change the Type field for thousands of customer records.
-
Highlight the root folder in the customer folders list. Selecting the root folder affects ALL customers.
-
Click on Edit Defaults button.
-
Highlight the Type entry.
-
Enter the information that you want to copy to all the customer records.
-
Right click on the Type field.
-
Toggle both option buttons ON.
-
Press OK.
The list of items that are globally changed using the filter down feature can be restricted to a subset using the Advanced button. When the first check box - Check this box to change existing... option is enabled an Advanced button appears as shown below:
This advanced feature allows the user to query the set of records that are globally changed to a specific subset based on the query settings. For example, to only change the customer records that are within the state of Ohio, set the following query. Click on the Advanced button to open the query dialog as shown below:
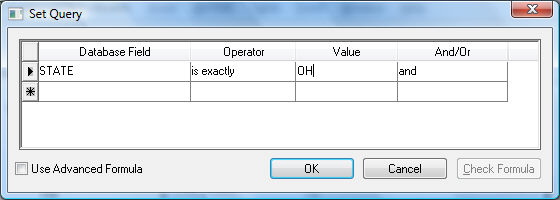
Set the Database Field = STATE, Operator = is exactly, and the Value = OH.
Review the Technical > Advanced Query Options section for more details on query options.
This filter down feature is powerful when changing pricing within inventory, terms for a group of customers, or other data that is common between items or accounts within a folder group. This feature is very useful to globally change codes set in the advanced tabs of vendor, customer, inventory, and employee windows.
WARNING: The data will be changed as soon as OK is clicked on the filter down dialog. There is no way to undo this process. This feature can be disabled using security settings. Review the Creating Users and Assigning Rights section for more details on restricting this function.
Filter-Down Batch Size
The Filter-Down Batch Size represents the number of changes committed as a single database transaction, while performing filter-down. The greater the value, the better the filter-down performance but may degrade the experience of other EBMS users. Only increase this value to improve filter-down performance while others are not using EBMS on other network stations.
Select to access the Filter-Down Batch Size.
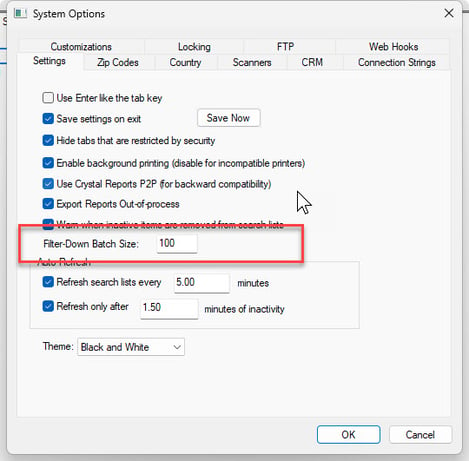
The recommended value is 100.