Set default inventory settings for groups of products
EBMS gives managers the tools to set product defaults so that important standard settings are consistently set for each new item. Configuring accounting defaults, pricing grids, standard purchase methods, unit of measure settings, and other important inventory settings can save time and make data entry more consistent.
It is wise to set up inventory category defaults before entering new inventory items. If the defaults are considerably different for the first level of category folders, highlight each folder and perform the following steps for each folder. The Products folder list example shown in the previous section contains a service folder, which will contain defaults that are quite different from standard product folders. It is a simple process to set up defaults for a higher-level category folder and copy the values into its subfolders.
Setting Defaults for Category Folders
To set defaults for all folders, go to the root folder (the root folder is the top category folder, usually called Inventory or Products). Note: Very few defaults can be set from the root folder, because of the broad range of products included under it. Usually default settings won't apply to every single product in a company's Product Catalog, so most category defaults should be set from a lower-level category folder.
To set defaults, highlight a category folder.
Click the Edit Defaults button and the following window will appear: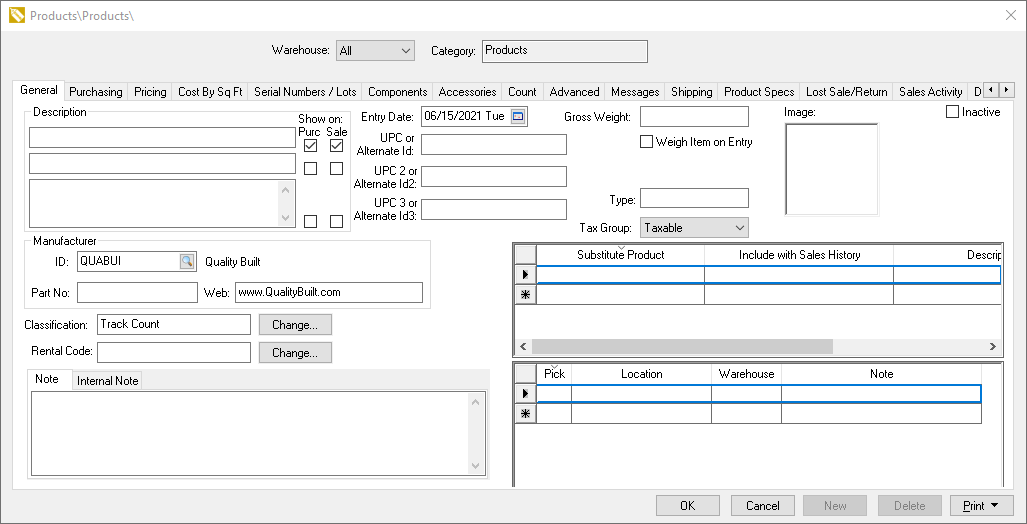
The Products window appears very similar to an individual product record, but this window is used only to enter default values.
Any data entered into any of these category entry fields will be a default the next time a new inventory item is entered. For more details on individual fields, review section Changing Product Information.
General Tab
From Inventory > Options > Product Categories > Edit Defaults, click on the General tab.
Select the appropriate option from the Tax Group drop-down menu to determine how sales tax will be calculated for the group of inventory items in the selected category folder. Review Sales Tax for more details on sales tax set up and how tax groups are created.
Enter the Manufacturer ID if the same manufacturer manufactures all the products within the selected category folder.
Set the inventory Classification option to reflect the class of all inventory items in the selected category folder. This setting is important and should be set within the default settings of each folder. Review the Inventory Classifications section for more details.
In normal situations, most other fields within the General tab should stay blank. Because each change will be applied to a whole group of products, only set product defaults that apply to all the items in the selected inventory group.
Purchasing Tab:
From Inventory > Options > Product Categories > Edit Defaults, click on the Purchasing tab to preset vendor information before the initial purchase as shown below: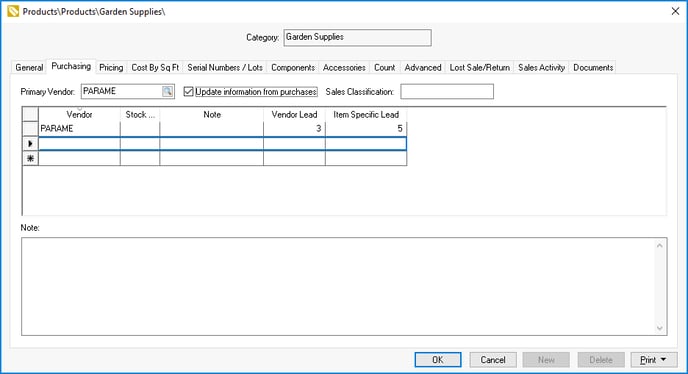
-
Set the Primary Vendor if all new items should inherit a Primary Vendor setting before the purchase.
-
Enable the Update Information from purchases option to set the Primary Vendor setting during the initial purchase.
-
The Sales Classification setting can be kept blank since the recommended procedure for this setting is to run the Inventory > Utilities > Determine Sales Level utility. Review Sales Level Classification for more information.
-
The main reason to add vendor purchasing records is to enter the vendor's Item Specific Lead days for a group of products. The Item Specific Lead days setting should be kept blank to use the vendor's Terms tab if all items from a specific vendor have a common ETA lead day setting. Review Estimated Time of Arrival (ETA) Date before continuing with the following steps. Complete the following steps only to add Lead Days information for a group of inventory items:
-
Enter a Vendor ID to create a new record.
-
Enter the number of Item Specific Lead days for the current folder group. This only applies if an entire product group is purchased from a common vendor.
-
Repeat for other vendor lead days settings for the current folder group.
-
-
Review Purchasing Tab for more details on the vendor purchase records.
Pricing tab
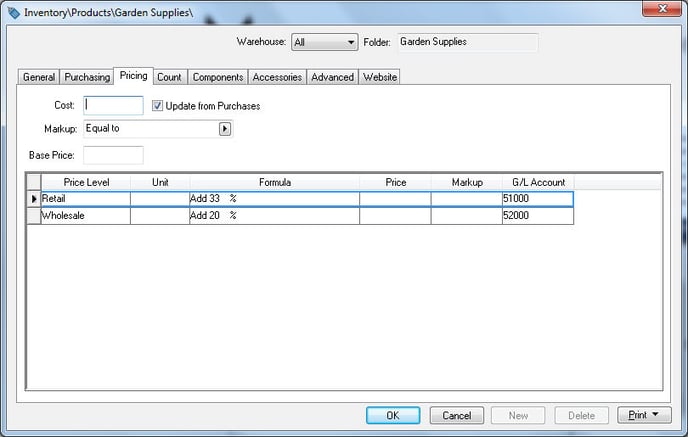
From Inventory > Options > Product Categories > Edit Defaults, click on the Pricing tab to set any general price formulas. To set standard price formulas for each new item within the selected folder, take the following steps:
-
Set Margin or Markup setting to Equal to if the item price is normally calculated from the cost.
-
Set Margin or Markup setting to (None) to manually enter the base price and calculate different price levels from the base price. A manual base price example is if all price level prices are derived from a suggested list price. The base price would equal the list price that is manually entered.
-
Set a Formula for each Price Level in the table. Review Inventory Pricing Overview for more details on setting formulas.
-
Set the G/L Account for each price level in the table if the Use Price Level G/L Account option is enabled within the Advanced tab.
Most other tabs can be ignored when setting folder defaults.
Click the OK button to return to the inventory options window.
Repeat the steps above for each of the different folders. To copy defaults to all subfolders, right-click on the field and select Filter Down from the context menu.
Count tab
From Inventory > Options > Product Categories > Edit Defaults, click on the Count tab to set default purchasing method, unit of measure settings, and the integer option as shown below:
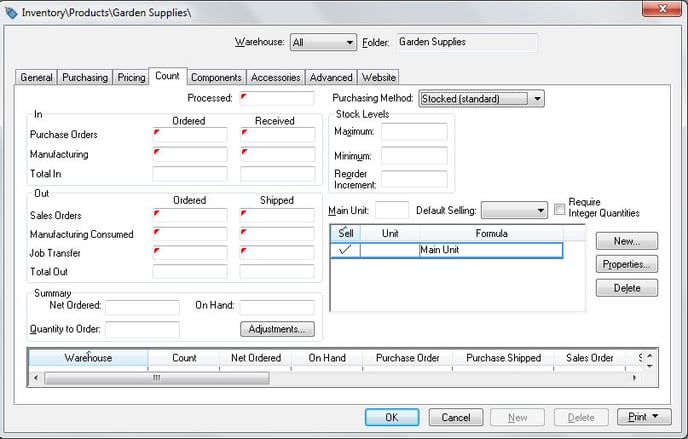
The Purchasing Method should be set properly as a default. Review Purchasing Methods for details on these options.
Set the appropriate Stock Level settings. Note that often these settings are kept blank if the stock levels are not consistent for the entire folder. Review Inventory Stock Level Settings for more details.
Set the desired unit of measure settings including multiple UOM settings, the Main Unit, and the Default Setting unit.
Disable the Require Integer Quantities option to allow the user to enter fractional quantities into a sales order or purchase order. The system will bar the user from entering fractional quantities if this option is enabled. Go to Integer or Fractional Quantities for details.
Alternative Unit of Measure settings can be added as defaults of new inventory items have common unit of measure settings. Review Unit of Measure for more details.
Advanced tab
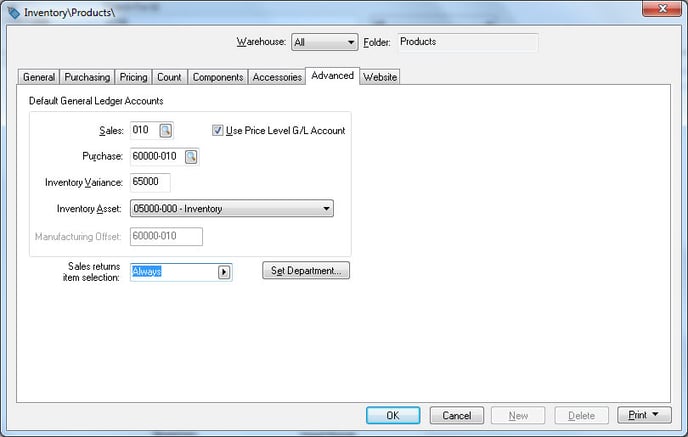
From Inventory > Options > Product Categories > Edit Defaults, go to the Advanced tab.
if the sales totals of the products within the selected folder (no matter what price level) are recorded within the same general ledger account, disable the Use Price Level G/L Account option and enter the general ledger account. Enable the Use Price Level G/L Account if the sales revenue is posted to different general ledger accounts based on the price level. Enter the Sales department on the Advanced tab and record the 5-digit G/L Account within the Pricing tab.
Enter the default Purchase general ledger account. This account should be an expense account that records the purchase totals within the general ledger.
Enter the default 5-digit Inventory Variance general ledger account. The inventory variance account code will be completed with the 3-digit account extension from the purchase or sales account depending on the process. For more details on Inventory Variance accounts, review the Inventory Variance section. This field will be disabled if the inventory classification (set in the General tab) is set to Service.
Set the appropriate Inventory Asset general ledger account by selecting from the available accounts. Many companies use a single inventory asset account. The Inventory Asset account will be disabled if the item is classified as Service or No Count. (Review the General tab for the classification setting.)
The Manufacturing Offset (MFG offset) setting will only appear if the Classification within the General tab is set as No Count or Service. Review Credit Offset Transactions for more details on the Manufacturing Offset.
Set the Sales returns item selection to match the default response when items are returned on a sales order. Review Product Returns and Sales History for more details.