Company Groups may be used to limit the companies that are shown in the Login dialog when a user logs into EBMS. Using company groups is not required and may be enabled at the discretion of the EBMS Administrator.
Example Scenario: A company owner sets up separate companies to aid in separating the accounting and expenses for business and personal accounting. The administrator may wish to limit the Login dialog on an employee's computer to show only the business company(s).
To add, edit, or remove the Company Group of an EBMS company:
Go to a company data set tile on the main Server Manager page and look for the Group field. The option will say [No company group] unless this field has already been configured. Click on the field entry field to open the Change company group dialog.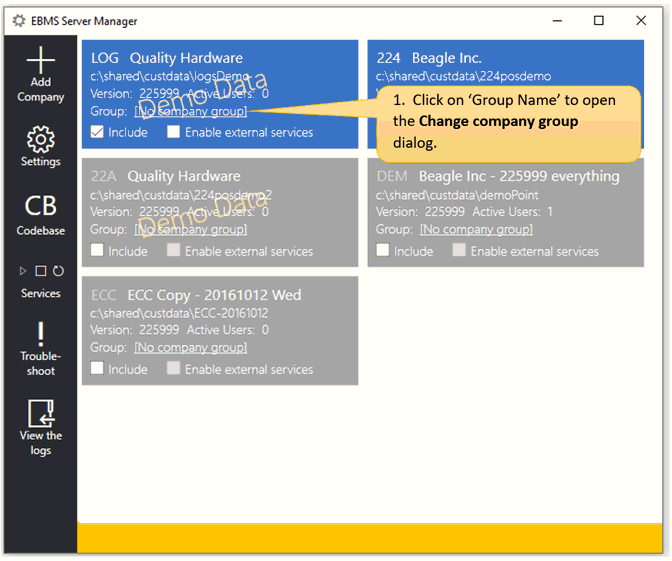

Enter a Group name and click Save.
To enable only companies with a specific 'Group Name' to show in the EBMS login:
Launch EBMS and on the login page, click the Server button to open the Server Connection dialog.

Enter the Company Group name created earlier and connect it with the server name using the @ symbol. For example, if the new Company Group name is HardwareCompany and the server name is localhost, the server connection syntax would be HardwareCompany@localhost. Click OK to save changes.

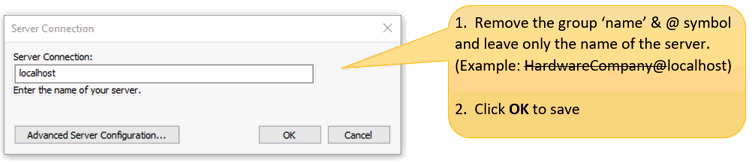
To disable a company group from showing in the Login and return to showing all other selected companies, remove the group name and @ symbol and leave only the name of the server. In the example above, the user would remove HardwareCompany@ and only leave localhost in the Server Connection field. Click OK to save.
Listing only the name of the server will exclude all company groups. If you wish to include both, do so by listing MyServer,MyGroup@MyServer and separate the company group names by a comma. Choose Advanced Server Configuration for more instructions.