- EBMS Knowledge Base
- Financials
- Bank Accounts
-
Client Resources
-
EBMS Main Documentation
- Introduction
- Getting Started
- Getting Started | Initial Installation
- Getting Started | Company Setup
- Quick User Guide | Financial Staff | Accountant
- Quick User Guide | Financial Staff | Accountant | Accountants Journal
- Quick User Guide | Sales Staff
- Quick User Guide | General Staff
- Features
- Reports
- Security
- Server Manager
- Technical
- Technical | Data Import and Export Utility
- Technical | SQL Mirror
- Automotive
- Automotive | Parts Catalog
- Automotive | Pricing
- Automotive | Point of Sale
- Automotive | Product Application
- Automotive | Keystone Interface
- Metal Supply
- Fuel Sales
- Horticulture
- Horticulture | Farm Setup
- Horticulture | Processing Payroll
- Horticulture | Managing the Farm
-
Sales
- Introduction
- Customers
- Customers | Miscellaneous Customers
- Proposals
- Proposals | Processing Proposals
- Proposals | Sets and Templates
- MyProposals
- MyOrders
- Sales Orders
- Invoices
- Materials Lists
- Sales and Use Tax
- Sales and Use Tax | TaxJar
- CRM
- CRM | Auto Send
- Recurring Billing
- Credits
- Customer Payments
- Payment Card Processing
- Payment Card Processing | Gift Cards
- Payment Card Processing | Loyalty Cards
- Payment Card Processing | Verifone Gateway
- Freight and Shipping Tools
- General Ledger Transactions
- Point of Sale
- Point of Sale | Point of Sale Hardware
- Point of Sale | Xpress POS System
- Point of Sale | Advanced Tools
- Signature Capture
- Salesperson Commissions
-
Inventory
- Product Catalog
- Product Catalog | Using Product Codes for No Count Items
- Product Pricing
- Product Pricing | Special Pricing
- Tracking Counts
- Unit of Measure
- Purchasing
- Special Orders and Drop Shipped Items
- Receiving Product
- Barcodes
- MyInventory and Scanner
- Components (BOM) and Accessories
- Components (BOM) and Accessories | Component Formula Tool
- Made-to-Order Kitting
- Configure-to-Order Kitting
- Multiple Inventory Locations
- Multiple Inventory Locations | Creating Locations
- Multiple Inventory Locations | Using Multiple Locations
- Multiple Inventory Locations | Product Catalog Sync
- Multi-Vendor Catalog
- Serialized Items
- Serialized Items | Purchasing or Manufacturing an Item
- Serialized Items | Selling and/or Associating an item with a customer
- Lots
- Product Attributes
- Product Attributes | Selling and Purchasing Items with Attributes
- Product Attributes | Custom Attributes
- Mobile Scanner (Legacy)
-
Labor
- Getting Started
- Workers
- Taxes and Deductions
- Work Codes
- Time and Attendance
- Time and Attendance | Time Track App
- Processing Payroll
- Closing the Payroll Year
- Processing Payroll - Advanced
- Salaried Pay
- Piecework Pay
- Direct Deposit
- 3rd Party Payroll Service
- Subcontract Workers
- Flag Pay
- Prevailing Wages
- MyDispatch
- MyTasks
- MyTime
- MyTime | Communications
- MyTime | Setup
- Tasks
- Tasks | Getting Started
- Tasks | Creating Tasks
- Tasks | Scheduling Tasks
- Tasks | Customizing Task Views
- Tasks | Managing Tasks
-
Financials
- Introduction
- Fiscal Year
- Chart of Accounts
- Budget
- Financial Reporting
- Transactions and Journals
- Transactions and Journals | Journals
- Account Reconciliation
- 1099
- Departments and Profit Centers
- Fund Accounts
- Bank Accounts
- Bank Feed
- Vendors
- Vendors | Miscellaneous Vendors
- Purchase Orders
- Expense Invoices
- Vendor Payments
- AP Transactions
- Landed Cost
- Fixed Assets and Depreciation
- Fixed Assets and Depreciation | Fixed Assets
- Fixed Assets and Depreciation | Fixed Assets | Adding Assets
- Fixed Assets and Depreciation | Processing Depreciation
- Fixed Assets and Depreciation | Disposing Assets
- MyJobs
-
E-commerce
-
Rental
-
Job Costing
-
Manufacturing
Create Prenote and Submit NACHA to Bank Web Portal
How to create an ACH Prenote test file
EBMS contains the tools to create an ACH prenote test file to submit to the bank to test the direct payment process. This process allows the user to create a cash management account and submit a file to the bank to test the communicate before an actual payment or direct deposit is processed. The bank will test the file content online and respond with any data file errors.
Electronic Fund Transfer (EFT) is the backbone of the Canadian payment industry including debit and fund transfers: Contact Eagle Software Canada for assistance to configure EFT transactions.
Create Prenote File from EBMS
A Prenote File is a zero-dollar transaction that is created and sent through the ACH network to test the validity of the payroll information within EBMS. This pre-authorization process is required by some banks whenever employees are added or removed, or account information is changed. This process has no effect on the bank account balance or the employee's pay since all of the account values are zero. The prenote can be created from the following locations:
-
Configure the bank account information. Review Configuring ACH and EFT Direct Payments for bank account setup steps.
-
Set the proper information before creating the Prenote File at one of the following locations:
-
Go to Labor > Labor Options > General to set the appropriate G/L Account to be the Payroll Bank Account.
-
Open a vendor record by going to Expenses > Vendors and selecting a vendor. In the vendor record, go to the Terms tab and enter the vendor's Direct Payment Information (Account Number and Routing Number).
-
Open a customer record by selecting Sales > Customers and selecting a customer. In the customer record, go to the Terms tab and enter the customer's Direct Payment Information.
-
Click on the Create Prenote File button to the right of the bank account information within A) labor options, B) vendor terms, or C) customer terms.
-
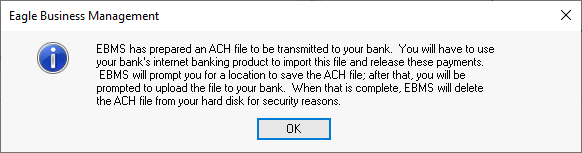
Click on the OK button when the following dialog appears:
-
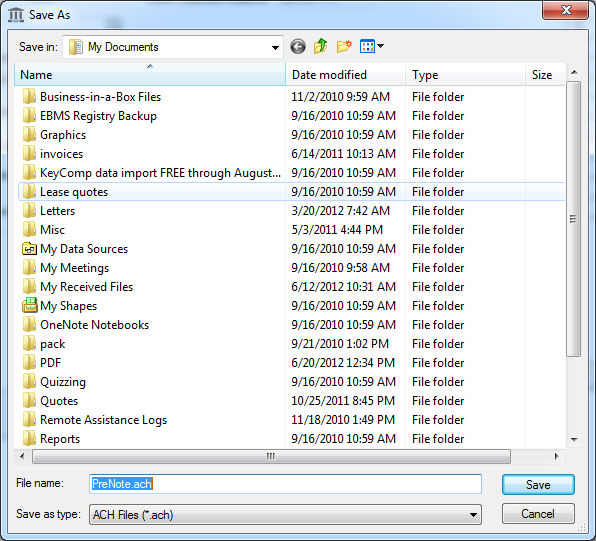
Save the Prenote file as shown below:
-
Upload the Prenote file using the standard ACH direct deposit steps from the bank. Note that a cash management account must be requested from the bank for the specific checking account utilized to process ACH direct deposits. Contact your banker for instructions to set up cash management options and the steps to upload a NACHA pre-note file. Review the following instructions to complete this step.
Set Up Bank Portal and Submit Prenote
Request an online cash management account from your bank that will allow a NACHA file to be submitted for direct payments. This online web account varies between banks but often includes an ACH dollar limit and other rules of submission. Most banks require special security requirements for a cash management account that differs from the standard online bank account login.
- Apply for an online bank cash account. This is not a normal online bank account but requires special cash management options.
- Log into your cash management account and submit the NACHA Prenote file that was created in the previous step. Submit one or multiple prenote files to test settings.
- Correct any noted errors communicated by the bank's online portal.
- Submit the actual NACHA file that is created by EBMS to the bank portal to process payments. Review the following sections for instructions to create the NACHA file:
- Direct Deposit Labor Payments: Review Processing Direct Deposit Pay for instructions to create the direct deposit NACHA file.
- Expense Invoice Payments: Review Processing Direct Payments ACH for instructions to create the accounts payable payments NACHA file.
- Customer Payments: Review Process ACH Payments for instructions to create a NACHA file to transfer funds from customer accounts.