It is imperative that direct deposit parameters have been entered in the company bank account record prior to creating ACH Transactions. Review Direct Deposit Overview for details on entering the payroll bank account settings.
Employees must also be configured for direct deposit before continuing with this section. Review the Worker Configuration for Direct Deposit article for more details.
The steps required to process employee payments using the ACH direct deposit method is very similar to printing paychecks. Complete the following steps to process employee payments as direct deposits:
-
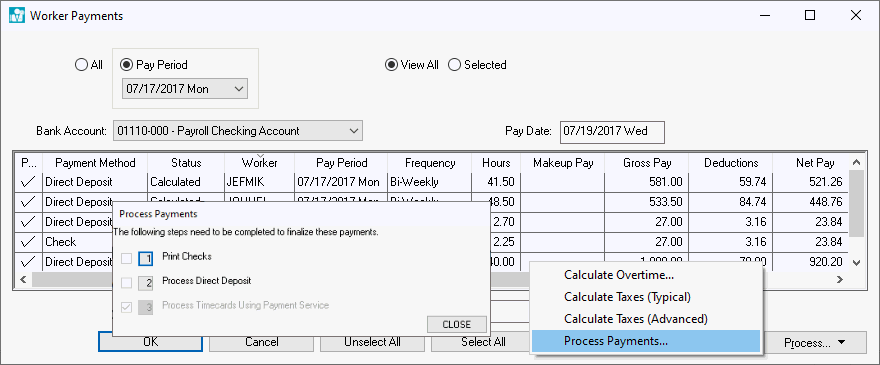
Go to Labor > Worker Payments to open the following dialog:
-
Click the Pay Period option and select the current Pay Period.
-
Click the switch in front of View All to show all timecards.
-
Make sure the proper Bank Account is selected. (Usually, this will be a checking account specifically set up for paying payroll.)
-
The Pay Date is the date printed on the paycheck and is the same for all paychecks within a pay period. The Pay Date is set when the Pay Period is created. EBMS allows the user to generate a paycheck for an employee before all other timecards are entered, but the check date for both the employee that was paid early and the other employees will be the same. Review the Open New Pay Period section for more details.
-
To select all the timecards for payment, hit the Select All button at the bottom of the window. To select individual employee timecards, click the Pay column to select which timecards in the list to pay. Any timecard lines with a checkmark in the Pay column will be paid when payments are processed.
-
Review the Payment Method column. This setting determines if employee payment processing will generate a paycheck or a direct deposit notice for the employee. The Payment Method option will not include Direct Deposit as a payment option unless the Method is set to Direct Deposit in the worker record Pay tab. The selected method on the worker record determines the worker's default payment method throughout EBMS.
-
Click on the Process Payments button and select Calculate Taxes (Typical) to process taxes and deductions. This step will calculate the taxes and deductions for all the timecards that have been selected. Review the Separate Bonus Pay Periods for more details regarding the Calculate Taxes (Advanced) option.
-
Click on the Process button and select Process Payments from the dropdown list.
-
Click on the Print Checks step to print pay checks. This option will be disabled if all employees are paid using the direct deposit method. Review the Process Worker Payments section for more details printing paychecks.
-
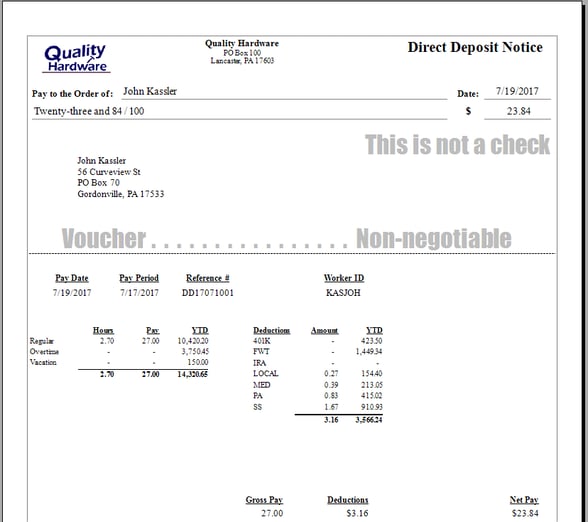
Click on the Process > Process Direct Deposit option to create ACH transactions and print direct deposit vouchers. Direct deposit notices can be printed or sent electronically using the EBMS Auto Send feature.
-
Configure the printed direct deposit receipts form within the payroll bank account record. Review the Reports Tab section of the Changing Bank Account Information article for instructions on how to configure direct deposit reports.
-
Review the Auto Send Direct Deposit Notice article for instructions to automatically email direct deposit notices to workers.
-
-
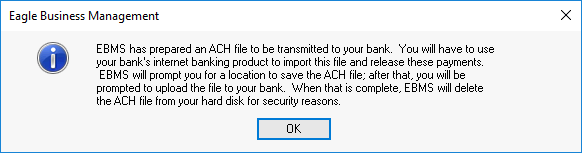
The following dialog will appear after payments are processed and the ACH (NACHA) file is created.
-
Click OK to open the following dialog to save the NACHA file (Initially designed by the National Automated Clearing House Association) as shown below:
-
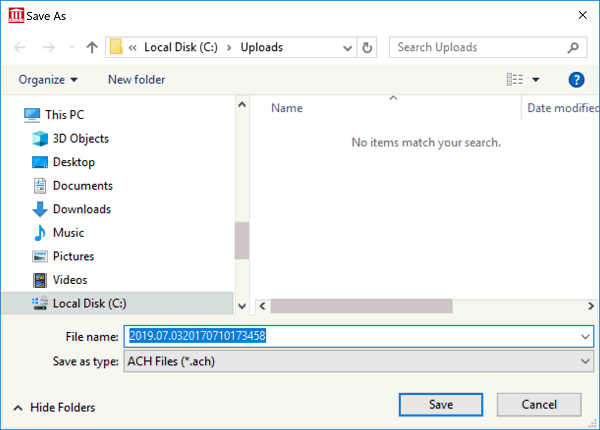
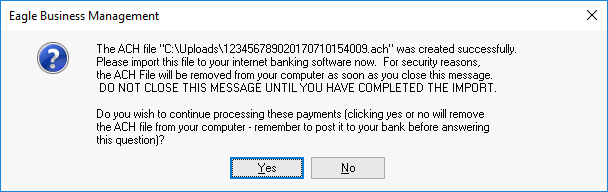
Click Save to save the *.ACH file in a location that is easy to upload to your bank’s cash management site. The following dialog will appear when the file is created. Keep the following dialog open until the ACH file has been successfully uploaded to the bank’s cash management site. Review Create Prenote and Submit NACHA to Bank Web Portal for instructions to upload this file.
Complete this upload step before continuing with the next step. The following prompt will appear: "The ACH File [file address] was created successfully. Please import this file to your internet banking software now. For security reasons, the ACH File will be removed from your computer as soon as you close this message. DO NOT CLOSE THIS MESSAGE UNTIL YOU HAVE COMPLETED THE IMPORT. Do you wish to continue processing these payments? (Clicking yes or no will remove the ACH file from your computer - remember to post it to your bank before answering this question.)"
-
Click Yes after the ACH file has been successfully uploaded to the bank’s direct deposit processing portal. Click No if the direct deposit process was not successful - this option will abort the payment process.
Review Process Worker Payments for instructions to repeat this payment process.
Electronic Fund Transfer (EFT) is the backbone of the Canadian payment industry including debit and fund transfers: Contact Eagle Software Canada for assistance with EFT transaction setup.