It is highly recommended to reconcile bank accounts on a regular basis based on a bank statement or an online transaction list. Regularly reconciling checking, credit card, and other bank accounts helps verify that all expenses have been properly recorded.
Complete the following steps to reconcile a bank account:
-
Identify the bank Statement Ending Balance based on a bank statement or the bank website ending balance.
-
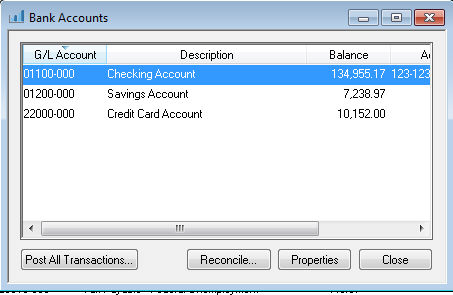
Select and highlight an account from the list. Click on the Reconcile button.
-
The Bank Account list will display the bank accounts classified within the general ledger account. This list will only appear if multiple accounts are classified as Bank Accounts.
-
Click on the Post All Transactions button to post all transactions to the General Ledger. Review the Financial Transactions Overview section for more details.
-
Select an account and click on one of the following buttons:
-
Click on the Properties button to open the main Bank Account dialog. Review the Changing Bank Account Information section for more details on the Bank Account dialog.
-
Click on the Reconcile button to open the Account Reconciliation dialog window as shown below.
-
-
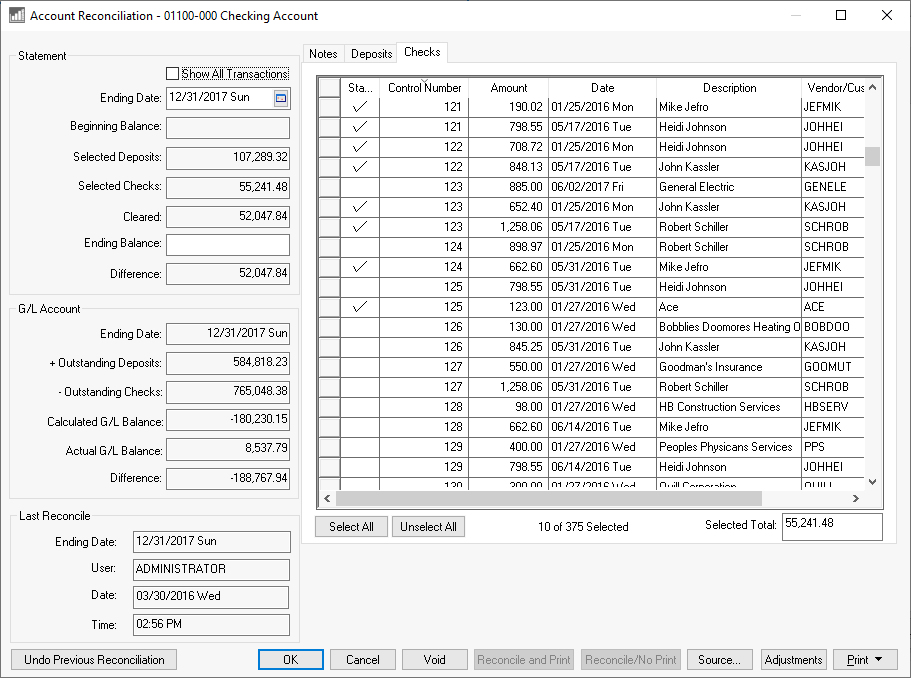
Use the Account Reconciliation dialog to reconcile the bank account:
-
The Statement entry group is used to reconcile the bank account. Enter the bank statement date in the Ending Date entry. If the Show All Transactions option is enabled, the system will hide transactions created since the statement date.
-
Enter the bank statement Ending Balance. Click on the deposits tab with the mouse or hit Ctrl + Tab keys on your keyboard to move to the Deposit tab.
-
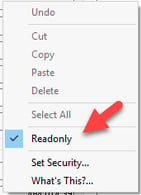
The Beginning Balance should be copied from the previous reconciliation. Right click on the Beginning Balance entry and disable the Read Only option to enter a beginning balance amount.
-
Select all Deposits/Credits that are listed on the bank statement by clicking on the Status column. If it is the first time that you have reconciled your bank account with the EBMS software, check all deposits that were listed on the current or prior statements. Only outstanding deposits should be listed without check marks. Notice that the Outstanding Deposits total on the left side of the dialog reflects the total outstanding deposits. If deposits listed on your bank account do not show up in the Deposits tab, it is important to make sure the deposits were properly entered into the system.
-
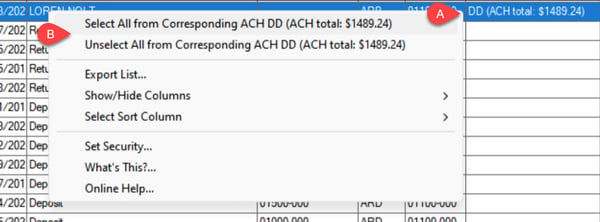
Additional ACH payment tools are available to assist with ACH transaction reconciliation:
-
ACH payment information can be shown by making the direct deposit DD (ACH Total) column visible.
-
Right click on any ACH payment and use the Select All... and Unselect All... options to select all transactions within a single ACH file.
-
-
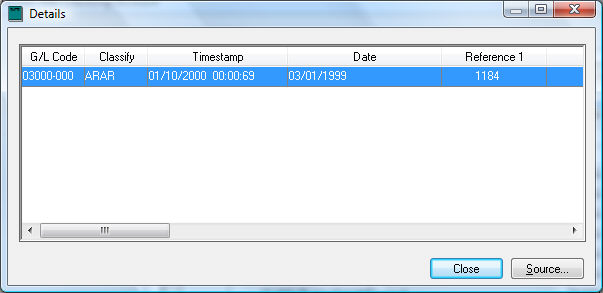
To view more information on a specific deposit, click the Source button and the following window will appear:
-
To view details of the specific payment listed, click the Source button to list all the customer's invoices paid with the selected payment. Click Close to return to the Account Reconciliation window.
-
Move to the Checks tab on the Account Reconciliation dialog and follow the same steps as the Deposits/Credits tab. Mark all the checks that are on your statement or that are not outstanding. Click Source to view the source of the highlighted check. The Outstanding Checks will equal the total outstanding checks (unselected checks).
-
To void a check or deposit, highlight it and click Void. This will open a wizard with instructions on how to complete the void function.
-
If there are any miscellaneous debits or credits on your statement, such as bank charges or interest received, press the Adjustments button. (Review the section on Adjustments to Bank Account for more information.) Make sure all adjustments are checked if they appear on the bank statement.
-
If the Adjusted Statement Balance equals the Account Ending Balance, the Difference field will show zero. If Difference equals zero that means your account is balanced, which is the goal. If the Difference total does not equal zero, review the section on Adjustments to Bank Account for more on voiding checks, correcting differences, or making adjustments.
-
The Difference field MUST equal zero before you can process or complete the account reconciliation.
-
Click Process to complete account reconciliation. This step removes all checked Deposits/Credits and Checks, leaving only the outstanding transactions. The process will record the reconciliation details based on the Statement Date.
-
The most recent reconciliation process can be reversed by selecting the Undo Previous Reconciliation button on the lower left corner of the dialog.
-
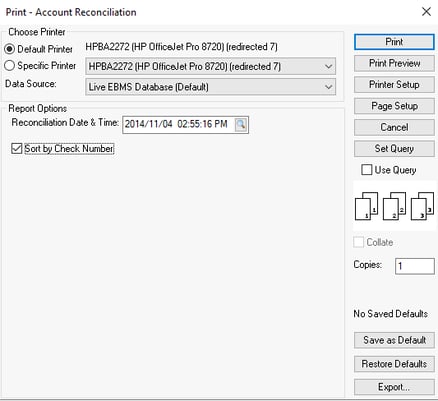
Select the Print button and print the Account Reconciliation report as shown below:
-
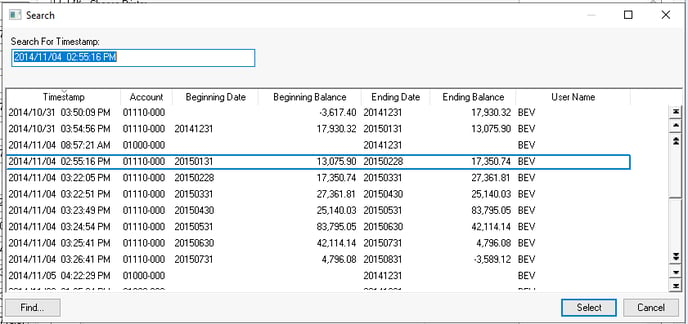
Select the desired Reconciliation Date & Time. Click on the lookup button to list all past reconciliation process dates as shown below:
-
Print any other user-defined reconciliation reports listed on the Print button. Review Print Buttons and Menus if the bank account reconciliation report is not listed
Click OK to exit window.