-
Client Resources
-
EBMS Main Documentation
- Introduction
- Getting Started
- Getting Started | Initial Installation
- Getting Started | Company Setup
- Quick User Guide | Financial Staff | Accountant
- Quick User Guide | Financial Staff | Accountant | Accountants Journal
- Quick User Guide | Sales Staff
- Quick User Guide | General Staff
- Features
- Reports
- Security
- Server Manager
- Technical
- Technical | Data Import and Export Utility
- Technical | SQL Mirror
- Automotive
- Automotive | Parts Catalog
- Automotive | Pricing
- Automotive | Point of Sale
- Automotive | Product Application
- Automotive | Keystone Interface
- Metal Supply
- Fuel Sales
- Horticulture
- Horticulture | Farm Setup
- Horticulture | Processing Payroll
- Horticulture | Managing the Farm
-
Sales
- Introduction
- Customers
- Customers | Miscellaneous Customers
- Proposals
- Proposals | Processing Proposals
- Proposals | Sets and Templates
- MyProposals
- MyOrders
- Sales Orders
- Invoices
- Materials Lists
- Sales and Use Tax
- Sales and Use Tax | TaxJar
- CRM
- CRM | Auto Send
- Recurring Billing
- Credits
- Customer Payments
- Payment Card Processing
- Payment Card Processing | Gift Cards
- Payment Card Processing | Loyalty Cards
- Payment Card Processing | Verifone Gateway
- Freight and Shipping Tools
- General Ledger Transactions
- Point of Sale
- Point of Sale | Point of Sale Hardware
- Point of Sale | Xpress POS System
- Point of Sale | Advanced Tools
- Signature Capture
- Salesperson Commissions
-
Inventory
- Product Catalog
- Product Catalog | Using Product Codes for No Count Items
- Product Pricing
- Product Pricing | Special Pricing
- Tracking Counts
- Unit of Measure
- Purchasing
- Special Orders and Drop Shipped Items
- Receiving Product
- Barcodes
- MyInventory and Scanner
- Components (BOM) and Accessories
- Components (BOM) and Accessories | Component Formula Tool
- Made-to-Order Kitting
- Configure-to-Order Kitting
- Multiple Inventory Locations
- Multiple Inventory Locations | Creating Locations
- Multiple Inventory Locations | Using Multiple Locations
- Multiple Inventory Locations | Product Catalog Sync
- Multi-Vendor Catalog
- Serialized Items
- Serialized Items | Purchasing or Manufacturing an Item
- Serialized Items | Selling and/or Associating an item with a customer
- Lots
- Product Attributes
- Product Attributes | Selling and Purchasing Items with Attributes
- Product Attributes | Custom Attributes
- Mobile Scanner (Legacy)
-
Labor
- Getting Started
- Workers
- Taxes and Deductions
- Work Codes
- Time and Attendance
- Time and Attendance | Time Track App
- Processing Payroll
- Closing the Payroll Year
- Processing Payroll - Advanced
- Salaried Pay
- Piecework Pay
- Direct Deposit
- 3rd Party Payroll Service
- Subcontract Workers
- Flag Pay
- Prevailing Wages
- MyDispatch
- MyTasks
- MyTime
- MyTime | Communications
- MyTime | Setup
- Tasks
- Tasks | Getting Started
- Tasks | Creating Tasks
- Tasks | Scheduling Tasks
- Tasks | Customizing Task Views
- Tasks | Managing Tasks
-
Financials
- Introduction
- Fiscal Year
- Chart of Accounts
- Budget
- Financial Reporting
- Transactions and Journals
- Transactions and Journals | Journals
- Account Reconciliation
- 1099
- Departments and Profit Centers
- Fund Accounts
- Bank Accounts
- Bank Feed
- Vendors
- Vendors | Miscellaneous Vendors
- Purchase Orders
- Expense Invoices
- Vendor Payments
- AP Transactions
- Landed Cost
- Fixed Assets and Depreciation
- Fixed Assets and Depreciation | Fixed Assets
- Fixed Assets and Depreciation | Fixed Assets | Adding Assets
- Fixed Assets and Depreciation | Processing Depreciation
- Fixed Assets and Depreciation | Disposing Assets
- MyJobs
-
E-commerce
-
Rental
-
Job Costing
-
Manufacturing
Assigning Lots to a Sale or Items Consumed
The power of the Inventory Lots module is that a lot number is assigned each time an inventory item is sold, consumed within the manufacturing module, transferred to a job, or moved to another warehouse. The Lot Number can be assigned using one of the following methods:
-
Manually selecting the lot number.
-
Scanning the lot number using a barcode.
-
Automatically selecting lots.
Manually Selecting the Lot Number
The lot number can be assigned to the detail lines of a sales order any time before the sales order is processed into a sales invoice. Complete the following steps to select the desired Lot Number within a sales order.
-
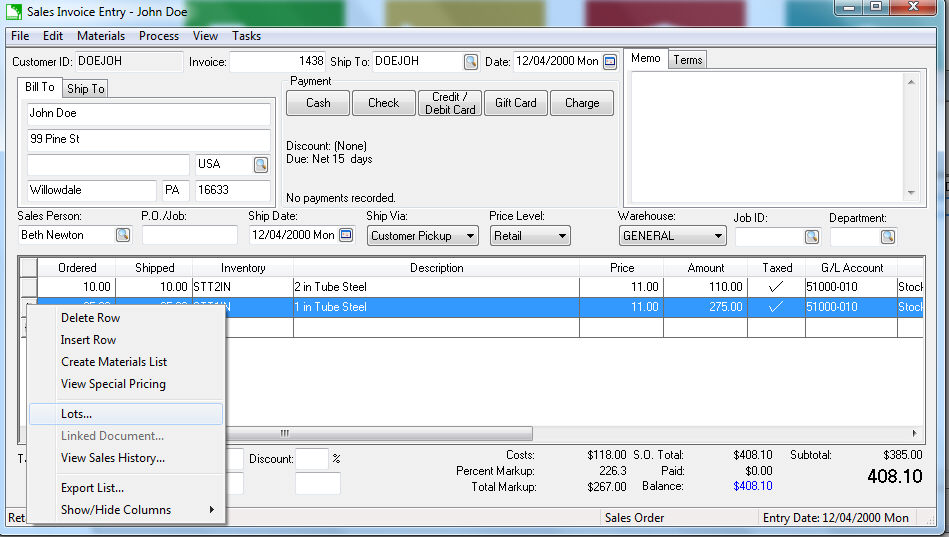
Open a sales invoice and right-click on any detail line to view or select Lots from the context menu as shown below:
-
From the context menu, click on the Lots option to open the Lot Selection for Inventory Item dialog as shown below:
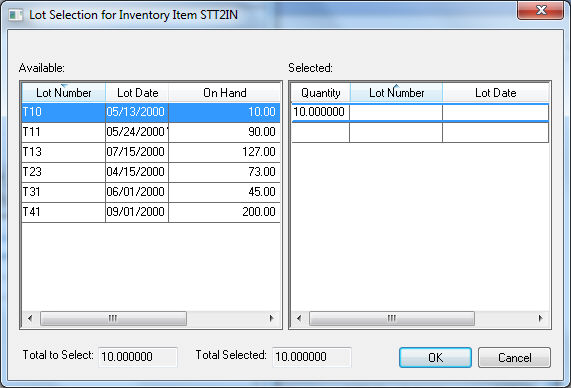
Note that the Selected pane on the right side shows the Quantity within the sales order. -
Double-click on the desired Lot Number within the Available pane to set the Lot Number and Lot Date within the Selected pane of the dialog.
-
Reduce the Quantity amount if the first Lot of the product is being taken from multiple lots.
-
The Total to Select and the Total Selected fields must equal before the dialog is closed. Click OK to return to the sales order.
- Repeat for each line of the sales order with inventory items classified as Lots.
Scanning the Lot Number using a barcode
Lot numbers can be scanned into a sales order, manufacturing batch, or other document using the standard barcode.
EBMS allows the user to scan a Lot Number into EBMS in the same way as an inventory item ID. This feature gives the user the ability to scan product into a sales order using a single Lot Number barcode rather than scanning an inventory ID along with another barcode for the lot number. The software will prompt the user if duplicate Lot Numbers exist with different inventory IDs. Review Barcodes & POS Tools Overview for setup and scanning details.
Automatically Selecting Lots
The EBMS Lots selection process can be automatically assigned by the software for inventory items with a Classification of Lots - Avg Cost. The Lots Control option in the product record Lots tab will not appear if the inventory item is Classified as Lots - Linked Cost.
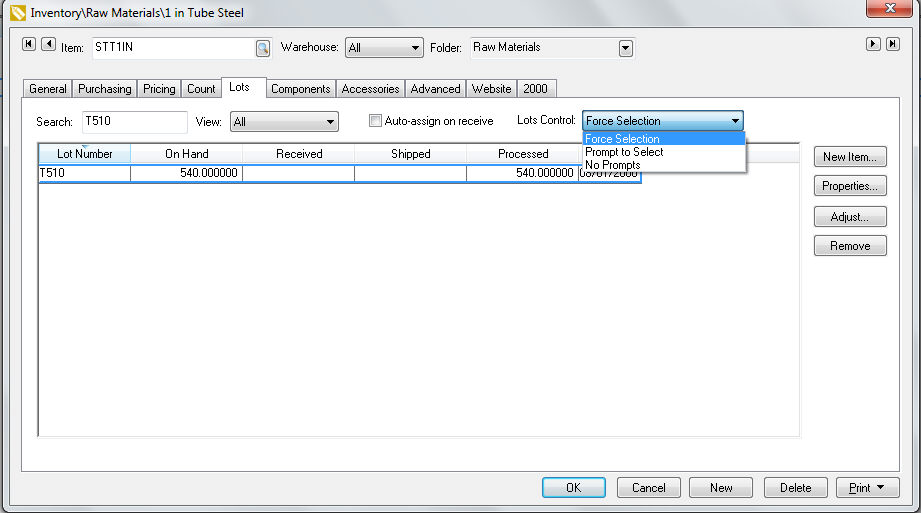
Select one of the following Lots Control settings from the drop-down menu:
-
Force Selection: This recommended option forces the user to manually select the Lot Number. This option requires the user to select a Lot Number before the sales order is processed into an invoice.
-
Prompt to Select: This option prompts the user to select a Lot Number but does not require a selection. The user can cancel the selection process.
-
No Prompts: The user has the option to right-click on the detail line to assign a lot number, but the system will never prompt the user to make the selection.
Continue with the Tracing Lots and Reporting Lots Information section to review existing lots information.