- EBMS Knowledge Base
- Sales
- Point of Sale Hardware
-
Client Resources
-
EBMS Main Documentation
-
Sales
- Customers
- Proposals
- Proposal Sets and Templates
- Sales Orders
- Sales Invoices
- Materials Lists
- Sales and Use Tax
- TaxJar
- Recurring Billing
- Customer Credits
- Customer Payments
- Card Processing and Koble Payments
- Gift Cards and Loyalty Cards
- Verifone Gateway and Point Devices
- Freight and Shipping
- General Ledger Transactions for Sales
- Point of Sale and XPress POS
- Point of Sale Hardware
- Salesperson Commissions
-
Inventory
- Product Catalog
- Using Product Codes for No Count Items
- Product Pricing
- Special Pricing
- Tracking Inventory Counts
- Unit of Measure (UOM)
- Purchasing Stock
- Special Orders and Drop Shipped Items
- Receiving Product
- Barcodes and Inventory Scanners
- Components, Accessories, and Bill of Materials
- Component Formula Tool
- Made to Order Kitting (MTO)
- Configure to Order Kitting (CTO)
- Multiple Locations: Warehouses, Divisions, Departments
- Sync Product Catalogs between Companies
- Vendor Catalogs
- Serialized Items
- Lots
- Product Attributes
-
Expenses
-
Labor
-
Financials
-
Tasks and Work Orders
-
Job Costing
-
Manufacturing
-
Rental
-
Apps
-
E-commerce
-
EBMS Automotive
-
EBMS Horticulture
-
EBMS Metal Supply
-
EBMS Fuel Sales
Receipt Printer
How to set up an Epson receipt printer
Complete the following steps to install and connect a receipt printer to EBMS:
-
Install the Epson receipt printer driver found here within MS Windows before configuring the report. Verify that your printer model matches the model of your printer. For example: TM-88V is different than the TM-88VI.
-
Verify that the paper size on the printer driver is correct. Typically, receipt paper width is 3.125 inches wide.
-
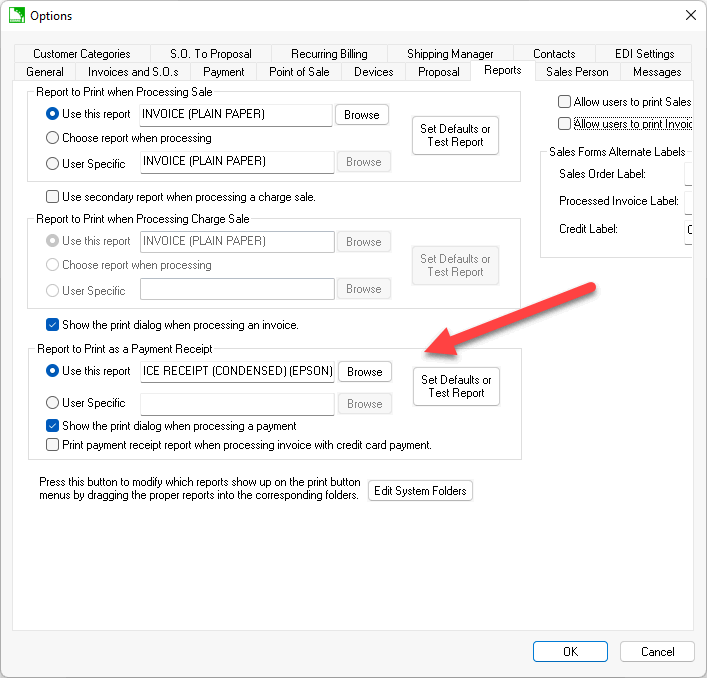
Go to Sales > Options > Reports from the main EBMS menu.
-
Select the Report to Print as a Payment Receipt by clicking Browse. The INVOICE RECEIPT (CONDENSED) (Epson) found in File > Reports > Sales > Forms is an example receipt report. See image above.
-
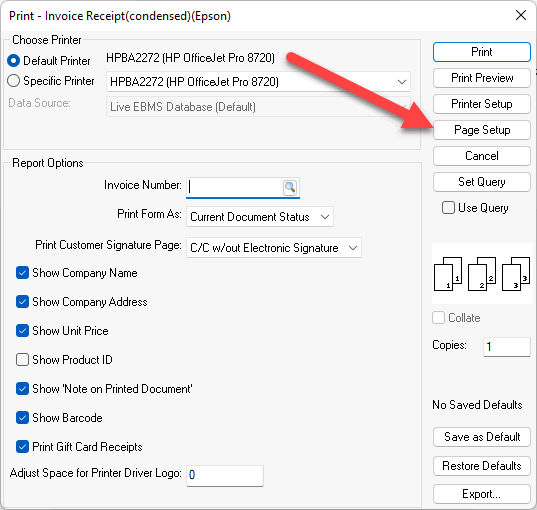
Click the Set Defaults or Test Report button to open the print dialog.
-
Click the Page Setup button on the right side of the page.
-
Select the custom page Size name that corresponds with the receipt paper size.
-
Set the Source as "Page[Feed,Cut]".
-
The right and left options for Margins (inches) should be set to 0.
-
Review other printer page setup options and click OK.
-
Review Printing a Sales Invoice or Payment Receipt for more details on the settings on this page.
Device settings must be set for each computer, workstation, or POS station.