Complete the following steps to install the EBMS Time Track App on a client device.
-
Verify that the Time Track App solution is included in the EBMS license by verifying that TimeTrack App is included in the Help > About module list. See [Main] Server Manager > Optional Modules to add modules to EBMS.
-
Purchase Windows 10 compatible hardware such as a tablet or other Windows device to host the Time Track App. A touch screen device is preferred although a mouse can be used.
-
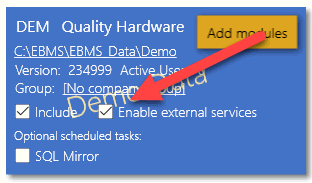
Time Track requires that the Enable external Services option for the EBMS data set is enabled. This setting is set within the EBMS Server Manager before continuing with the following steps. Review [Main] Server Manager > Enabling Access to Company Data for instructions to enable external services.
-
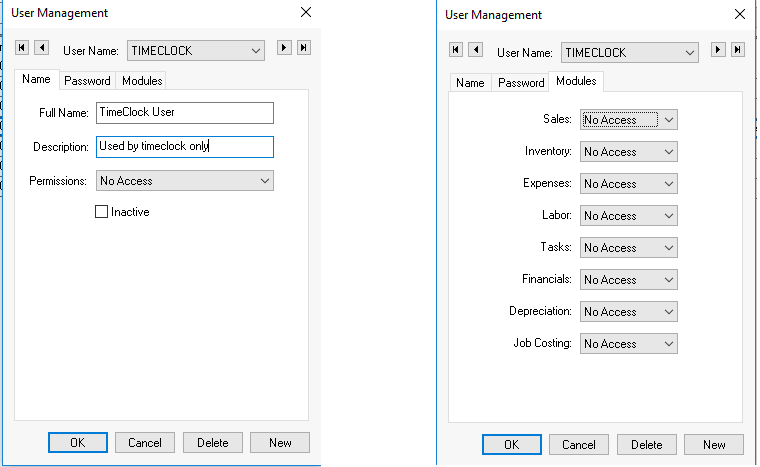
Create a generic EBMS user name Timeclock as shown below:
-
Set an appropriate password within the Password tab.
-
Set Permissions for all modules to No Access including the labor module. This user should only be used by the time clock so that any transactions created by the time clock are clearly logged.
-
Review File > User Management and create a new 'timeclock' EBMS user. More information can be found at [Main] Security > Creating Users and Assigning Rights.
-
-
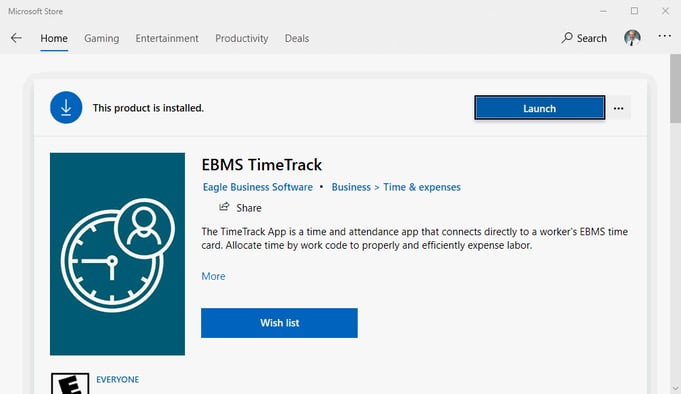
Download the EBMS Time Track App from the MS Windows Store for each MS Windows 10 device.
-
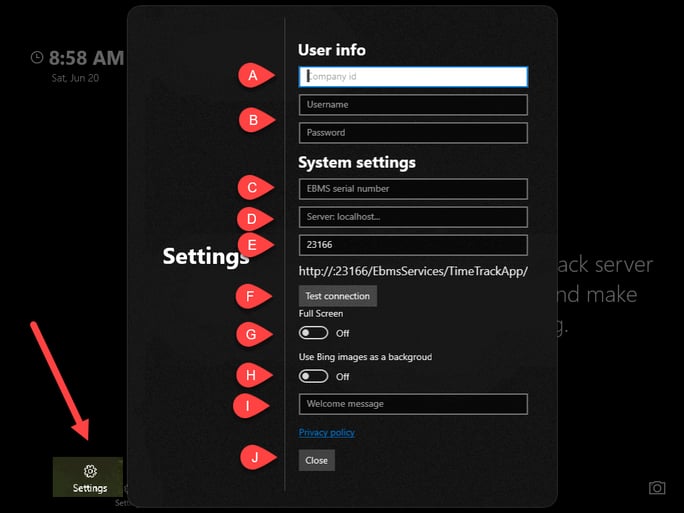
Launch the MS Store Time Track app and click Settings as shown below:
-
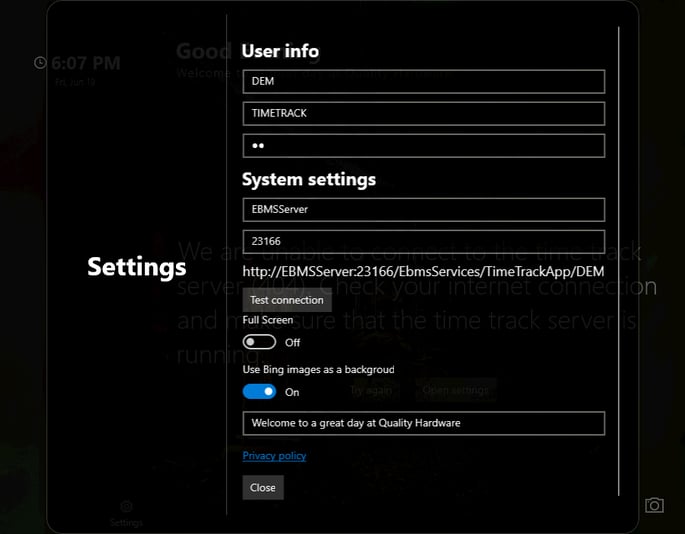
Enter the Time Track Configuration settings: Complete the following steps:
-
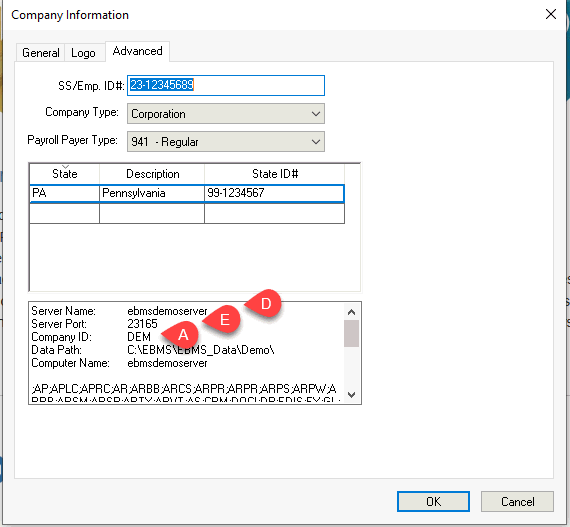
Always enter the Company ID for the appropriate data set as shown in the File > Company Information > Advanced as shown above or within the EBMS Server Manager. Review [Main] Server Manager > Enabling Access to Company Data to locate the 3 character Company ID.
-
Enter the Username and Password as configured in step #3.
-
-
Set the following Time Track configuration options and configure the options only if Time Track is located remotely and outside the local area network.
-
Enter the EBMS Serial Number found under the dialog or within the Advanced server settings dialog. The system uses the Azure Bus to connect outside of a LAN connection.
-
The Server computer name should be blank.
-
The Port Number should be blank.
-
-
Set the following if Time Track is connected to EBMS using a LAN or local network:
-
The EBMS Serial Number should be kept blank. This blank setting is important since the populated Serial Number setting will enable the Azure bus connection.
-
Set the server's computer name in this field. This name can be found within the server's operating system or can be found in as shown below:
-
Enter the Port Number as found in as shown above or within the EBMS Server Manager > Advanced tab.
-
Click the Test Connection button to determine if the connection between Time Track and EBMS is successful.
-
The Track App can be used in kiosk mode (the application is in full-screen mode, and the computer is locked down) by clicking on the Full Screen option. Disable this option if Time Track is used on a computer with other applications.
-
Enable Use Bing Images as a background option to add graphics from Microsoft Bing. Disable this option to keep the appearance basic.
-
Enter an optional welcome message that is displayed on the main time clock.
-
Click Close to exit the settings dialog.
-
-
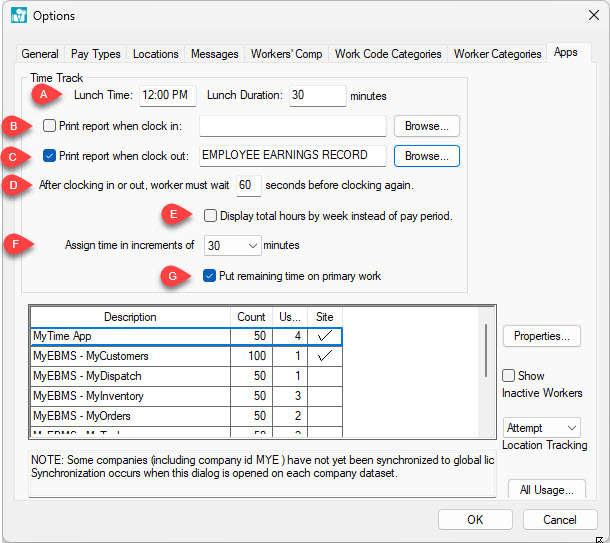
Configure the following settings within EBMS. Select to view the following settings:
-
Set the optional Lunch Time setting if the user wishes to select a Lunch Time on clock out, and set the Lunch Duration in minutes.
-
Enable the Print report when clock in option if a tag, label or report should print when a Worker clocks in. Select the report file by clicking Browse. Review [Main] Reports > Reports Menu for more information on identifying a report or adding a Custom Report.
-
Enable the Print report when clock out option to generate a tab, label, or report when a Worker clocks out.
-
Set the After clock in in or out, worker must wait __ seconds before clocking again setting to 60 to keep a user from inadvertently clocking in and out multiple times.
-
Enable the Display total hours by week instead of pay period option if the standard pay period is biweekly or monthly and the users prefer to view weekly hours. This option can be ignored for payroll periods that are weekly.
-
The Assign time in increments of __ minutes setting affects the way the clock out time sliders are configured.
-
Enable the Put remaining time on primary work option to require the system to calculate the timecard time to match the daily hours (clock in/out time) total.
-
Click OK to save.
-
-
Create applicable work codes to identify the labor recorded within the timecard lines. Review the Work Codes documentation for more information on creating work codes. This tool can also be used to record piecework work codes. Review Piecework Pay > Collecting Piecework Details using Time Track for instructions.
-
Configure the user settings within EBMS for each worker that will be using Time Track. Continue with User Configuration to configure users or workers.
-
Enable the Location setting within the MS Window's settings to display the Time Track weather for the current location.
