The Product Attributes option is an inventory feature that is used to group a significant number of items together based on one or more item attributes. An inventory group (category folder) may contain multiple items that are very similar but differ based on size, color, or style. Some examples:
-
Shelf or furniture - A company may contain a group of wooden shelf inventory items that vary based on the wood type, stain or color of the finish, and the length of the shelf. Since 5 different wood types are offered, in 8 different stains and 6 varying lengths, there may be up to 240 inventory items in EBMS to manage all the combinations of the selected shelf.
-
Clothing or shoes - A store sells shirts in a variety of sizes and colors. An inventory item is created for each item that is sold within the store. All of the item IDs within EBMS are grouped in a single folder.
The product attribute features allows the user to assign an inventory item ID (Sku#) to each combination of options. The optional component feature should be used if the user prefers to use a single common ID no matter which options are selected. Go to Optional Components for more details on optional components within a single inventory item.
Configure Products
All items within a specific folder should consist of the same attributes. Complete the following steps to create a group of items with the same attributes:
-
Create a folder group for the items. Review the Adding and Deleting Product Categories section of the inventory documentation for more details on creating category folder groups.
-
Set up the inventory defaults. The user can save a substantial amount of entry time if the inventory defaults are properly set up before items are created, since many of the items within the folder group contain the same information. Review the Changing Inventory Defaults section of the inventory documentation for more details.
-
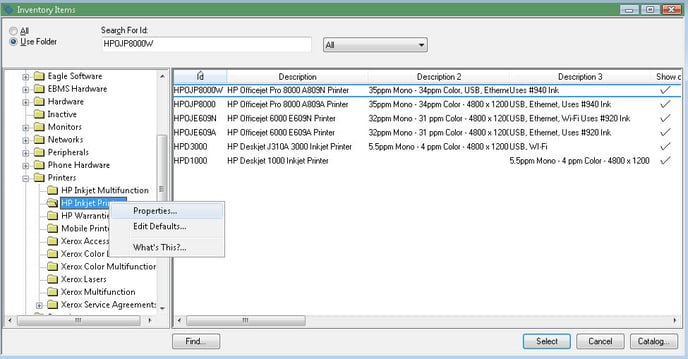
Open the inventory folder properties by right-clicking on a folder and selecting Properties from the context menu as shown below:
-
Click on the category properties Product Attributes tab as shown below. Note that the Product Attributes feature is an additional option in the E-commerce system. Contact your EBMS support representative for more details if EBMS does not display this option.
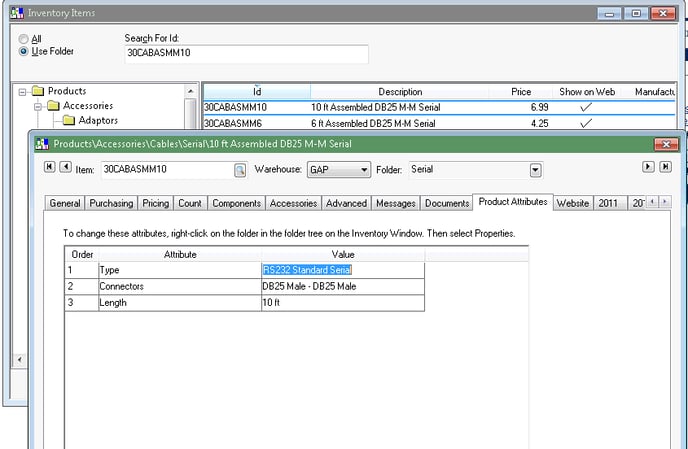
The Product Attributes tab of the folder identifies the attribute labels but does not define the options. Attribute options are set within the individual inventory items. All items within the folder should have common attributes. For example in the example shown above, all items within the selected folder include a Type, Connectors, and Length attributes.
The Default Inventory Item should reflect the most popular inventory item within the current folder. This item will default the attribute settings for the standard/productattributes1 and standard/product attributesconfig templates explained later in this section. Note that this setting is not used if the query list template is used (standard/productattrfilter).
Add attribute labels by clicking on the Add button. Enter the Attribute label.
Click the Change Order button to change the order of the Attribute options. The order of the attributes are important since the setting options may be restricted based on attributes settings with greater priority. The affect of the order is explained in more detail in the inventory attribute settings descriptions below.
It is important to enter all attribute labels before continuing with the attribute options within the inventory item.
Click OK to save the Product Attribute labels.
Entering Product Attribute Values
Product attribute options are set within each inventory item. Continue with the following steps for each item that is listed on the web.
-
From Inventory > Product Catalog, double-click on a product from the list that you wish to show on the web:
-
Set the Value for each attribute as shown above. Note that the attribute option values must be entered precisely with each item with the exact spelling and format as the option within another item within the same folder. Use the copy / paste function to populate the same option between multiple inventory items. Note that a slightly different spelling will cause the attribute Value to appear as an additional option.
-
Populate the Product Attribute Value for each inventory item before enabling the Show on Web option within the Website tab. Enable the Show on Web option for each item with the proper attribute settings
-
Reopen the category properties dialog after all inventory items are properly set. Right-click on the category folder and select Properties as described above. Click on the Website tab as shown below:

There are three standard templates that use the product attributes options. Note that custom configuration for a specific site may change the appearance or functionality of a template. The standard features are as follows: -
standard/productattributes1: This Template option should only be used when the combination of attribute options are unique for each item. This template should never be used if there are two or more items that contain the exact combination of attribute value. The inventory item is selected by the combination of attribute settings on the website requiring the combination to be unique to purchase the item. This template option also queries the options based on the settings listed above the current selection.
For example in the serial cable template used below, the Connectors option will only show the Connectors options that also have a Type of RS232 Standard Serial. The only Length options listed will be the items that contact a Type and Connectors setting that match the options above the Length option. Having the options limited to the attributes shown above the attribute being selected.
-
standard/productattributes2: This template appears the same was as standard/productattributes1 but the functionality is quite different. This template will list ALL options for a specific attribute such as length. This template should be used with caution since selecting a specific option (such as Length in the example above) could change an option above it (change Type or Connectors options). This template will appear the same as the standard/productattributes1 template if there is only one attribute label.
-
standard/productattributes3: this template appears and functions considerably different than the previous 2 options. The attribute settings function like a query option as shown below. The user can choose one or more attributes for the matching items to be listed below. Note that the product items will be shown after the selection narrows the list to less than the specified number (Standard = ). This template allows the attributes for items to be identical with one another rather than the unique requirement of the previous 2 templates. The following example displayed a list of items after the Type attribute was selected.
Note that the default product attribute options are set by the Default Inventory Item set on the folder at the same location as the attribute labels. The productattributes1 and productattributes2 templates use a default item. The system will select an item if the Default Inventory Item setting is blank.
Save the Website settings and give the software sufficient time to populate the new settings to the web. It is important to test the attribute options within the website to verify that the proper option list has been compiled from the folder's item list.
Note that attribute options will disappear if items are moved from a folder or made inactive. It is important to monitor folder changes for inventory items that contain attributes.