The optional components and accessories option within EBMS allows the user to attach multiple options to a specific assembly or item. An equipment dealer may have options available for the piece of equipment that is being sold. The list of components within an assembly may have a combination of standard features (components) as well as additional options (optional components). Options such as color may or may not affect the price of the entire kit. The pricing options for the assembly may be based on the total cost of individual components or the base price of each component.
Go into the product record Component tab and click on the New button on the right side of the page to connect optional items to the main product. Complete the following steps:
-
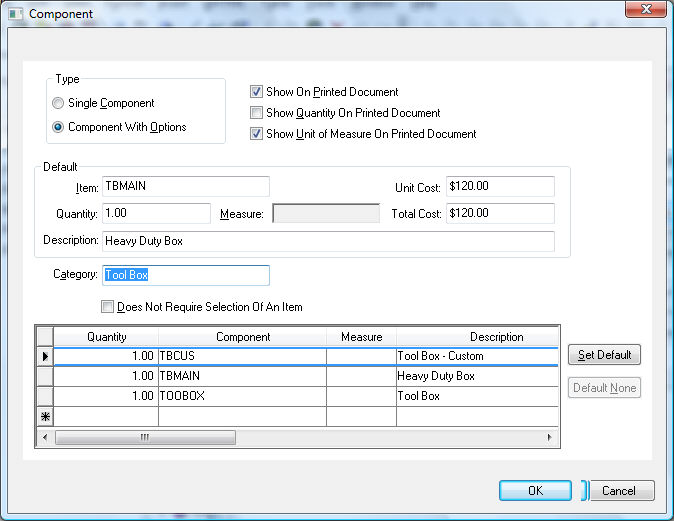
Find the Type section and select the Components with Options type on the top of the dialog as shown below:
- Decide what to component information to show on printed documents:
Enable the Show on Printed Document option to show the item description within a sales order or proposal.
Enable the Show Quantity on Printed Document option to display the quantity of items within the component list. Note that if the quantity of items on the component list is one, the quantity will not show even if this option is enabled.
Enable the Show Unit of Measure on Printed Document option to show the component's unit of measure setting. Note that these Show on Printed Document options do not apply to optional accessories since accessories are appended to the document rather than placed within a materials list.
-
Enter a Category label for the group of options. This label will be shown on the component list and also on the option dialog within the sales order.
-
Click the Does Not Require Selection of an Item option ON to allow the user to select none of the options. This option should be OFF to force the user to select an option.
-
Enter any pertinent information that falls outside description or other fields into the Note field. This field can be especially helpful for assembly instructions or option recommendations. Inventory Notes and Instructions for more details on the Note field.
-
List the optional components for the current category:
-
Enter the Quantity of the component option.
-
Enter the Component Product ID code and the unit of Measure setting. The Unit Price, Extended Cost, and Base Price will be populated from the inventory item.
-
Repeat these steps for each component or accessory option.
-
-
Click on the item that you wish to default within any option dialog and click on the Set Default button.
-
Click on the Default None button to set no default component options.
-
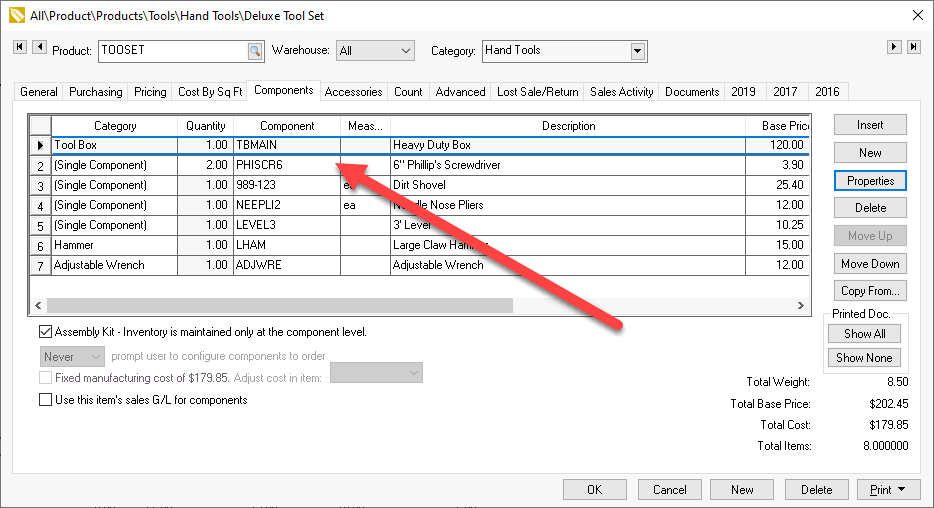
Repeat for any additional component or accessory groups. Click OK to save. (Note the Tool Box Category in the component list shown below.)
Optional Components are used extensively when using the kitting options within EBMS. This gives the user the ability to select customizations or options within the sales order based on the customer's preferences. There are two powerful kitting processes that use the optional components settings:
-
Configure-To-Order (CTO): This option should be used when the custom special order item is purchased as a complete unit rather than assembled by the user. Review the Overview of CTO Process section for more details on this process.
-
Made-to-Order (MTO): This option should be used to sell a kit that has been purchased as individual components and assembled rather than assembled by the vendor. Review the MTO Kitting Overview section for more details on this process.
Optional components can be associated with a product Attribute by using the optional product attribute module. Review the Product Attribute Overview section for more details.
Optional components can also be configured within an e-commerce website. Review E-Commerce > Optional Components for more details.
Continue with the following section to set the Option and Kit Pricing.