Markup or Margin
EBMS allows different price calculation using Margin or Markup percentages. Go to to set this option and the following window will open. Under Method to markup prices choose either Margin or Markup.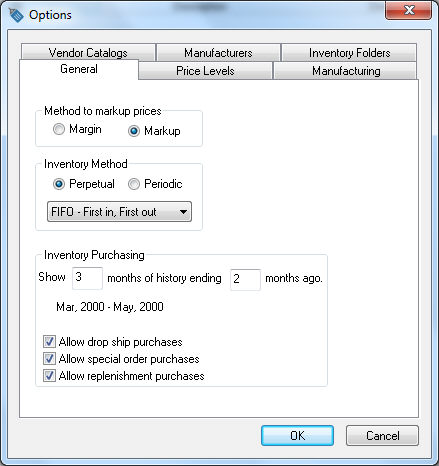
The Markup option is used only when inventory prices are calculated using the cost of an item or a base price, such as list price or vendor-supplied price.
The resulting calculated price will be different based on which option is chosen. For example, if a 50% Margin was added to a cost of $10.00, the price would be $20.00. If a 50% Markup was added to a cost of $10.00, the price would be $15.00.
Creating Price Levels
EBMS also allows multiple price levels when selling inventory items or services. The price levels facilitate multiple pricing options for each inventory item. A price level is associated with each customer to determine the default price within a sales order. Click on the Inventory > Options > Price Levels tab and the following window will appear: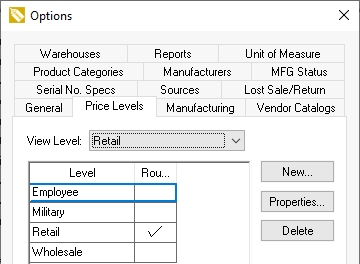
If you wish to record the retail, wholesale, and distributor price for each item, enter each new price level by clicking on the New button on the Price Levels tab.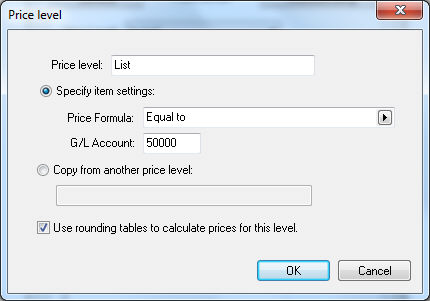
Enter a short Price Level description.
Select one of the formula options for the new Price Level:
- Click on the Specify item settings option and select a Price Formula that is used for all items within the inventory system. Note that these formulas can be changed for individual items or for entire folder groups after the price level is created. Enter correct G/L Account information.
- Click on the Copy from another price level option to copy the formulas from another price level.
Turn the Use rounding tables to calculate prices for this level switch ON to apply rounding to the sales price. Review the Rounding Calculated Prices section for more details on rounding prices. The recommended setting is ON.
Click the OK button to create a new price level.
Click Properties to change the price level description or click Delete to remove any price levels. If price levels are deleted, the associated prices for any inventory item will be deleted as well.
View Price Level
If you wish to show pricing on the main inventory lookup list as shown below, set the View Level to a desired price level. Go to Inventory > Options > Price Levels tab to check the View Level setting at the top of the page. Set the View Level as (none) if no pricing on the lookup list is desired.
For example, this Price column displayed in the Product Catalog tables is determined by the View Level field in the Price Level tab. In this case, the displayed price in this column is the retail price level, because that is the view level setting.

Price Level Defaults
Price levels can be set as default (standard) in inventory category folders so that new items added to that folder will have price levels already set up. EBMS allows price levels to have set units, G/L accounts, formulas, and prices. The most common use is formulas, as this allows the price paid for inventory items to be increased by the formula set according to different price levels. To see how this works, look at the following example:
A user adds a new inventory item to the tools category folder. The tools folder has set price levels of Retail and Wholesale. The retail price level has a formula of "Add 33%" and the wholesale price level has a formula of "Add 20%." The inventory item is purchased for $10.00 and has no markup. When this inventory item is sold using a Retail price level, the selling price will be $13.30. When this inventory item is sold using a Wholesale price level, the selling price will be $12.00. This will change if the base price of the item is not the same as the purchase price. The price level increase is on the base price. To establish a base price for an item, review the Pricing section.
To set default price levels for inventory category folders, take the following steps:
Go to Inventory > Options and click on the Product Categories tab. The following window will appear:

Note: The folders within this example window may differ from the folders names in your window.
Select the top-level folder (or any subfolder) and click the Edit Defaults button to open the inventory defaults window.
Click on the Pricing tab:
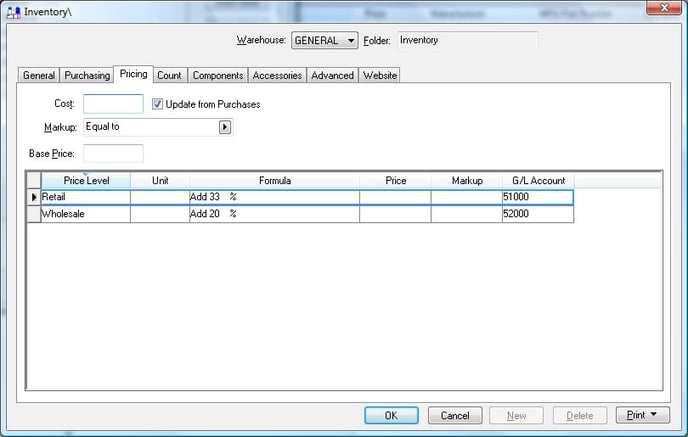
The default price formula should be set for each price level, which will become the default formula for each new item that is added to the selected category folder.