Adding Costs within a Serialized Item
Create cost batches, configure cost batch reports, and attach costs to a purchase order
EBMS allows the user to add parts, labor, or other costs to individual serialized items. For example, a serialized item that is purchased from a vendor or is a trade-in may need an additional part before the item is sold. The cost of any additional parts must be reduced from inventory and added to the cost of the serialized item. The total cost of inventory (parts or other perpetual items), labor, and other costs are recorded within the individual items to manage the serialized item.
Costs can be added to a serialized item using any of the following methods:
-
Add inventory products from stock.
-
Add non-inventory parts or labor that increases the value of the serialized item.
-
Add costs from a purchase order.
-
Add parts and labor from a task or work order.
Example Scenario: An equipment sales and service company may disassemble a used forklift to obtain parts to service a customer’s forklift. This trade-in forklift was disassembled for parts instead of being refurbished. Various component inventory counts need to be increased as the forklift is disassembled or consumed. The reverse manufacturing process is important to identify the forklift end as well as manage inventory for the resulting parts.
Adding Costs
Complete the following steps to add costs using any of these methods:
-
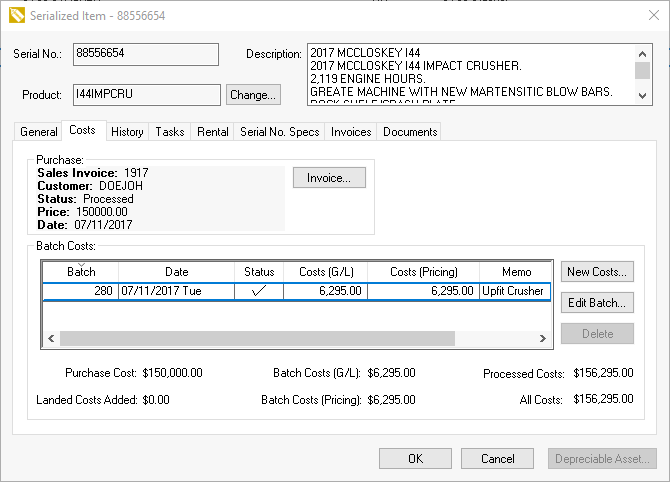
Go to Inventory > Serialized Items and double-click a serial number to open a Serialized Item record and click on the Costs tab as shown below:
-
The Serialized Item Costs tab displays the following costs for the serialized item:
-
Purchase Cost: This is the purchase cost of the serialized item derived from the expense invoice if the item was purchased or the manufactured value if the item was manufactured. The Vendor will display ($)ADJUST if the item was manually added or ($)MFG if the item was manufactured.
-
Landed Cost: This cost is added to the purchase cost to give a total cost including shipping or other process cost. Review Landed Costs Overview for more details on this advanced purchase cost feature.
-
The Batch Costs (G/L) value will be zero if the Only post Track Count Inventory Values to G/L option is enabled and the inventory item is not classified as Track Count or another perpetual inventory classification.
-
The Batch Costs (Pricing) amount will be copied from the perpetual cost of the inventory item and cannot be changed if the inventory item is classified as Track Count. The cost can be edited if the item is classified as No Count or Service. Review Only Post Track Count Inventory Values to General Ledger for details on the Cost (G/L) amount.
-
The Processed Costs total reflects the total costs that are processed through added cost batches.
-
The All Costs total reflects all costs associated with the item, even if the costs have not been processed by clicking on the Process button of the added cost batch.
-
-
Additional costs are added to an item in batches. Click on the New Costs button on the right side of the Serialized Item Costs tab to create a new batch of costs.
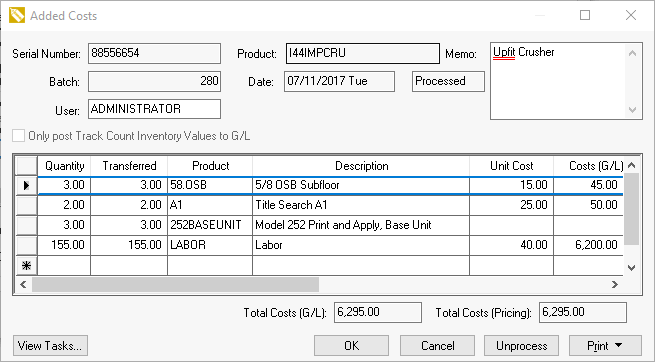
The Batch number is automatically incremented unless the user manually enters a batch number. The Next Batch Number can be set up in the Inventory > Options > Manufacturing tab. -
Enter the Date that the batch of costs should be added to the inventory item.
-
Verify the User name. The User defaults to the login user. This value can be set to identify the individual responsible for posting the costs to the item.
-
Disable (uncheck) the Only post Track Count Inventory Values to G/L option. Review Only Post Track Count Inventory Values to General Ledger for details on this option.
-
Enter miscellaneous information within the Memo field.
-
Enter cost details into the table.
-
Enter the quantity of items added in both the Quantity and Transferred columns. The only advantage of entering a Quantity amount and not entering a Transferred amount is if you wish to allocate some inventory, but the inventory has not been added at the time of the entry. The Quantity and Transferred fields are processed in a similar way as the Ordered and Shipped fields within the sales invoice. The quantity affects the Net Ordered amount within the product record Count tab, but it is not subtracted from the total inventory On Hand amount.
-
Enter the Product and unit of Measure columns. The Description will be populated from the product record.
Repeat the steps listed above for each inventory item that you wish to add to the registered whole goods.
Click on the OK button to save the batch of costs without processing the batch.
Click on the Process button to process the cost batch and apply the listed costs to the serialized item.
The Task and Work Order module within EBMS can be used to apply the costs to a serialized item. This option is useful when processing a worker order for equipment or vehicles that are being resold. Review Linking Tasks to a Serialized Item for instructions on this powerful tool for trade-in equipment, up-fitters, or other serialized items that are sold after the work order is processed.
Added Costs Report
The recommended method to list the Added Cost Batch Details is to generate a report. Complete the following steps to generate the added cost information:
-
Go to Inventory > Serialized Items and double-click a serial number to open a Serialized Item record.
-
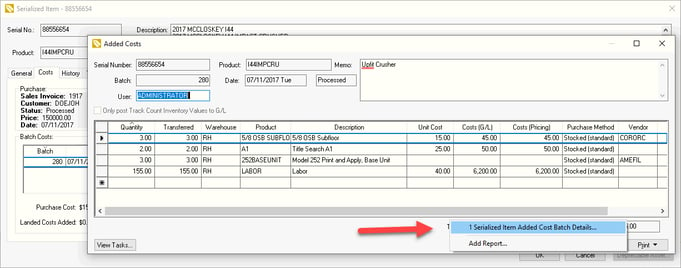
Go to the Costs tab for the serialized item and click the New Costs button on the right-hand side to open the Added Costs dialog as shown below:
-
From the Print button in the lower right-hand corner, select Serialized Item Added Cost Batch Details as shown above. (Many of the report option prompts shown below will be default settings when launched from the Print button.)

This report can also be found by going to File > Reports > Inventory > Serialized Items > Serialized Item Added Cost Batch Details. -
From the report options, select a Range of Added Cost Batch Numbers or select a single batch by launching the report from the batch's print button. Review Print Buttons and Menus for instructions to a print button.
-
Enter an optional Serial Number: Leave this entry blank to list all added cost batches rather than limiting the list to a single serial number.
-
Enter a Serialized Product to limit the list to a group of serial numbers with the selected inventory ID. Keep this setting blank to list all items.
-
Select a Batch Status:
-
All (include all cost batches)
-
Unprocessed (include only cost batches that have not yet been processed)
-
Processed (include only cost batches that have already been processed)
-
-
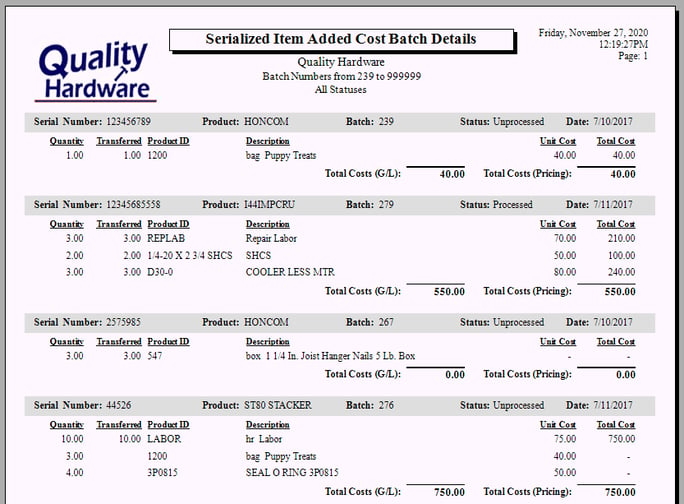
Set other optional report settings and click Print Preview to generate the following report:
Attaching Costs to a Purchase Order
Complete the following steps to create a purchase order from the Added Cost batch as shown below:
- From Inventory > Serialized Items, double-click to select a serial number and open a Serialized Item record.
- Go to the Costs tab and click the New Costs button on the right side of the page.
- Create a new added cost batch from the Added Costs dialog and enter the information as described in the steps listed above.
- Enter a special order Product code and set the appropriate Purchase Method as shown below. (In this example, the selected Purchase Method is Associated.)

- Enter a detailed Description that will be copied to the purchase order.
- Enter a Vendor ID to identify the purchasing vendor.
- Right-click on the line and select Create Order: Purchase Order from the context menu to create the purchase order. (See image below.)
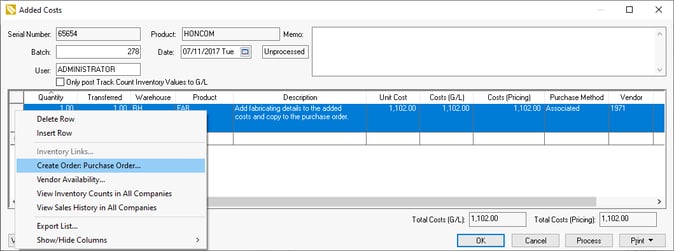
- Create purchase orders for additional lines within the same batch if desired.
Review Purchasing Special Orders for more details on this powerful special order process that creates purchase orders from Added Cost Batches, sales orders, and manufacturing batches.
Attach a Task or Work Order to Add Costs
Parts and labor costs can be added to a serialized item's added cost batch by attaching a task to the batch. Review Linking Tasks to a Serialized Item for instructions to use tasks to create an Added Cost Batch. This is helpful for attaching new parts and maintenance service tasks to a vehicle or other equipment.
Process Transactions
The process procedure creates the following General Ledger transactions:
| Debit | Credit | Amount |
| Inventory Asset Account (Serialized Item) | Inventory Variance (Serialized Item) | Total Cost (G/L) |
| Inventory Variance Account of each detail item |
If the Cost (G/L) value is not zero (Track Count items) then credit the Inventory Asset G/L account. If the Cost (G/L) is zero (No Count Items) then credit the Manufacturing Offset G/L account listed on the item's Advanced tab. |
Cost (Pricing) of each line |
Unprocess or Void Added Cost Batch
Complete the following steps to unprocess or void a cost batch:
-
Select a cost batch from the Cost tab of the serialized item record.
-
Click on the Edit Batch button to open the cost batch.
-
Click on the Unprocess button to reverse the cost transactions.