Select the Scanner app within MyEBMS and select Warehouse transfer as shown below:
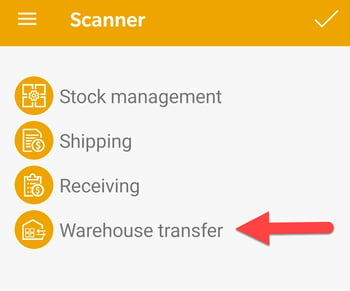
The Warehouse transfer mode is used to move product from one location to another. A location may include a store, vehicle such as a service or supply truck, or a warehouse. A transfer ticket barcode can be scanned to open a ticket.
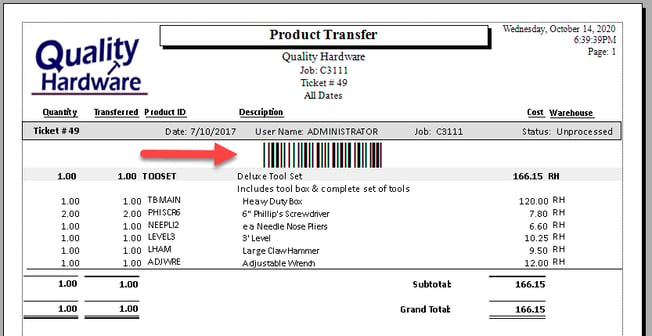
Scan or enter a sales order number and tap the Open order icon ![]() to open an existing order. Tap the camera button
to open an existing order. Tap the camera button ![]() on the title bar to scan a barcode using the device's camera.
on the title bar to scan a barcode using the device's camera.

Tap the Create new plus sign icon ![]() to create a new warehouse ticket.
to create a new warehouse ticket.
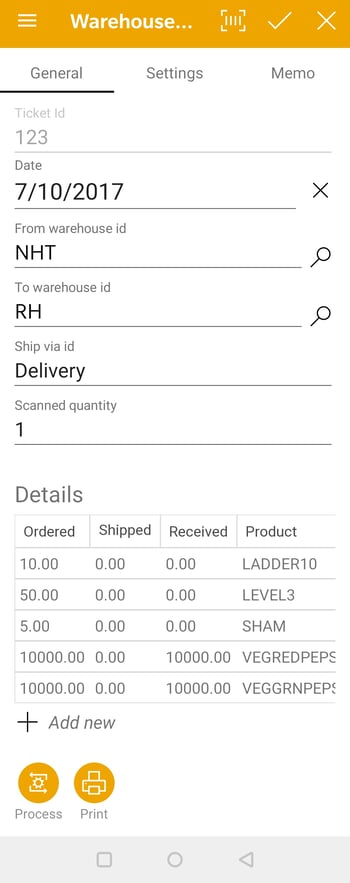
Set the Date used within the inventory transfer ticket.
Verify the source location (From Warehouse ID) and the target location (To Warehouse ID) of this product transfer ticket. The default settings of these twin warehouse settings are set within the Settings option as shown below.
Set the appropriate shipping method within the Ship Via setting that reflects the shipping mode for the product.
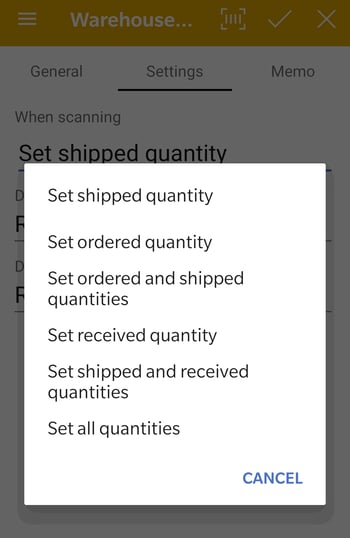
Product can be scanned to entered into a transfer ticket by scanning a UPC code or a printed label. The quantity can be incremented by subsequent barcode scans or by adjusting the quantity. The quantities that are increased by this scanning action are determined by the user-basedSettings shown below:
-
Set ordered and shipped quantity: Use this option at the shipping location in conjunction with E at the receiving location.
-
Set ordered quantity: Use this option at the shipping location in conjunction with D at the receiving location or by using the 3-step process described below.
-
Set shipped quantity: Use this option only for existing transfer tickets in a 3-step process described below.
-
Set shipped and received quantity: Use this option at the receiving location when B was used at the shipping location.
-
Set received quantity: Use this option at the receiving location when A was used at the shipping location or if the 3-step process described below is being used.
-
Set all quantities: Always use this option for the 1-step process described below.
Use the following settings based on the product transfer role and process used this warehouse transfer:
-
3-step process: The user that configures the MyInventory > Scanner > Warehouse Transfer > Settings with the F option listed above.
-
2-step process: The shipper at the original warehouse should use either the A or B option listed above, the receiver should use D (if the shipper used option A) or E If the shipper used option B.
-
1-step process: The user should always use the F option listed above.
These settings are user-based setting. Review Manage and Increment Counts using a Barcode Scanner within EBMS for default settings.
Tap Memo and dictate any notes into the inventory transfer > Memo within EBMS.
Tap the Add new plus sign icon ![]() to add new products to the order.
to add new products to the order.
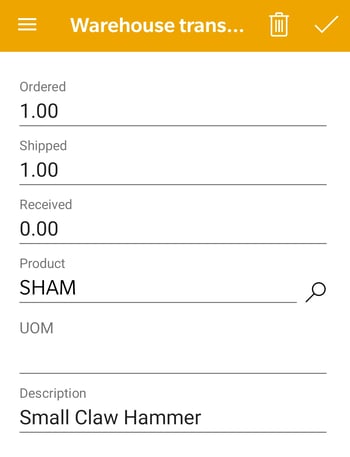
Enter Product IDs or scan the product barcode as well as adjust the Ordered, Shipped, and Received quantities. Tap the save icon ![]() to add these items and return to the inventory transfer list.
to add these items and return to the inventory transfer list.
Tap Process to process the transfer ticket.
Tap Print to print the transfer ticket. This option will print the report that has been set in EBMS for the scanner. Review Configuring the MyInventory Scanner in EBMS for instructions to set up the report.
Review Transferring Inventory Between Warehouses to view this document within the EBMS software.