Sick and leave pay is a benefit pay that is configured within EBMS. This section will use sick pay and leave pay types as examples of benefit pay options within the labor module, but the software is not limited to these benefit pay types. Review the parameters of these benefit types with a Koble Systems consultant or account manager to verify that rates, minimums, and the amount of benefit pay hours are properly configured.
Complete the following steps to configure sick pay within the EBMS labor module:
elect the sick pay benefit type from the list and click Properties to edit or view the settings. In the example below, the Description is Sick, the Base is Hour, and the pay Type is Benefit. 
Click on the New button to create a Sick pay type if it does not already exist. Select Properties to review Sick Pay settings as shown below:

Compare the Sick pay settings to the settings shown above if a Sick benefit pay type already exists. Review Pay Types for more instructions in adding or changing a pay type.
Complete the following steps to add this new pay type to a group of workers. (Skip this step and continue to the next step to add a sick pay type to individual employee records.)
Select Labor > Workers from the main EBMS menu.
Right-click on the root category folder that contains the list of employees that require the new pay type. Note: Do not include subcontractors or any other non-employees that do not receive sick pay. If the top-level category (for example, the Workers folder shown below) includes workers that will not receive sick pay, select a more specific category folder or subfolder to edit.
Select Edit Defaults from the context menu. (In the example above, clicking Edit Defaults will open default settings for the Clerical worker category, because it is highlighted. If the top-level Workers category was highlighted, clicking Edit Defaults would open the default settings for all worker records.)
When the worker category defaults open, go to the Pay tab and click on the New Rate button if the Sick Pay Type does not already exist on the Pay Rates pay list. The following dialog will open: 
- Select Sick as the Pay Type.
- Enter the Work Code that will direct sick pay costs to the worker Benefit General Ledger account.
- Enable the Active switch to make the Sick Pay Type default for all workers. Disable this option to require each employee to enable the Sick Pay Type individually.
- Set the Rate Formula to set the worker's hourly rate for sick pay. Use the Equal to option to set the rate to equal the employee's hourly rate as shown above. A user can also use a rate formula to set sick pay as a percentage of the standard hourly rate. For example, if sick pay is set as 2/3 of the average hourly rate, the rate formula can be set as Is 67% by selecting Is _% from the dropdown list and typing in 67 to complete the formula.

- Enter the total Sick hours available in the This Calendar Year field in the Hours Available section. For example, enter 80 if there is a 2-week maximum available for sick time for the current year. [8 hours per day * 10 business days = 80 hours]
- Click OK to save all default changes for the selected worker category.
Filter down the Sick Pay Pay Type to all employees by completing the following steps:
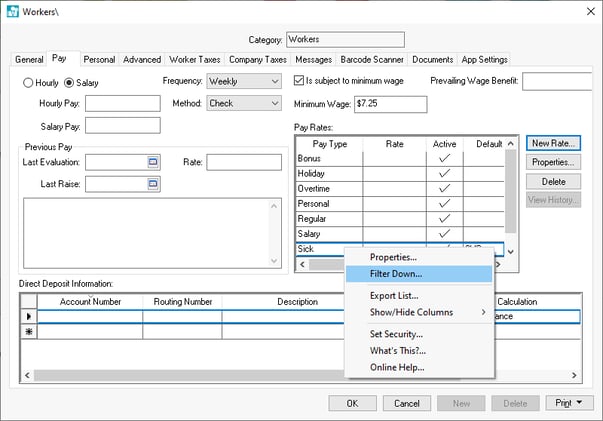
Select the Sick Pay Type from the Worker Category Defaults Pay tab as shown above.
Right-click on the Sick Pay Type and select Filter Down from the context menu.
- Enable Check this box to change existing data along with the folder defaults to change all existing employees within the select worker catalog. Use this option with caution, because it will overwrite any pay rate settings that already exist within the category.
- Enable Check this box to include all sub-folders within this folder to include all sub-folders within the selected root category folder. Review Change Defaults, Filter Down Data and Globally Change Data for more details on filter down options.
Click OK to set new defaults and filter down the Sick pay type to all workers within the selected category.
Additional Sick Pay Verification and Actions
- Review the individual worker records to verify that the Sick Pay Type is listed along with the proper pay rate for each worker. Complete the steps above to add the Sick pay Pay Type to individual worker records.
- Verify that the Sick pay rate is calculated for the worker. Review the worker record Pay tab section of Changing Worker Information for more details on setting or changing worker pay information.
- Enter the Sick pay into the timecard to pay the employee for actual sick pay. Review Entering Timecards to add sick pay to a timecard.
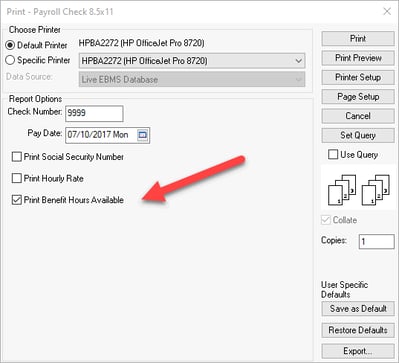
- The payroll check stub will list the Sick Pay Type if any sick pay was paid for that payroll period, or if the Print Benefit Hours Available option is enabled on the check form prompt as shown below:
Leave Pay
Follow the steps listed above to create a Leave pay type similar to the Sick pay type.
Create a unique Leave Pay Type by going to Labor > Labor Options > Pay Types tab by clicking New and creating a new benefit type with a Leave description.
If a leave pay type already exists in the Pay Types list, select the description from the list and click Properties to view or edit the settings.
Insert the new or edited benefit pay type for Leave pay into a group of worker records by using the Edit Defaults settings and then Filtering Down the pay type as described in the steps above.
Related Videos and Content
Videos
ERSL Sick Pay ERP Support Training