The rental system requires two sets of rental inventory codes:
-
Rental service codes - These inventory items are used with a rental contract. Grouping these codes properly will enhance the user's ability to locate available equipment. The rental service items record the rental pricing and the general ledger codes for rental income.
-
Equipment inventory codes - These inventory items are used to record the purchase of the equipment and the eventual sale of the rental equipment. These codes will NOT be used within the rental contract. The serial numbers of individual equipment are associated with the Equipment inventory codes.
Creating separate folders for rental service codes and the rental equipment inventory is an important step in simplifying the process of creating rental service codes to invoice the rental and inventory items that contain the equipment value. Complete the following steps to create the folders and set up default settings such as rental pricing periods, general ledger codes, and other rental specific settings.
Creating Folders
Complete the following steps to create inventory folders for the two sets of rental codes:
-
Select the Inventory > Options from the EBMS menu.
-
Click on the Product Categories tab as shown below.

-
The rental service codes and the rental equipment may be placed in a rental folder as shown above. The two folders could also be placed in different locations within the inventory item structure if desired. Continue with the folder configuration for both the rental service and rental equipment folders.
Rental Service Folder Defaults
Completed the following steps to configure the product categories for rental service codes:
-
Create a Rental Services folder in the Inventory > Options > Product Categories as shown above.
-
Highlight the Rental Services folder and click on the Edit Defaults button to set the following details for a service code:

-
The Classification setting should be set to Rental Code. Click on the Change button to change the Classification as shown above. Note: If the optional Rental module is not installed, this classification option will not be available.
-
Enable the Taxable option if rental services are taxable.
-
Click on the Count tab to create the standard Unit of Measure settings:
-
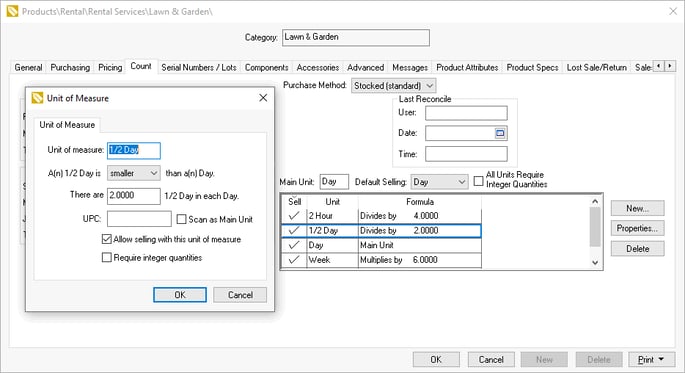
Enter Day into the Main Unit entry. (Note that the Main Unit of measure entry must be set as day.) Click on the New button to the right of the table and enter the standard unit of measure for each rental period option. The unit of measure options can be ignored within the default settings and entered into each item individually if the rental periods (unit of measure) vary greatly. The following examples may be applicable for rental service items:
The other entries within the Count tab should be kept blank, because none of the other fields need to be rental default settings.Unit of Measure Smaller / Larger Divisor / Multiplier of the main UOM (Day) 2 Hour Smaller Hours in Day / 2
Hours in Day column is found within the business hours table in Rental > Options > General tab.
Example: If the Hours in Day setting is 10, the divisor is 5.
1/2 Day Smaller 2 Week Larger 6 (This multiplier affects history. Each time the item is rented for a week, the total rentals on history tabs will be incremented by this number.) Month Larger 25 (See note above) -
Click on the default Advanced tab and set the General Ledger codes if all rental income is posted to the same G/L account. (Note: If G/L accounts vary between rentals, do not set defaults on this page.)
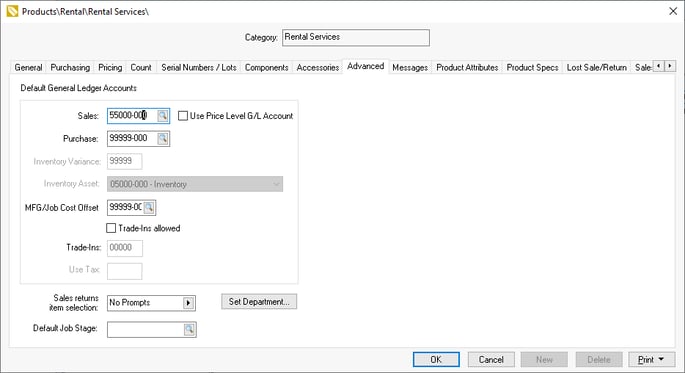
-
Disable the Use Price Level G/L Account option and enter the rental income General Ledger account into the Sales account. The Purchase and Inventory Variance General Ledger codes can be ignored under normal circumstances. Review the Changing Inventory Defaults section of the Inventory documentation for more details on the Advanced tab settings.
-
Click on the default Pricing tab as shown below:
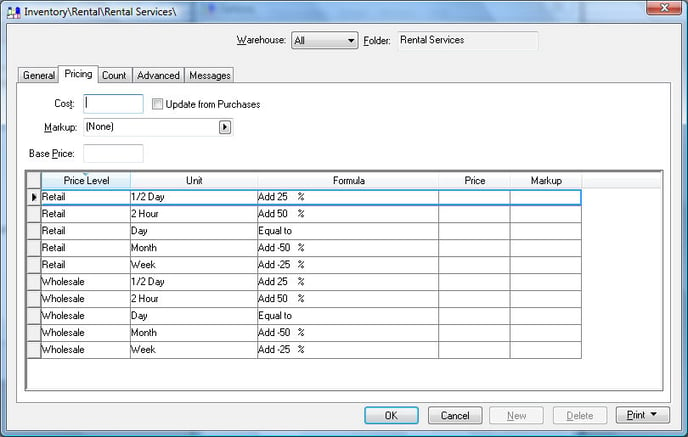
-
The Markup/Margin setting should be set to the (None) option so Base Price can manually be set within the item.
-
Set the pricing Formulas accordingly. Review the Creating Rental Service Codes section for more details on pricing. All the Cost and Prices should be kept blank within the default setting dialog.
-
Save the defaults for the Rental Services folder and return to the Product Categories tab of Sales > Options by clicking on the OK button. Review the Creating Rental Service Codes section for steps in creating the rental service codes.
Equipment Inventory Folder Defaults
Create a folder for rental equipment. This folder will contain the equipment purchased for rental. These codes are not used within a rental contract but are used when the equipment is purchased or sold.
Complete the following steps to configure the default settings for the rental equipment folder:
-
Create a rental equipment folder in Inventory > Options > Product Categories tab and complete the following steps to enter the equipment item defaults:

-
Highlight the Rental Equipment folder and click on the Edit Defaults button to open the folder defaults. Select the General tab.

-
Click on the Change button to set the default Classification for the rental equipment folder to Non-inventory Serialized Items. Review the Entering Rental Equipment section for more details on classification options.
-
Click on the default Advanced tab for the folder and set the following defaults:
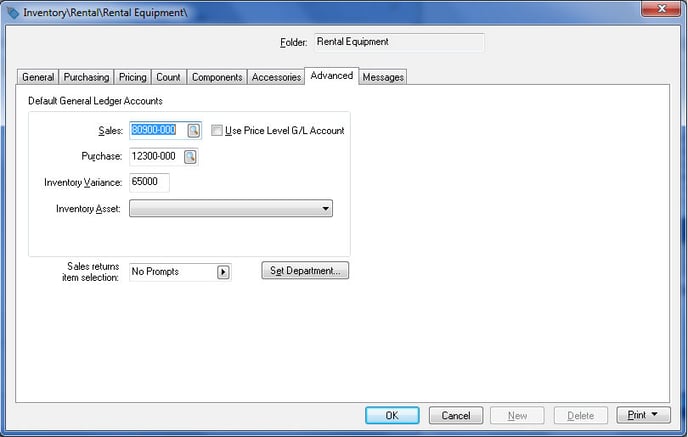
-
The Sales General Ledger account should be set to the G/L account classified as Sale of Assets.
-
The Purchase General Ledger account should be set to the rental equipment asset G/L account. This account will be found under Assets > Fixed Assets within the Chart of Accounts instead of the purchase section. Review the depreciation documentation for more details on the depreciable asset G/L accounts.
-
The Inventory Variance, Inventory Asset, and the Sales returns item selection accounts can be left blank for the default page.
Review the Changing Inventory Defaults section within the Inventory documentation for more details on the inventory defaults.