The E-commerce system allows the user to list items on multiple websites. There are three main ways this can be accomplished:
-
Use a single EBMS data set for each site by using separate company data sets. This method is generally used if invoicing, customer accounts, shopping cart info, and/or General Ledger transaction reporting for each site should be recorded separately. Inventory items are maintained on two separate lists. Review Creating a New Company Data Set in the main EBMS documentation for information on setting up multiple companies on EBMS Server Manager and the pros and cons of keeping the data sets separate.
-
Use a subfolder in a common data set to list separate items for different sites. This method is used if inventory items are maintained from the same list and company, but the inventory items do not overlap.
-
Set up multiple websites in EBMS by completing the following steps:
Set up multiple websites
Website 1: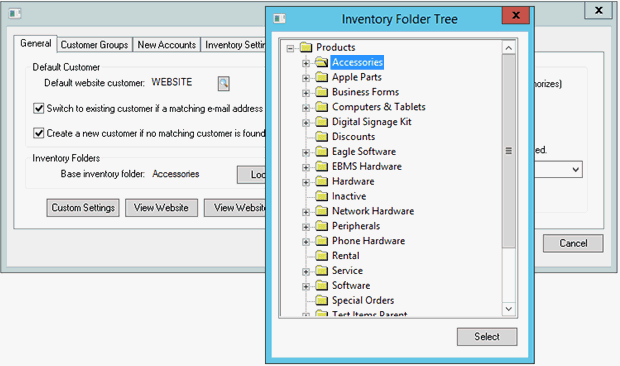
Website 2: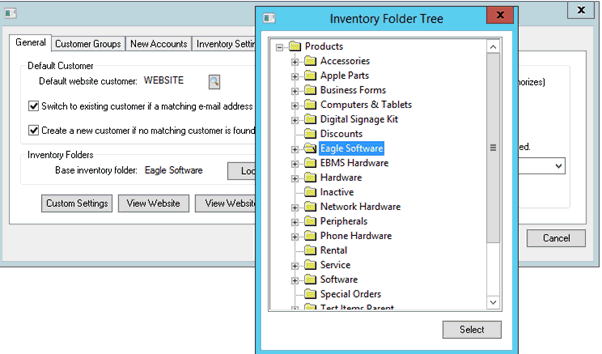
Open the Run window on your computer.
Change the end of the following command to your website name: ebms:dbscript?command=NewWebsite&[put your site name here].
Example: ebms:dbscript?command=NewWebsite&EshComputer.com
Run the command from the Run window. This command creates an additional website record. All groups, logins, and custom settings are copied from the first website record.
-
Go to Sales > Web > Website1.com
-
Set the Base inventory folder.
-
Repeat the above two steps for Website2.com using the same base inventory folder.
-
Set up the primary customer group for each website. Review the E-Commerce Customer Groups section for more information.
-
Go to Sales > Web > Website1.com > Customer Groups > Primary > Properties > Filter inventory by query button.

-
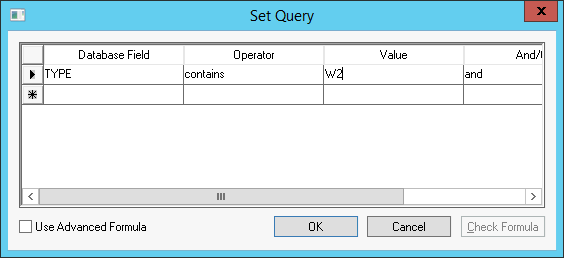
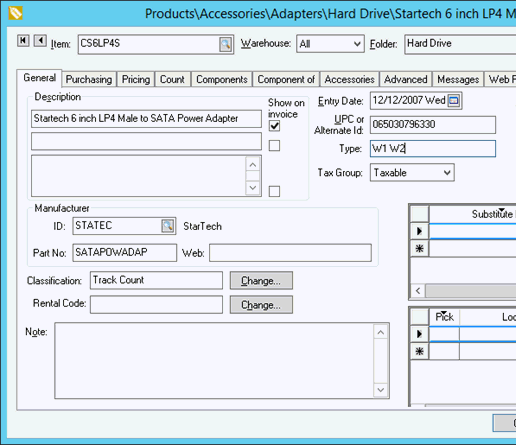
Set the Database Field to TYPE and Operator to "contains" as shown below. Enter the identifying code (example: W1 for items to be shown on Website1.com) in the Value column.
-
Click the OK button to save the query. Review the Set Query Options section of the main EBMS documentation for more details on creating queries.
-
Repeat the above steps for Website2.com as shown below:
Filter down the short identifier (example: W1 for website1.com and W2 for website2.com) in the Type field of the inventory group for a folder or group of folders. Each item can be set individually as well. Review the Edit Defaults, Filter Down Data and Globally Change Data section within the main EBMS documentation for more details on filtering down data.
Inventory Items that contain a Type of W1 will be shown on the website customer group with that query. Inventory items that contain a Type of W2 will be shown on the website customer group with that query.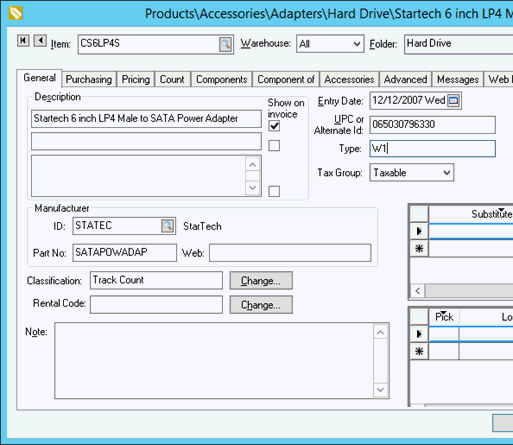
If items should be shown on both websites, a query with both query Values can be used since the query Operator is set as "contains".
-
-
Open the Run window on your computer.
-
Change the end of the following command to your website name: ebms:dbscript?command=NewWebsite&[put your site name here].
Example: ebms:dbscript?command=NewWebsite&EshComputer.com
-
Run the command from the Run window. This command creates an additional website record. All login groups, logins, and custom settings are copied from the first website record.
-
Go to Sales > Web > Website1.com and set the Base Inventory Folder to the root folder for the products to be listed.
-
Repeat for the second website, using a different root folder for products to be listed.
-
Continue with the setup of each website as detailed in the section Setting Up the E-commerce Module.
-
Use the inventory query within the website settings to list inventory items on multiple sites. This method is used to list items within the same inventory list on multiple sites. This option allows the user to include specific products when connecting to multiple sites.
-