The MS Windows Task Scheduler App is a MS Windows application that EBMS uses to automate some recurring processes that are not supported by the Timed Events tool found in File > System Options > Timed Events tab. Review Timed Events for details on this EBMS tool, which is the preferred method to create many recurring EBMS functions, such as emailing documents.
The Task Scheduler App does use an EBMS concurrent license during the period when the process is launched. Schedule automated processes during off hours to reduce the possibility of limited licenses. Review User License Allocation for additional license details.
Complete the following steps to setup a scheduled recurring process:
-
Open the Task Scheduler app in Windows 10.
-
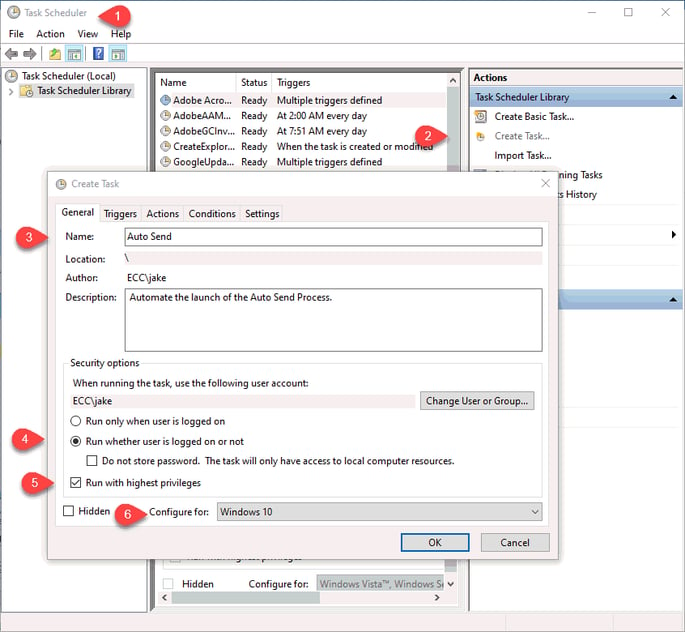
From the header menu, go to Action > Create Task to open the following dialog:
-
Enter a process Name into Task Scheduler to identify the process.
-
Select the Run whether user is logged on or not option as shown above.
-
Enable the Run with highest privileges option.
-
Set the Configure for to match the operating system of the device. The recommended device is on the server.
-
Click on the Triggers tab of the dialog.
-
Click New to create a New Trigger schedule as shown below:
-
Set the Begin the task option On a schedule.
-
Set the schedule Settings based on the activity. Set this option to Daily for many processes including those that regularly check for information. Select Weekly or Monthly for less frequent processes such as emailing statements or reports.
-
Schedule the Start time sometime during non-business hours so these processes do not affect EBMS business processes.
-
Enable the Repeat task every: _________ setting for a duration of: 1 Day for processes that need to be activated more than once a day. Use Repeat task every: 15 minutes for a duration of: 1 Day to convert files or other frequent processes that require immediate action as soon as the data is available. Disable this option if a daily, weekly, or monthly process is sufficient.
-
Enable the Stop task if it runs longer than: 30 minutes. Increase this time for lengthy processes.
-
Turn the Enabled option ON and click OK.
-
Click on the Actions tab and click New to open the Edit Action dialog as shown below:
-
Set the Start a Program Action.
-
Enter the EBMS software file (EBMS.EXE).
-
Copy the URL based on the following type of EBMS function that is being automated:
-
Auto Send: The URL is found in the and select an auto send mode. The URL is found at the bottom of the . Review Auto Send Overview and select the document you wish to send via Task Scheduler.
-
Text Import/Export Utility: The URL is found in and open a mappings record. Select one of the 3 available URL settings at the bottom of the dialog. Review Data Import and Export Utility Overview for details.
-
Recurring billing: The URL is found on the bottom of the dialog.
-
Keystone Inventory Update: The URL is found in tab. Click Keystone Inventory Update Options at the bottom of the dialog. Review Keystone Interface Setup for more details on the setup settings including the URL.
-
-
Edit the URL copied from the URL field in the dialogs listed in the previous step. The URL will appear similar to "/URL:"ebms:dbscript?command=[script name]&ServerName=[server name]&CompanyId=[COM]&UserName=[user]&Password=[password]&ShowUI=false&ConnectExisting=false". (This is a sample URL, so do not use this text. Use the text copied from the appropriate URL field.)
NOTE: The maximum length for a Task Scheduler password is 10 characters, so if the user's EBMS password is longer than 10 characters, it may cause Task Scheduler login issues.
-
Replace [COM] with the 3-digit Company ID code used to identify the data set in EBMS Server Manager. Review Enabling Access to Company Data for steps to access this company ID.
-
Replace the [user] and [password] with a user name and password that has advanced entry or higher permissions in inventory. Review Creating Users and Assigning Rights for user name and password setting instructions.
-
Enter edited URL into the Add arguments entry.
-
-
Enter the EBMS software (EBMS.EXE) file location such as C:\Program Files (x86)\EBMS\ in the Start in entry. Click OK to save the New Action.
-
Configure any Conditions settings. The default Conditions settings should be satisfactory.
-
Configure Settings for this action. The default Conditions settings should be satisfactory.
Repeat these steps to automate multiple EBMS tasks.
Review Timed Events for details on the recommended EBMS tool for many recurring EBMS functions, such as emailing documents.