EBMS contains a variety of standard forms that are created using Crystal Reports. These forms can be altered or customized using Crystal Reports if the standard options do not meet the needs of the company. Review Crystal Reports Interface Overview for more details on report customizing.
Many of the form options are listed in the report menu: File > Reports. Note that the Expenses, Sales, Payroll, and other report groups contain a sub-folder with form options.

Often report margins need to be adjusted to fit a preprinted form. Open the report's Print dialog and click on the Page Setup button as shown below:
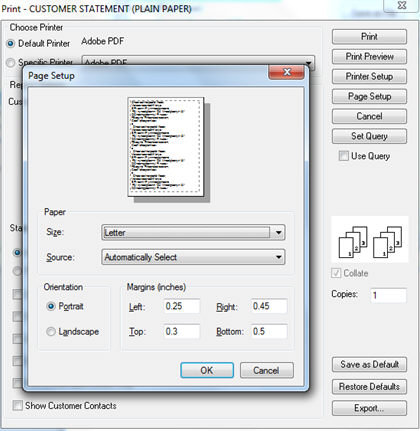
Adjust the Margin (inches) settings to move the margin to fit the preprinted form. Click OK to save the margin settings. Click on the Save as Default button on the Print dialog to save the margins for future times the form is printed. Note that the margin adjustments are saved on the local computer and will need to be adjusted for each computer or profile used to print the form.
Configuring the Expense and Payroll Check Form.
The appropriate check form must be set up before checks are printed for the first time. Complete the following steps to setup various check forms:
- Go to the Expenses > Bank Accounts window and double-click on a checking account in the list. In the checking account record, select the Reports tab.
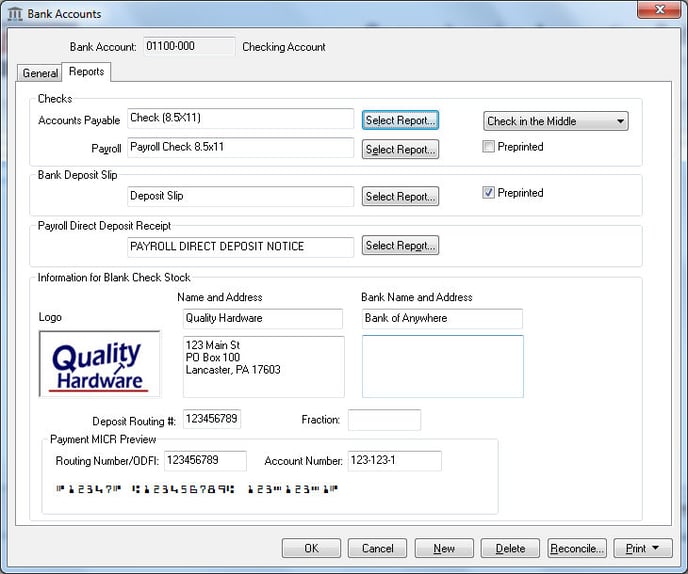
- The Accounts Payable Check Report and Payroll Check Report settings must be set for each applicable bank account. These settings can be left blank for accounts without bank checks.
-
Click on Select Report buttons to define the proper check that you wish to use for this checking account. The check report must match the check stock paper for the specific bank account. (You can ignore the Payroll Check Report setting if this account is not used to general payroll checks or receipts.)
-
Select either the Check on Top or Check in the Middle check position settings. This is an important setting to make sure the check position is correct.

-
Enable the Preprinted option if the checks are preprinted. Review the Printing Checks and other Forms on Plain Security Paper for details on how to set up information for Plain Paper Forms. Review the Changing Bank Account Information section for details on how to change bank account settings.

-
Click OK to save the bank information.
-
-
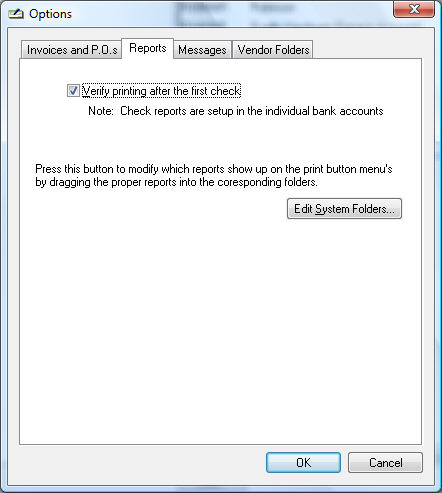
Complete the following step to prompt the user to verify that the first check printed properly. Go to the Expenses > Options menu. Select the Reports tab as shown below:
-
Enable the Verify printing after the first check option to have a message box appear after a check is printed to verify the check is correct. Click OK to save settings.
Configuring Bank Deposit Slips and Direct Deposit Payroll Receipts.
-
Go to the Expense > Bank Accounts list.
-
Double-click to select a bank account that has Checking as the account Type.
-
Click on Reports tab.
-
Select the check form for the Bank Deposit Slip or Payroll Direct Deposit Receipt by clicking the appropriate Select Report button. The report window will appear.

-
Open the Report > Expenses > Forms folder for the Bank Deposit Slip (this form may be in a subfolder called Preprinted). Open the Report > Payroll > Forms folder for the Direct Deposit Receipt form.
-
Select the check form for the Payroll Check and Direct Deposit report by repeating the steps above. Open the Report > Payroll > Forms folder and select the proper size check or direct deposit form.
-
EBMS allows users to print these forms on plain paper. Review Printing Checks and Other Forms on Blank Security Paper section for additional instructions.
Configuring Sales Invoices and Payment Receipts
EBMS offers a variety of available invoice style options. Both preprinted forms and plain paper layouts are available. The Preprinted forms are useful if a dot matrix printer is being used, and duplicate copies are required. The plain paper invoices are convenient to print on laser or inkjet printers. Invoice forms can be customized using Crystal Reports to allow for a unique invoice layout. Contact your Koble Systems account manager for details on custom reports and forms.
A sales invoice form should be added to the sales invoice print menu before it is selected within Sales > Options > Reports tab. Review the Printing a Sales Invoice or Payment Receipt section of the sales documentation for details on configuring the standard invoice or payment receipt reports.

Configuring Sales Orders or Sales Invoice forms
Review the instructions within Sales Order Documents for instructions to configure and customize various sales order documents.
Configuring Purchase Orders Forms
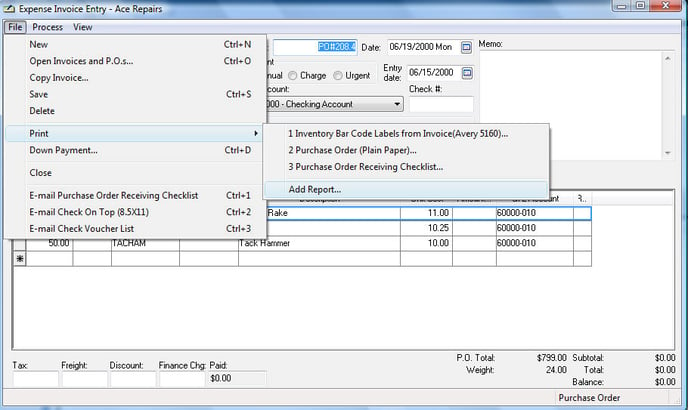
Purchase order forms and reports should be added to the expense invoice. Select File > Print from the Expense Invoice Entry menu to view the forms attached to the expense invoice dialog.
Review the Print Buttons and Menus section for more details on adding or changing reports on the Print menu.