Due to the complexity of all the options available in Components with formulas, this example will be a basic package that looks at some of the features of the Calculated Formulas.
Complete the following steps to create a package product.
-
Product record General tab:
-
Set the product Classification as No Count.
-
Enter the following product Description that reflects its optional dimensions. Example: Roof Metal Package for {Width}' Wide x {Dem}' Long will replace the placeholders with actual dimensions.
-
-
Product record Pricing tab: All price level formulas must be set to From Component Pricing. Note that base is not used for package products.
-
Product record Components tab:
-
Enter a Color Code placeholder if you are using color management, to determine the colors of the items below, to the next Color Code.
-
Enter the metal panel Product or a placeholder as a component.
-
Enter roof trim that is to match the color of the roof.
-
Enter a Color Code placeholder for the rest of the trim.
-
Enter Trim profiles
-
Turn on the Assembly Kit option at the bottom of the screen.
-
-
Product record Parts Calculate tab: Enable Replace Key Words in Item Detail to have the description reflect the dimensions. Note that this will prevent the user from changing the description to a user-defined description since this option will overwrite with the dimensions provided. Review Formula Setup for Component Formula Tools for details.
-
Setting formulas within the product record Components tab:
-
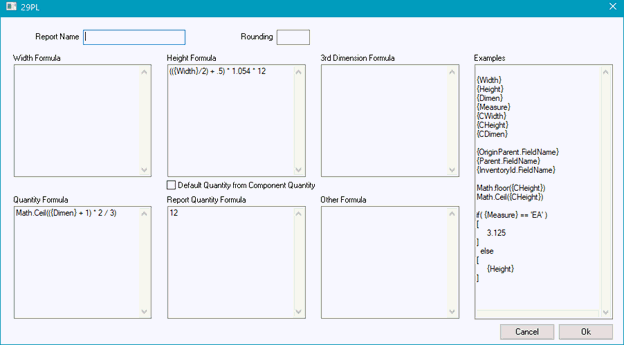
Roofing Panels: Right-click on the detail line that contains the roofing panel placeholder and select View Calculation Formula.
-
Enter in the formula in the Height field required to calculate sheet length: ½ the width of the building + .5’ for overhang, times the required multiplier for the pitch of the roof, in this example.
-
Enter the formula in the Quantity required to calculate the number of sheets: The length of the roof times 2 sides, divided by 3’ coverage, rounded up to the closest sheet, in this example.
-
Trim requirements: Assuming 10’ trim lengths, you can use formulas to calculate the number of trim pieces, based on the dimensions of the building. In this case, the dimensions entered in the package are feet, not inches, with the exception of the height field, which is the inch equivalent of the feet and inches columns, which you can use to enter the height of the building if calculating siding metal or trims.
-
ReviewLinear Feet/Inches Calculation Mode for more details on this option.