How to change or batch merge G/L Account IDs
A General Ledger account number can be changed, which may also require the account to be moved to another folder. Changing the general ledger code within EBMS requires a few quick steps. This change will retain the transaction history. The general ledger account can be changed using one of the following processes:
- Change the account code for an individual general ledger account: Right click on the Account code within the account record and select Change ID from the context menu. Review the following for context: Adding General Ledger Accounts.
- Change the account codes for a group of general ledger accounts: Read this article for instructions on how to batch change a group of G/L accounts.
Two accounts can be merged into a single general ledger account without losing any history. This process is ideal if the financial manager decides to combine general ledger accounts. Merging two accounts into one is preferable to making one account inactive, because it consolidates the history of both accounts. The merge process can be completed using either of the following processes:
- Merge two general ledger accounts: Right click on the Account code within the chart of accounts and select Merge Accounts from the context menu. Review Merging Accounts vs. Deleting Accounts for more details.
- Merge multiple general ledger accounts: Read this article for further instructions.
Change a General Ledger Account and Move to another Folder
The Change ID option allows the user to move an account to another folder as well as to change the account number.
NOTE: It is not recommended that a General Ledger code be changed without proper consultation with an accountant or financial officer.
-
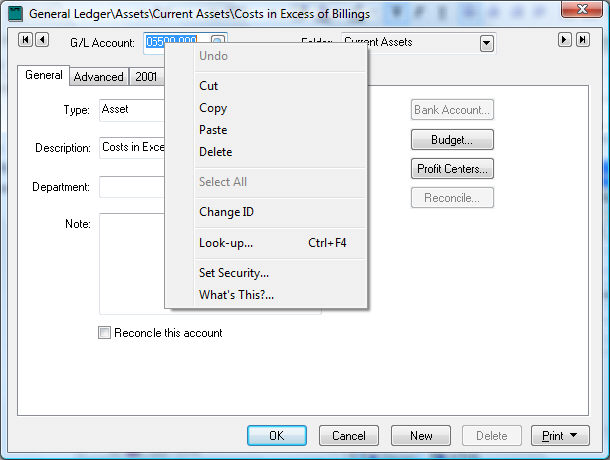
Open the general ledger account by selecting from the menu and selecting the account that must be changed. Right-click on the G/L Account with the mouse to open the context menu
.
-
Select Change ID from the context menu.
-
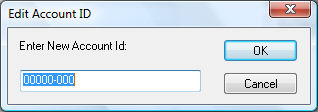
Enter the new General Ledger account number and click the OK button.
-
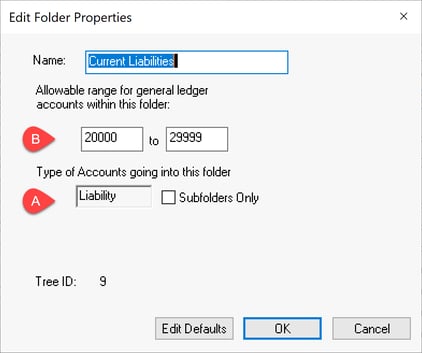
Go to the tab and click the Properties button to view the allowable range for any general ledger folder. Review the Chart of Account Folders section for more details on the allowable range of an account.
-
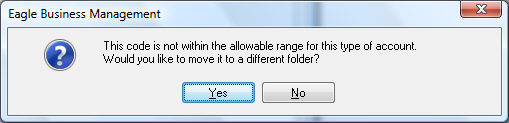
The following dialog will appear if the new account code is not within the allowable range contained in the general ledger folder. Review the Chart of Accounts Folders section for more details.
-
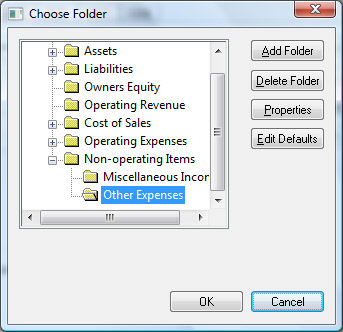
Click the Yes button to move the account and the following Choose Folder dialog will appear:
-
Select the category that you wish to place the changed account into. Note that the new account code must be within the Allowable Range of the selected folder. Click the Properties button to view the allowable range of any available folder. Click the OK button to continue and the following message will appear unless the account cannot be placed within the selected folder:
-
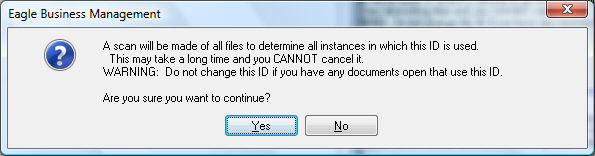
Click Yes to continue. This process could require five or ten minutes to complete the change, depending on the amount of data within EBMS. No user should be posting any transactions during this process. This process will scan all history files and change the General Ledger code from the original account to the new account including journals, invoices, advanced tab settings, etc. THIS PROCESS MAY NOT BE ABORTED.
Batch Change Merge Account Codes
An entire list of general ledger accounts can be changed using a batch process within EBMS, rather than changing account codes individually. This utility uses a spreadsheet list of the old accounts and new accounts and changes them as a batch.
Complete the following steps to batch change and/or merge general ledger account codes:
-
Create parallel lists of account codes within a spreadsheet or CSV file: Create one list with the current G/L account and a parallel list with the new G/L account.

This spreadsheet or CSV file can be created manually or exported from EBMS. Review Exporting to CSV Files for more exporting lists including a list of accounts. -
Create a new column if the column does not exist.
-
Populate the New Account column with one of the following GL accounts:
-
A new G/L account code which prompts a change ID process. This process will replace the old account with the new account code. Verify that all history will be maintained with the account change.
-
An existing G/L account code which prompts the merge process. This process will merge the old ID history with the new or existing G/L account. Warning: This process cannot be reversed.
-
-
Verify the following relationship between the original Account and the New Account before continuing with the next step:
-
Make sure the Account Type is the same. Type information is found in the G/L account General tab. The account type must match the Type setting within the account folder.
-
The Allowable Range found in the folder properties of the account. Note that the new account code must fit within the range of the old account's folder. Review Chart of Account Folders for instructions to edit the allowable range fields if needed.
-
-
Make a copy of the EBMS data before continuing if information is being merged.
-
Map the original and new account columns using the utility (as shown below):

-
Enter a Description to identify the change G/L account process.
-
Set the spreadsheet or CSV file as the Text File.
-
Click on the From Text File button to generate mapping. The system should map both the original account and the new account properly without additional configuration. The other columns do not need to be mapped. Review Data Import and Export Utility for more details on this mapping utility.
-
Click OK to save the mapping. IMPORTANT: Do not use the Update Data, Replace Data, or Create Data buttons.
-
-
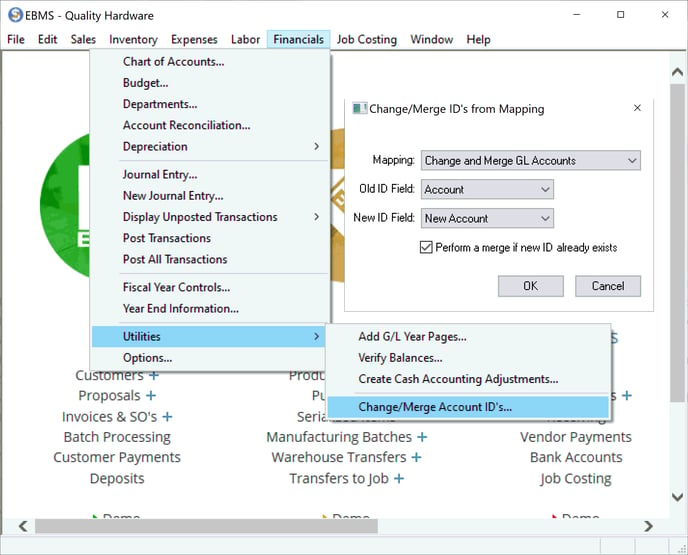
Select from the main EBMS menu.
-
Select the Mapping description file created in the previous step.
-
Select the Old ID Field setting that identifies the original G/L account.
-
Select the New ID Field that identifies the column that contains the new account or the merged G/L account.
-
Disable the Perform a merge if new ID already exists only if no general ledger accounts should be merged. Enabling this option will merge any account that already exists within the New ID Field column. Warning: A merge cannot be reversed.
-
Click OK to complete process