The Inventory > Adjust Counts component within EBMS allows a user to adjust the counts and values of multiple track count inventory items as a batch.
The following sequence of steps are required for each count cycle. Click on the links to jump to these steps:
-
Prepare for count: This step downloads the counts from inventory, which allows inventory sales and purchases to continue.
-
Create batches: Group product in one or more batches based on location, category, manager, or other grouping for inventory counts.
-
Count items: Physically count inventory items and manually enter counts or import them in using an Excel spreadsheet.
-
Count complete: All counts must be entered and confirmed before adjustments are made.
-
Review counts: Double-check the inventory count results to minimize the requirement to process multiple adjustments for the same count cycle.
-
Adjust counts for all batches: This step adjusts the counts within the product catalog for all batches. Note that this process is designed to allow inventory changes between step #4 and this step.
-
Report adjustments: This optional reporting step can be useful to explain inventory details to the financial manager, accountant, or owners.
1. Prepare for Count
At times, it is necessary to adjust inventory counts. Review the following items before creating an adjustment:
-
Review open unprocessed documents: Review all open, unprocessed documents within EBMS containing Products to confirm Shipped or Received quantities are valid and match the true state of the open document. This may include sales orders, purchase orders, manufacturing batches, serialized added cost batches, and job transfers.
-
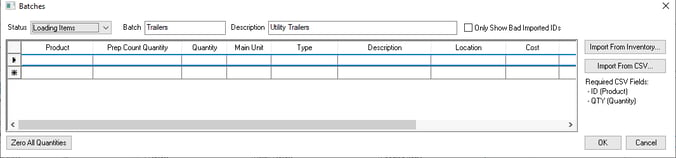
Go to on the main EBMS menu to open the Inventory Batch Numbers dialog shown below:
-
Click the Prepare For Count button just prior to taking the physical inventory count. This captures the current quantity of inventory on hand and will be compared against the physical inventory quantity to determine the adjustment. This feature enables the inventory manager to review and verify that the physical count is accurate even while inventory is being purchased and sold.
The following dialog will appear only if inventory is managed within multiple warehouses:
NOTE: Prepare For Count must be run and Inventory Counts entered before buying and selling may resume.
-
Select the Warehouses you wish to prep for counts by putting a checkmark in the Select column.
2. Create Batches
The product inventory may be divided into multiple batches based on location, categories, or other grouping. Do not create duplicate batch product lists for the same area. Do not create separate batches for each staff member if a team is counting the same area. The non-blank product line within each batch will be added together to create a sum of the product inventory on-hand.
Complete the following steps to add batches:
- Click on the Add button to open the Add Batch dialog as shown above:
-
Enter a Batch ID and Description to identify a batch. Include the location, product, and date of the batch.
-
Select a Warehouse if multiple warehouses are present and click OK. A batch can contain information for only one location or warehouse. Multiple batches must be created if inventory is counted from multiple locations.
-
The Status column on the Inventory Batch Numbers page gives the following snapshot of where each batch is at in the count cycle process. Periodically through the count cycle process the Status needs to be updated before proceeding to the next step.
-
Loading Items: Items are still being added to the list.
-
Loading Complete: The inventory items for a batch are loaded. Counting, verifying, and entering counts into EBMS are currently in process.
-
Counting Complete: The inventory list has been counted. Counts have been entered, and inventory is ready to be adjusted.
-
Adjustment Complete: When batches are processed, the status changes to 'Adjustment Complete.' No additional changes may be made to the batch.
-
-
Click Properties to configure a list of inventory Items that need to be counted or adjusted.
-
The user can add items to this list using the following methods:
-
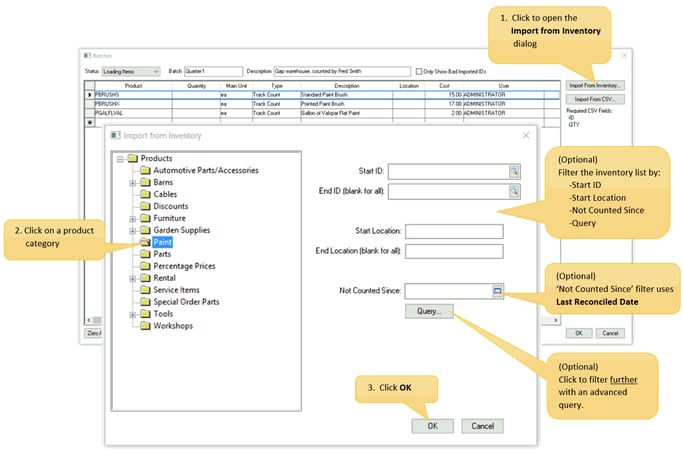
Import from the product catalog: Click on the Import from Inventory button as shown below, select a product category folder, use any of the optional steps listed below to filter results futher, and click OK to import.
Optional steps for Import from Inventory: Filter the inventory list by Start ID, Start Location, or Not Counted Since. Set up a query in using the Query button to filter more specifically. Use the Last Reconciled Date for the Not Counted Since date. These optional steps can help narrow down the products that will be imported.
-
Import from a CSV file: ID ('Product' column) and QTY ('Quantity' column) fields are required columns within the CSV file. Click on the Import from CSV button as shown below. Select a CSV file and click Open to add items and counts from the selected file.
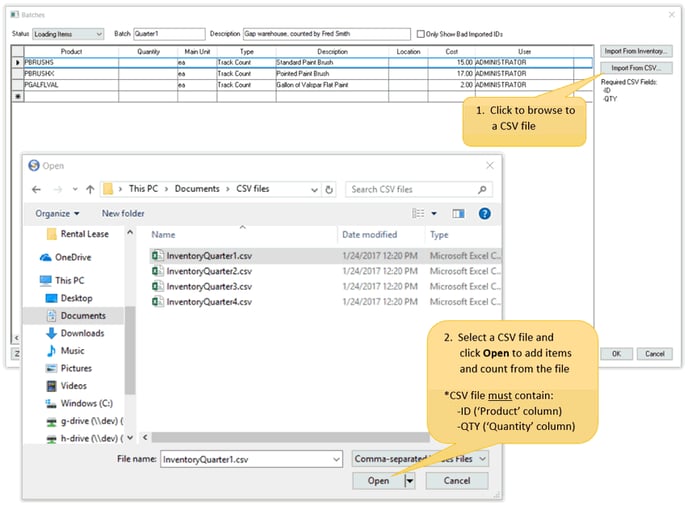
The following dialogs will appear after the file has been selected. Click OK to add the records.
-
Barcode Scanner: Inventory items can be added to this list using a barcode scanner programmed as keyboard wedge. All products will be populated with the main unit of measure.
-
Manually enter product items and count contained within the batch location. Click on the magnifying glass in a blank Product column field to browse and select a product. Click the Select button to add.
-
-
Only perpetual inventory items classified as Track Count, Serialized Items, or Lot can be added to the batch. Review Inventory Classifications for a list of perpetual inventory classifications.
-
Manually change the Status from Loading Items to Loading Complete as shown below. Only change the Status to Loading Complete when all items to be counted have been added to the inventory list.
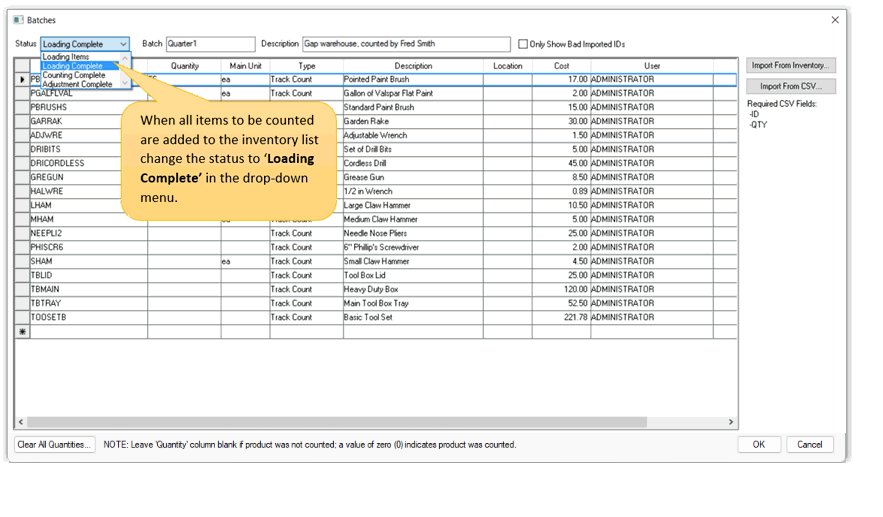
Note: Batch counts are added together to create a total count of product in stock. Duplicate items with count values will increment the total on-hand value.
3. Count Items
Once the status of the inventory list is changed to 'Loading Complete' the counts for each item may be entered. Complete the following steps to enter counts:
Within the Batches entry dialog, enter or adjust the quantity of each item you wish to change to reflect the new updated count of the batch. Use one of the following methods to adjust counts:
-
-
Enter counts manually by updating the Quantity column for specific products.
-
Import counts from a CSV file with the Import from CSV button demonstrated previously: Products listed on multiple spreadsheets will be added together to create a total during the review process.
The cost value is defaulted from the Product Cost field and is used during the adjustment when increased quantity. Decreases in the quantity will reduce the inventory value by the FIFO cost. -
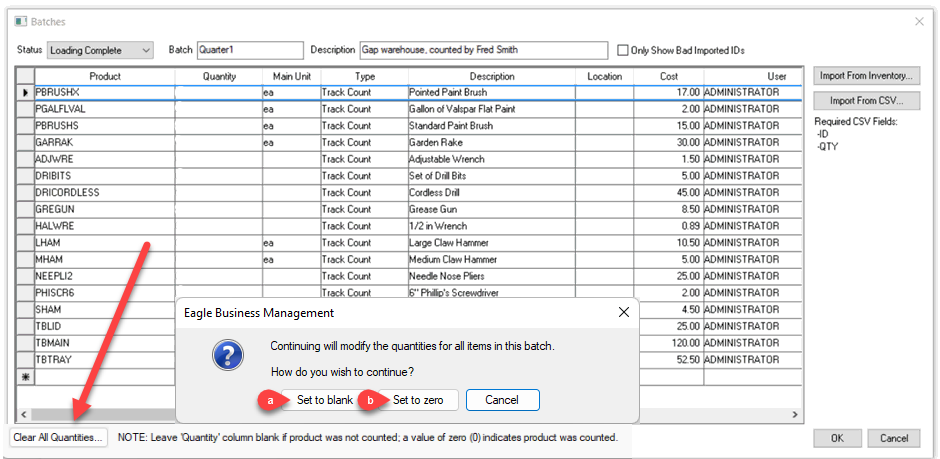
Click Clear All Quantities button at the bottom of the page to set the quantities of all items based on the following option dialog:
-
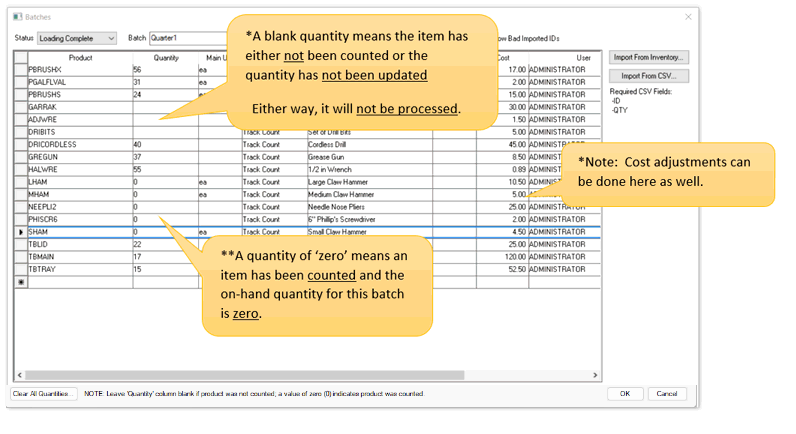
Set to blank: A blank value in the Quantity column will cause the system to ignore any changes to the associated product. This option can be used to only adjust products that contain a value of zero or non-zero. All blank lines are ignored.
-
Set to zero: A zero value adjusts the count to zero rather than ignoring the count.
For example, A Garden Rake Quantity of zero will adjust any inventory count to zero and a clear value (blank field) will not adjust the Garden Rake on-hand inventory quantity at all. Be careful to differentiate between a field entry of zero and a blank field, because it will make a major difference in how EBMS records the product.
-
-
Note: A batch with products that were not counted must have a blank Quantity rather than a quantity of zero. Zero should only be used when no inventory exists.
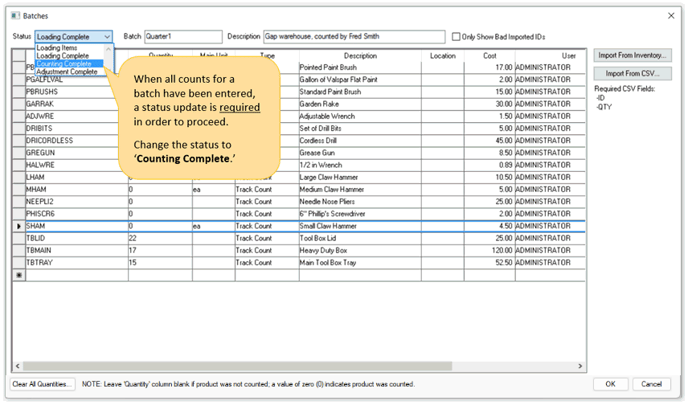
4. Count Complete
Change the Status setting to Counting Complete as shown below. Only change this status when all counts for a batch have been entered and double-checked. This status change is required to proceed to the next steps.
5. Review Counts
All Inventory batches must have a Status of Counting Complete in order to process adjustments.
Click Review to review counts as shown below: 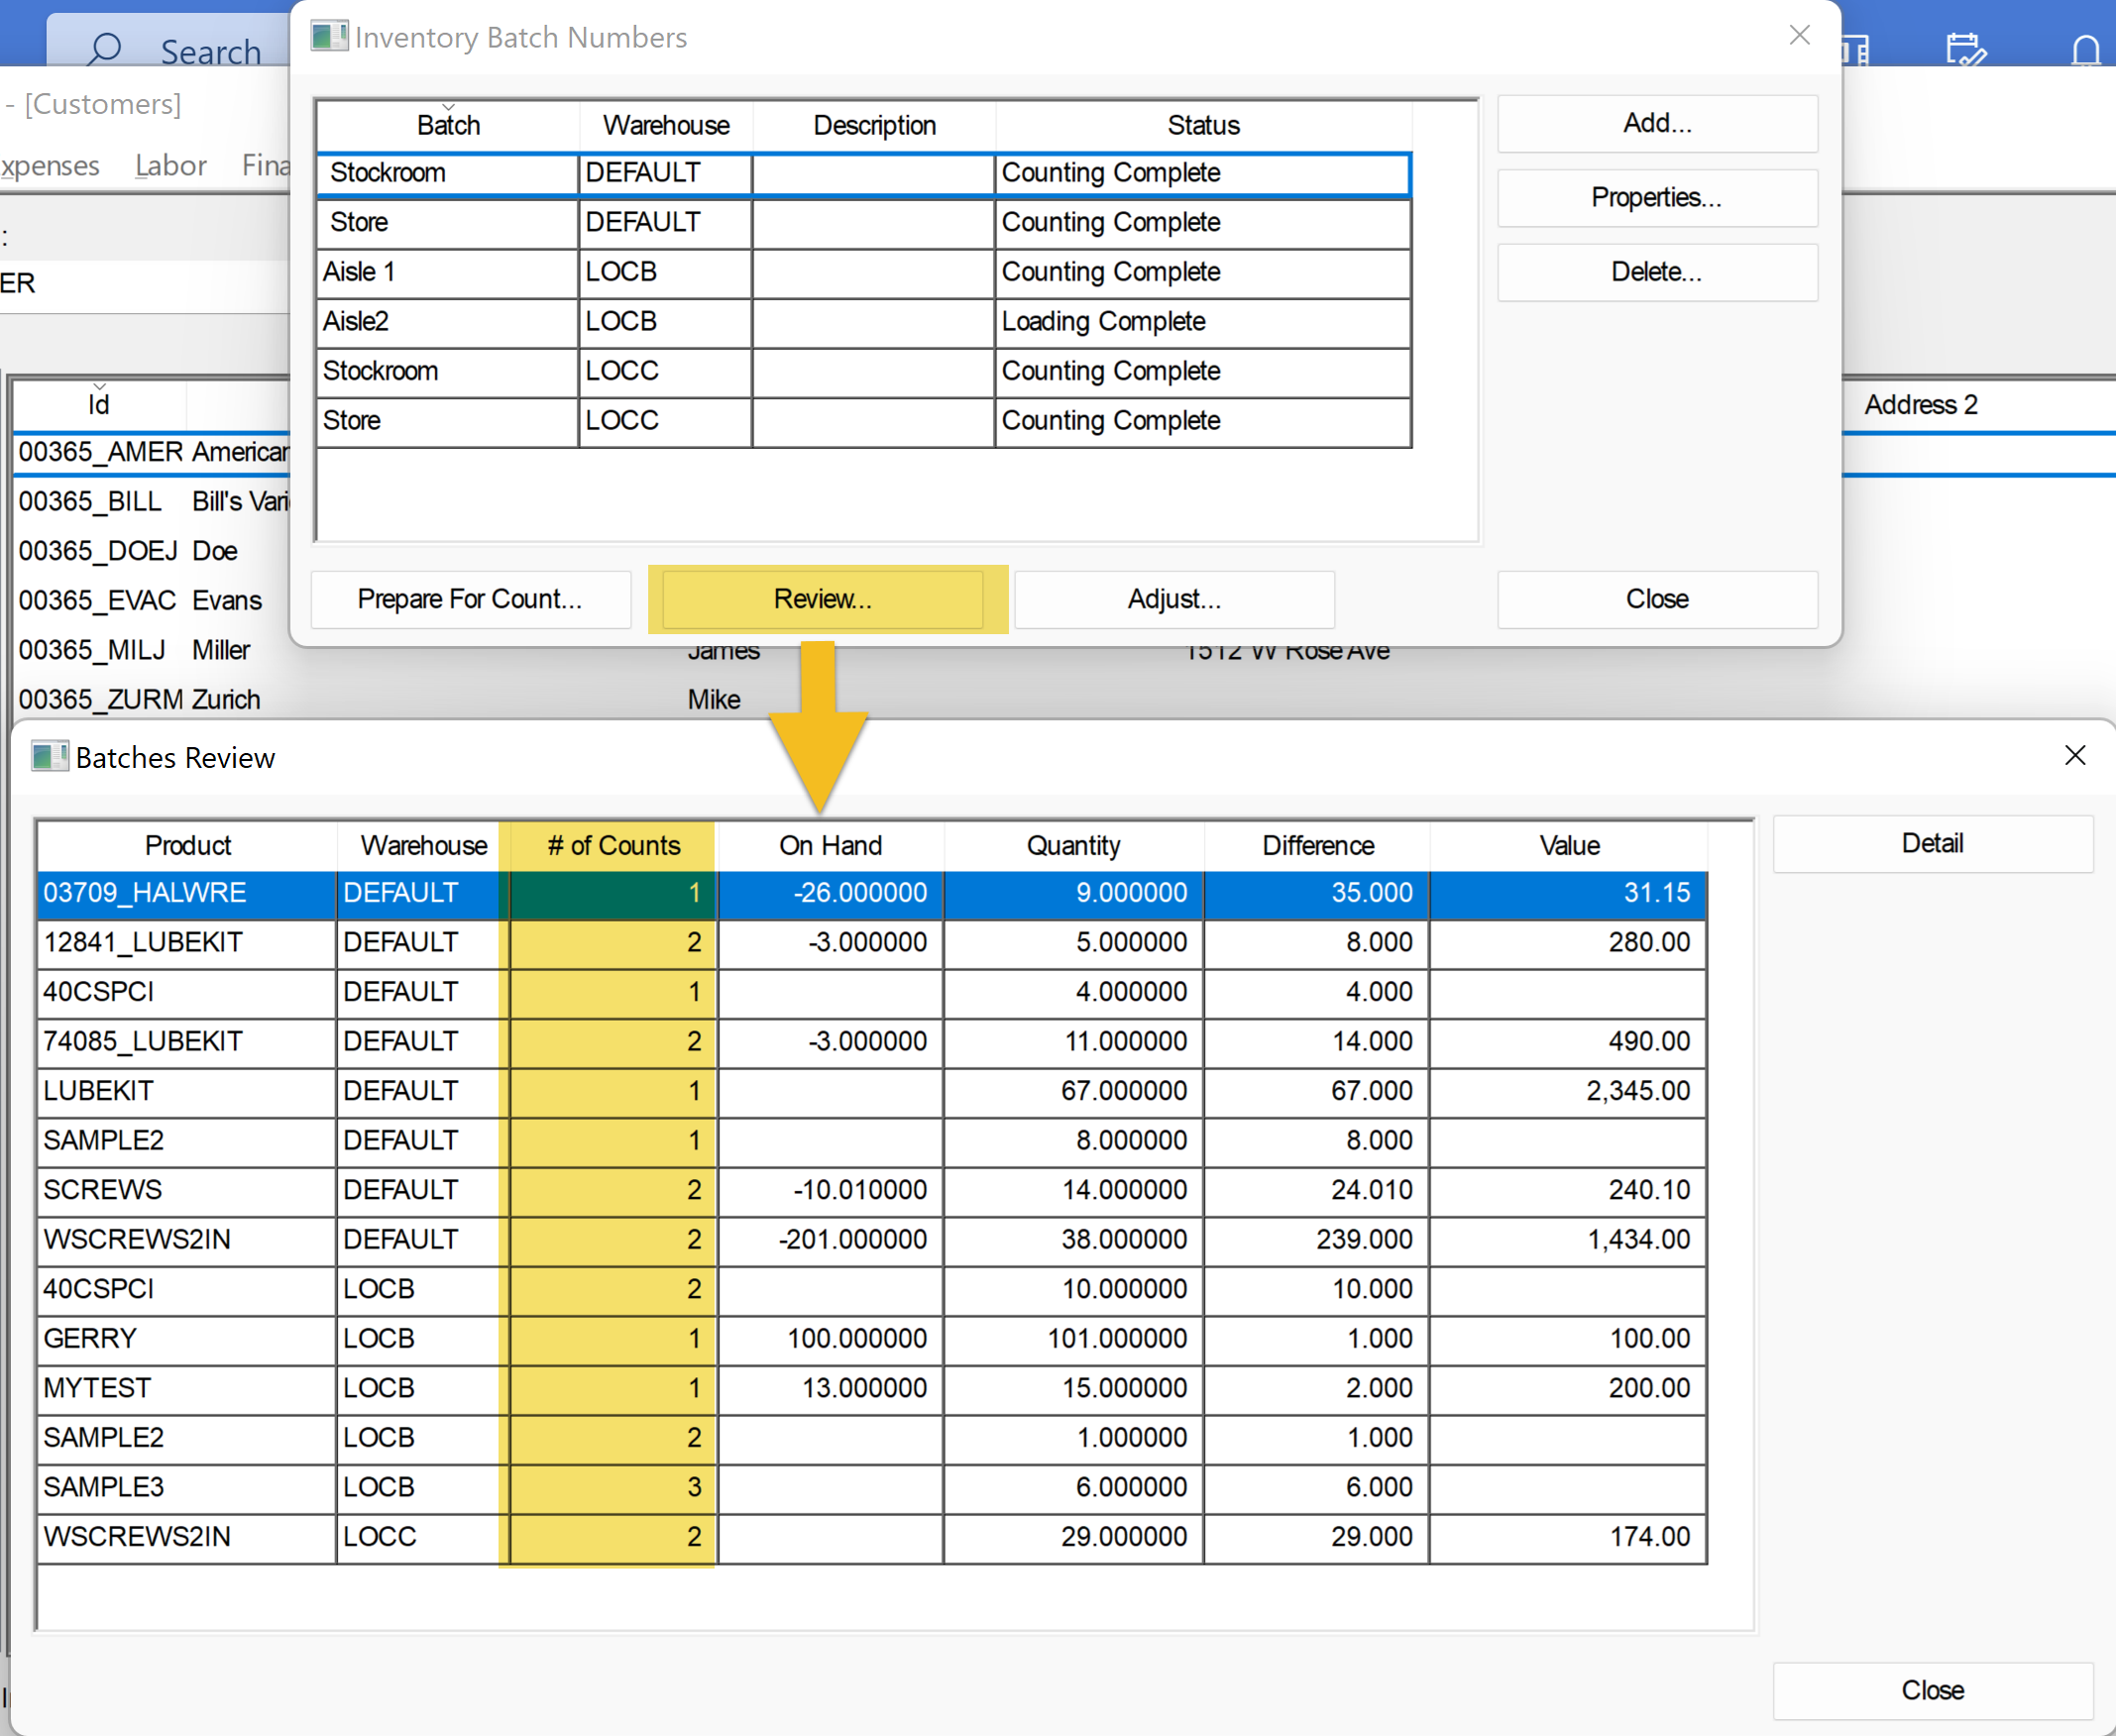
The # of Counts column indicates the number of lines within the imported batches. This value can be very useful to verify that all valid counts are included. Note that batch lines with a blank Quantity rather than a value of zero will not be included in this total, because blank Quantity fields are ignored, not counted.
The Quantity value is the sum quantity of every batch.
Review the totals and adjustments of each item. Click on an item and click the Detail button to view the individual count entries for the selected items.
6. Adjust Counts for All Batches
Counts are adjusted for an item using all batches.
WARNING: Do not use duplicate batches with values for the same product in multiple batches. The sum total of each product within all batches is used to calculate the adjustment.
Complete the following steps to adjust counts in EBMS.
- Click on the Adjust button on the Inventory Batch Numbers page to open the Adjust Inventory dialog:
-
Set the Adjustment Date that will be used for all adjustment financial transactions. Use the end of last fiscal year if this count adjustment is an end-of-year inventory count.
-
Set the Adjust On Hand to Quantity Counted option to adjust the On Hand value based on the adjustment shown in the previous review step. The new on-hand quantity may differ from the review on-hand value (in previous review step) if the on-hand count has changed since any of the batches were created.
-
Click the Adjust button to launch the count adjustment process for all the batches.
- Click Yes to launch the adjustment process.
-
The following information window will appear when the 'Adjust Inventory Count' was successful.
7. Report Adjustments
Open a product and click on the product record Activity tab to view adjustments for a single item. Review Sales and Purchase Activity for more information on the Activity tab.
Generate the File > Reports > Products > Counts/Values > Inventory Activity report to list all adjustments between two dates.