An inventory item must be created and classified as a Serialized Item before serial numbers can be entered or processed. The inventory item identifies the line of products that is being serialized. The purchase and sales history will be summarized at the inventory item level. For example, an inventory item must be created for the air conditioner or lawn mower based on the make and model of the unit.
The serial number identifies each individual item. If an inventory item is classified as a serialized item, a serial number must be entered for each item purchased or manufactured. The three following serialized item classifications can be used based on the needs of the user:
-
Use the Serialized Item classification for items that are purchased and resold. This is the most common classification used within EBMS for serialized inventory. (Continue within this section for details on using this classification.)
-
Use the Non-Inventory Serialized Item classification for non-inventory items, such as rentals. Review the following Non-Inventory Serialized Item section for more details.
-
Use the MTO Serialized Item classification for Made-To-Order items such as custom manufactured equipment. Review the Made to Order Serialized Items for more details.
Review the Changing an Inventory Classification for instructions to change an existing item to a serialized item Classification.
Create New Serialized Item
Take the following steps to create and classify a new serialized inventory item:
-
Launch the new inventory item wizard by going to Inventory > New Product in the EBMS menu or clicking the plus sign (+) next to Inventory > Product Catalog on the main EBMS page. (Review the Entering New Products section for more details on the new inventory item wizard.)
- On the Select Type page, choose the appropriate category folder or sub-folder for the new product. Highlight the selected folder and click Next.
-
On the Description page, add the product Description (along with any other fields that apply) and click the Next button.
-
On the Information page, select the Serialized Items option from the Classification options as shown below:

Inventory classified as Serialized Items will generate the same general transactions as an item classified as Track Count. Review the Non-Inventory Serialized Item section for information on serialized items that do not generate perpetual inventory general ledger transactions.
-
Complete the new item wizard as described in the Entering New Products section.
Classify an Existing Item as Serialized
Complete the following steps to classify an existing inventory item as a serialized item:
The Count value within the Count tab must be zero to change the classification of an inventory item. Review the Adjusting Inventory Count and Values section for more details on adjusting counts.
-
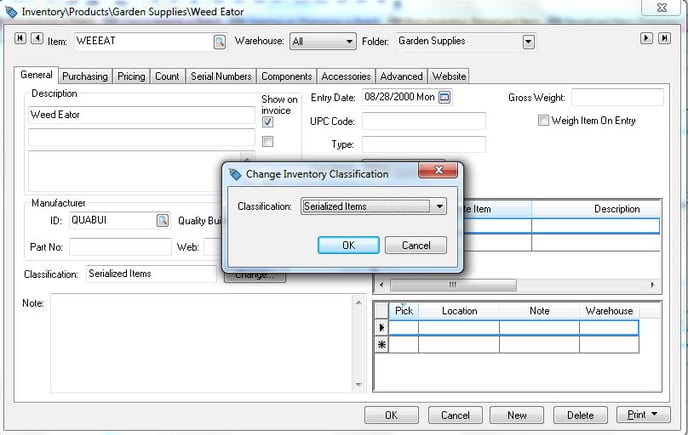
Open a product record and click on the General tab as shown below.
-
Click on the Change button to the right of the Classification field to open the Change Inventory Classification dialog.
For an existing product, this message may be prompted: "You cannot change the classification of this product, because there are unprocessed documents containing it. These documents can be found with a drill-down on the ordered counts of the Count page." If the product contains any count information, changing the Classification is not possible.
-
Select the Serialized Items classification and click the OK button.