Print product labels for inventory items without UPC codes, reserved inventory that is being staged, price labels, and other recordkeeping purposes. Printing labels from the purchase order can accomplish the following during the receiving process:
-
Label product to add information, such as barcodes, descriptions, and optional pricing.
-
Label reserved inventory with a label that contains the order number and customer information.
-
Verify that the amount shipped matches the amount ordered on the purchase order.
Select Label Format
Add the appropriate label report to the print menu on the purchase order. Review Print Buttons and Menus for instructions to add the user-identified label report to the EBMS document connected to receiving product.
Select the appropriate label type, size, and printer style by completing the following steps: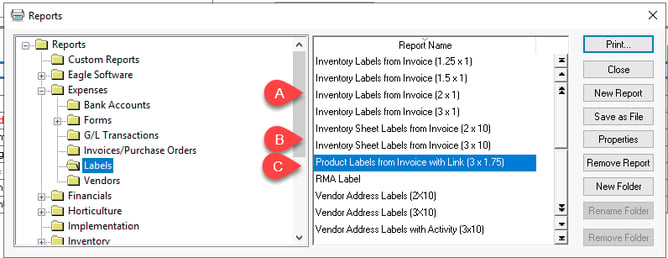
-
The Inventory Labels from Invoice options are different sizes for the DataMax or other label printer.
-
The Inventory Sheet Labels from Invoice options are designed for laser or other sheet fed printers.
-
The Product Labels from Invoice with Link is used to include reserved inventory labels.
-
Custom labels can be created using Crystal Reports. Review Crystal Reports Interface Overview for steps to add or change labels.
Printing Labels from the PO
Go to Expenses > Invoices & PO's and double-click on an existing purchase order to open it. Select the product label report from File > Print in the purchase order menu as shown below: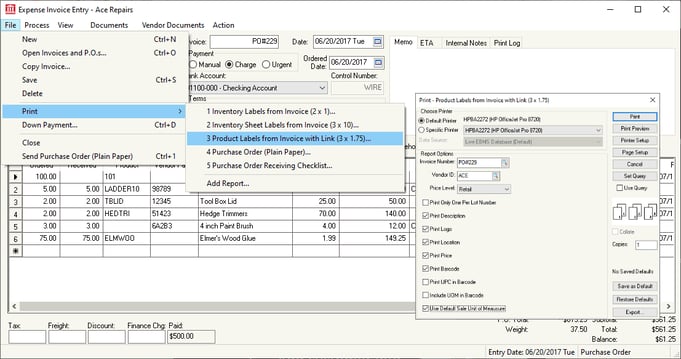
Select the desired label prompts as shown above:
-
From the Report Options print page for Product Labels from Invoice with Link, select the Print Only One Per Lot Number to combine product labels per lot number. (This option has no effect unless inventory lots are involved.)
-
Enable Print Description to add a product description on the label.
-
Enable Print Logo to add a company logo.
-
Enable Print Location to print the product location as defined in the product record General tab.
-
The Print Price option should be disabled unless the following conditions are true:
Cost has been updated before labels are printed, or pricing is not calculated from the cost. Review Updating Costs to Calculate Pricing for steps to update costs before processing the purchase order into an invoice.
-
Enable Print Barcode if the label will be used with barcode scanners.
-
Print UPC in Barcode: If this option is enabled, the system will print the item's UPC (Universal Product Code) instead of the recommended Product ID. Review Printing Barcodes for more details on barcode options.
-
Include UOM in Barcode: This option causes EBMS to prefix the barcode with the UOM setting which sets the appropriate Unit of Measure (UOM) when scanning this barcode. Review Unit of Measure Overview for more information on setting multiple UOM per item.
-
Enable Use Default Sales Unit of Measure to include the main sales UOM in the barcode.
-
Enable the Print Only Labels linked to an Order to ignore stock labels and only print items to ready to stage.
The following sample labels are available based on these prompts:
Inventory Labels from Invoice
The quantity of the labels will be determined by the quantity listed within the invoice Received column. Each label contains the current pricing and other product information. Verify that any price updates that need to be calculated from the selected purchase order are processed before printing labels. It is worth checking ensure the product label price is accurately printed.
Inventory Labels from Invoice with Links
This label option not only prints the product barcode but also prints a barcode for the connected sales order. This barcode combo can facilitate opening a sales order by scanning the special order first and then marking the product shipped by scanning the product barcode.
Review Barcodes Overview for information on using barcodes to A) identify a document, such as a sales order, and B) increase the shipped quantity by scanning the product barcode.