Many serial numbers include a barcode that contains the serial number or VIN. Product labels that contain the serial number barcode can be printed from EBMS to facilitate the following functions.

Scanning Serial Number Barcodes
Serial numbers can be selected within EBMS by scanning a serial number, internal stock number, or VIN number barcode. The following processes can be accomplished using the EBMS scanning modes:
-
Add or ship serialized items within a sales order or invoice: $S
-
Add serialized items consumed within a manufacturing batch: Manufacturing batch dialog must be open.
-
Add or transfer serialized items within a warehouse transfer: $W
-
Add or transfer serialized items within a job transfer: $H
-
Add serialized items within a rental contract as a rental or as a consumed item: The rental dialog must be open.
-
Check out and return serialized items within a rental contract. Review Scanning Serialized Rental Equipment for details.
The $R prefix is used to populate the Serial Number within various documents. Use the document prefix listed above to open a document. Review Purchasing a Barcode Scanner for programming details.
A serialized item with the Use the price and description from item in the sales invoice option enabled will ignore the Always combine lines when scanning the same item consecutively option setting found on the Sales > Options > Invoices and S.O.s tab. Review Pricing Serialized Items to set this option within individual serialized product items.
Processes that are not scanner-enabled using the EBMS scanner mode:
- Creating new serial number records.
-
Associating serialized equipment or VIN numbers to a task or work order.
-
Associating serialized items or vehicles to a sales order header.
-
Creating serial numbers within the serial number entry dialog of purchase invoices, trade-in, and finished goods in manufacturing.
Printing Serial Number Barcodes
Serial number barcodes can be printed from EBMS to a label. Complete the following steps to print barcode labels:
-
Open the purchase order that contains the purchase of the serialized item as shown below:

-
Print the Inventory Labels from Invoice label form from in the purchase order menu, as shown above. Review the Labels from a Purchase Order section of Printing Barcodes to set up this label form option within the purchase order's print menu and open the following print dialog:
-
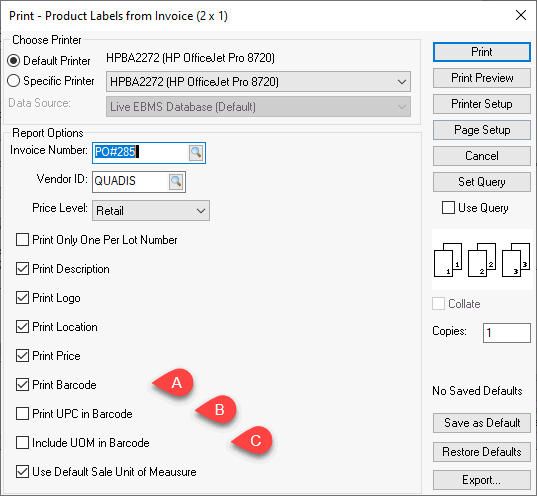
Set the following Report Options for label form printing:
-
Enable the Print Barcode option.
-
Disable Print UPC in Barcode.
-
Disable Include UOM in Barcode.
-
-
Click Print to print serial number labels to a label printer.
Review Barcodes Overview for more barcode details.