General Job Information may be changed at any time after a new job has been created. Additional information such as Job Notes, Budgets, Stage Detail, Site, and Architect Information may be added in this window. The main job window is also useful to view job history, process progressive billings, create budgets, and enter change orders.
Go to Job Costing > Jobs, select an existing job and the following window will open:
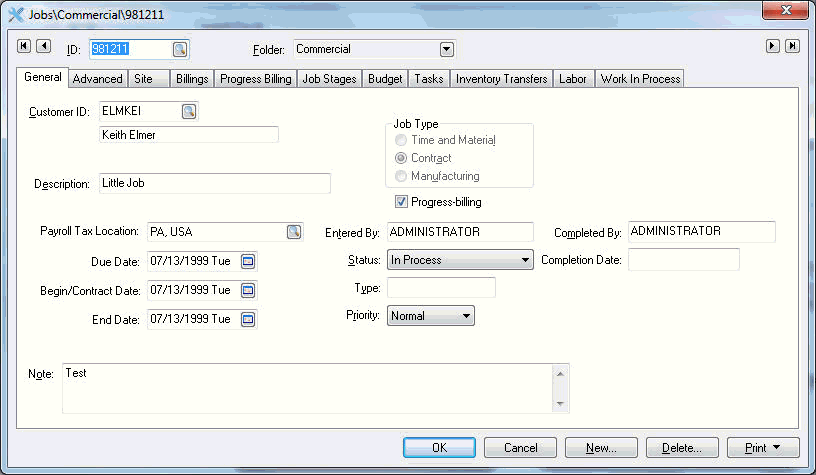
The job ID code is a unique code that is entered at the time the job is created. (Right-clicking on the job ID field and selecting the Change Id option can change this code. The Change Id selection will start a possible lengthy process of changing the job ID throughout the job history.)
Clicking on the down arrow button to the right of the current folder name and selecting a new folder can change the job Folder.
General Tab
-
The Customer ID code identifies the customer that will be billed for this job. Multiple jobs may have the same customer code. To view customer information such as the full address or history, right click on the Customer ID code and select Look-up from the context menu.
-
Enter job Description.
-
Enter the jobs Tax Location of the job. This setting will overwrite the tax location of the employee within the timecard. Review Payroll Taxes for Multiple Locations section of the labor documentation for more details.
-
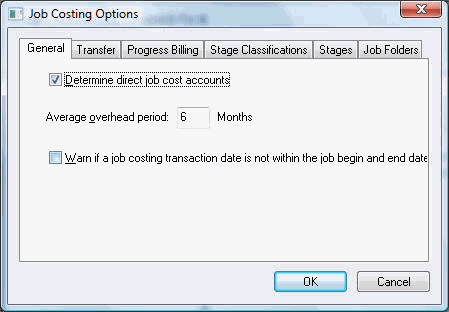
The Date fields are necessary for any scheduling functions or reports based on the schedule date. The Due Date should reflect the deadline of the project. The Begin and End date and times are used to schedule the project's duration. These dates are important if the Warn if a job costing transaction date is not within the job's begin and end dates option is enabled. You can view or change this setting by going to Job Costing > Options > General tab.
-
The Job Type option should be set to Time & Material if the entire job is being billed based on the cost of material and labor rather than a contract. The Job Type for a progressive billing job such as an A.I.A. job must be set to Contract. A job that consists of both contracts and Time and Material agreements should be set to Contract. The Job Type option cannot be changed if any progress billing invoices have been created.
-
The Progress Billing switch should be toggled ON for all progressive billing jobs such as A.I.A. contracts. The Progress Billing tab will show only if this switch is ON. For more details on progressive billing and A.I.A. contracts review the Progress Billing section.
-
The Entered By value should contain the name of the person who initially created the job within EBMS. This value will default to the EBMS login name at the time the Job is created.
-
The Status option is used to group jobs for reports or list purposes. If the Status is set to Closed the job cannot be entered into an invoice, proposal, or timecard. The Work in Process (WIP) calculations are affected by a job's status.
-
The Completed By entry should reflect the user who was responsible to close the job. The user's login name who set the job status to completed or closed will be copied into the Completed By entry if the entry is blank at the time a job's status is set as completed.
-
An optional job Type will allow the user to print reports or query jobs in specified groups.
Example: If a job is part of multiple groups, list all the types in the Type field and separate them with a space or comma. Grouping jobs only by using folders is limited since a job can only appear in a single folder. By entering a group of keywords or types, the user can query the jobs by any type or combination of types.
-
The Priority setting is for scheduling purposes.
-
The Note field is used to describe job details. The job window may be resized to enlarge the visible note area.
-
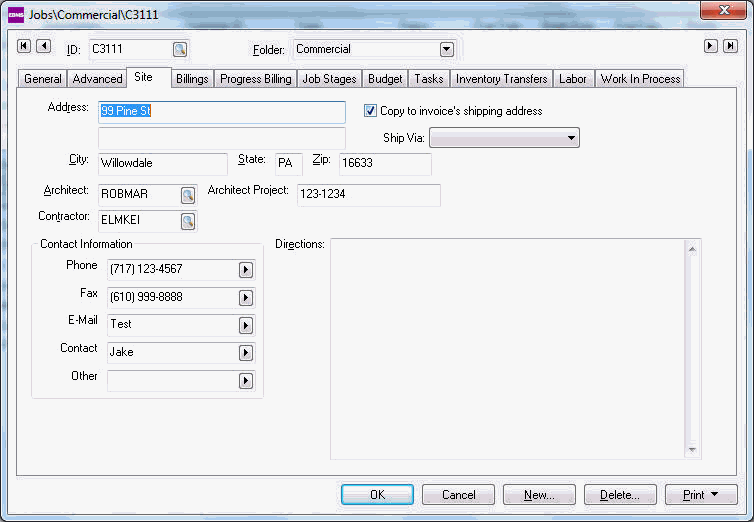
The site Address and Directions identify the location of the Job.
-
Enable the Copy to the invoice's shipping address option to copy the site address to billing sales invoices. This option will affect the sales tax rate, since the rate is based on the job location. Review the Sales Tax and Use Tax Overview section within the sales documentation for more details on establishing sales tax rates.
-
The Architect field may contain a Customer ID code. Create a customer folder labeled Architect and enter all the architect's contact information in a similar way as a new customer is created.
-
Enter a customer code within the Contractor entry in a similar manner as the Architect entry. Review Adding a New Customer for more information.
-
The site Contact fields are similar to customer and vendor contact fields. Clicking on the right arrow can change the labels of each one of these entries.