The MyTime app gives the user the ability to view tasks and task schedules in a variety of ways. Tasks can be displayed on the home screen or by tapping on a specific task schedule list button. Tasks can be displayed in a daily schedule view or shown as a task list. Tasks can be grouped and sorted in a user-defined order.
Continue with this section to configure the MyTime desktop settings.
The MyTime scheduling and display options are set per user or Worker within EBMS. A Worker can be defined as an employee, owner, or a 1099 subcontractor.
Complete the following steps to set the MyTime desktop settings for a group of workers:
-
Open the worker lookup dialog by selecting from the main EBMS menu.
-
From the category folders on the left side of the page, right-click on the worker group that will use the MyTime (select the top-level root folder to set for all workers) and select Edit Defaults to open the worker defaults dialog.
-
Go to the default App Settings tab and highlight the MyTime in the list and click the Properties button to open the following dialog. The desktop settings can also be set for an individual employee by selecting the App Settings tab > MyTime > Properties from an individual worker record.
The MyTime task queries can be configured to meet the specific needs of individual users. Note that some users may include unique views or lists. Enter the following settings for each display record: See the example records in the list shown above. -
Complete the following steps to configure a task query:
-
Enter the MyTime Description that briefly describes the view. For example, the description 'Today's Task' should describe the following task settings.
-
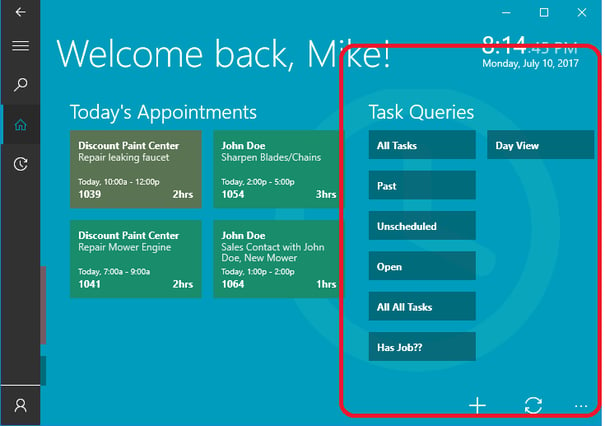
Enable the Show on Home option to show this set of tasks on the MyTime home page. Do not include query options with large task lists. The query options set within the Worker's App Settings tab that are not set to display on the home screen will be located as buttons on the right side as shown below:
-
Enable the Query by Worker option to only show the tasks and work orders assigned the current Worker. This option should be disabled to view tasks assigned to other Workers. Tasks that are assigned to the worker either as the Primary Worker or as Other Worker will be displayed.
-
Use the Inactive option to disable a view without deleting the display settings.
-
Enter the optional Group field setting. This setting is valuable when a large number of tasks will be displayed as a result of the display record settings. The Group field settings is the same field settings used in the EBMS advanced queries. Review the Set Query Options section within the Main EBMS Documentation for instructions on how to identify specific fields or information within EBMS. Some examples of Group options are as follows:
-
Start Date: This field setting will group tasks by date if multiple dates are displayed.
-
Worker ID: This field will group tasks by worker.
-
Type: Use this field setting to group tasks by task type. Review the Creating Task Types and Defaults section for more details on creating task types.
-
-
Enter the Sort field setting and the sort Order. These settings will determine the order the tasks are listed on the MyTime app.
-
Select the desired Query/View setting. This is an important setting to determine the format used to display the tasks. Select one of the following options:
-
Day view: This calendar view is the most common way to view the schedule for the day. The Day View settings is based on the Start Date within the task. Review MyTime Desktop Settings for more instructions on this view.
-
Due today (overdue and due today): Display all the tasks that are due or overdue. This setting is based on the Due Date field within the task.
-
Past: List all tasks that have an End Date within the task that is in the past. Review Scheduling Overview for more details on the Due Date, End Date, and Start Date within a task.
-
Open: List all tasks that are not completed. Review the Tracking Labor and Completing Tasks in MyTime section to complete a task in MyTime or review Tasks > Managing Tasks > Recording Labor and Completing the Task to change the task status within EBMS.
-
Unscheduled: List all unscheduled tasks. Review Tasks > Scheduling Tasks > Scheduling Overview for more details on scheduling within EBMS.
-
Query: This advanced option is the best means to query a list of tasks based on any other information within a task. This powerful option can be used to tailor the view query based on any information within the task. Complete the following steps to configure an advanced Query:
-
Set the Query/View setting to Query.
-
Highlight this display record with the Query setting and click on the Set Query button to the right of the MyTime display records. Set the Set Query Options section within the main documentation for instructions on these settings.
Practical Advanced Formula/Query Examples:-
Tomorrow's Tasks .not. completed .and. start_date = today()+1
-
Tomorrow's Appointments app_confirm .and. .not. completed .and. start_date = today()+1
-
-
-
The Set Query button can be used to set advanced query settings for display records with various Query/View settings. Review the Set Query Options section within the Main documentation for instructions on these settings.
-
-
-
Repeat these settings for each additional query.
-
Use the Move Up and Move Down buttons to prioritize the display records from the most used on the top of the list and the least used at the bottom.