The scheduling settings for a task are found within the Schedule group on the Schedule tab of the task. See example shown below: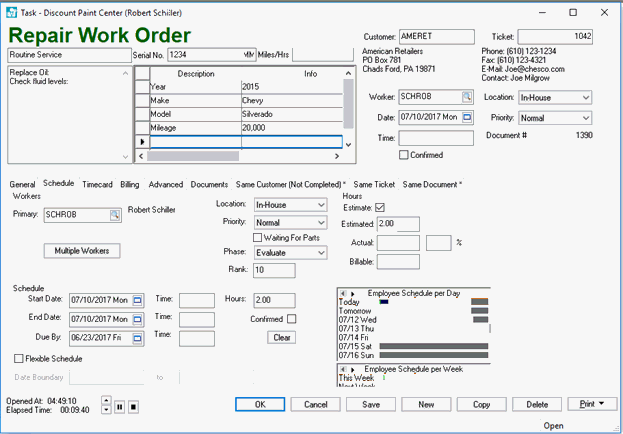
The task Priority settings may change the task list color to differentiate High priority or Emergency tasks from Normal priority tasks.
Enable the Waiting for Parts option if the task is on hold until the necessary parts arrive.
The optional Phase and Rank settings are used when a pipeline task has multiple phases. Review Pipeline Phases for more details on creating Phase settings or using the pipeline options.
Date and Time
Each one of the following settings, along with the Primary Worker, are very important to utilize the MyDispatch scheduling tool:
- The Start Date should reflect the scheduled time for this task or work order. The End Date should be used if the work order spans multiple days. The Start Date and Time will change the End Date and Time if the following conditions are true:
- A Primary Worker is set AND the worker's Daily Hours within the Advanced tab are set. Review Worker Clock In/Out Parameters to set a worker's projected daily hours.
- The task's Start Date must match a day within the worker's projected Daily Hours and the start Time must be within the time range.
- The task's Estimate option must be enabled with Estimated hours populated. Review Estimated, Billable, and Actual Time for Tasks to set Hours values within the task.
Changing the End Date will recalculate the Start Date and Time. Changing the end Time will recalculate the Hours instead of changing the Start date and time. Changing the End Date to a date before the Start Date will change the Start Date to equal the End Date.
- The Time entries should be populated with appointment times if the work order is scheduled. The Time entries can be kept blank if exact schedules are not required.
- The Hours value reflects the amount of time that is reserved within the schedule charts. This value can be entered by the user or calculated from the Estimated value.
Note: The Automatically recalculate estimated hours option found in should be disabled to properly estimate time within the EBMS task scheduling tools.
Review Estimated, Billable, and Actual Time for instructions to disable the Estimated time option.
Confirmed
The Confirmed option should be enabled if the schedule values reflect a confirmed appointment. The Confirmed option identifies the task as an appointment. Appointments will show on the schedule view or the charts in the color green. Review Task Schedule Charts for more details on the schedule charts.
Schedule Methods
Schedules can be viewed several different ways:
-
List View: Querying all the open tasks and grouping them by due data, scheduled start date, or employee. This list view option is a good option to list tasks grouped by due date and other query options. Review Creating Task Queries for instructions on querying the list. Review Creating Task and Work Order Groups for instructions on grouping tasks by due date or other schedule date.
-
Schedule View: The schedule view is ideal to determine schedules, available times, and changing task schedules or employees. The schedule view includes calendars, schedule charts, and employee and work group options. The color graphs display a visual chart of an employee's schedule or work group schedule. Review Task Schedule View for more details on this view. Review Task Schedule Charts for more details on the color scheme or details of the schedule charts. Review Work Groups for more details on the work group scheduling option.
-
Using MS Outlook: EBMS Tasks can interface with MS Outlook to create appointments within the MS Outlook calendar. Review Creating Calendar Appointments from Tasks for more details on the EBMS and MS Outlook interface.
Tasks can be temporarily moved to a pending or waiting for parts list by changing the status. Review Task Status Settings for more details on the status of the task.
Map Tab
Review Mapping and Location Services to use the map tab tools to view directions or create a route.
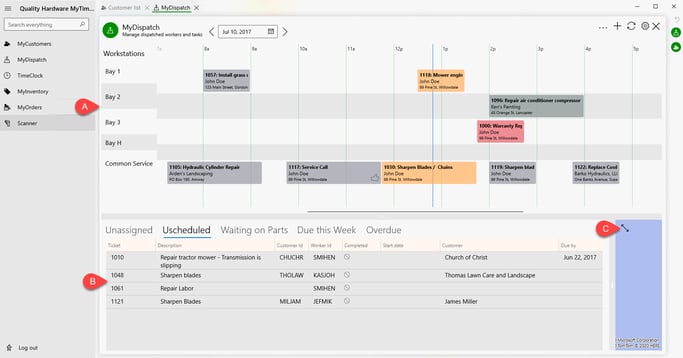
MyDispatch
The MyDispatch app is a graphical option to scheduling tasks with the following 3 panes:
-
Schedule pane
-
Task list pane
-
Map pane
Multiple Views
Create multiple views including overdue task list, list open tasks group by employee, and an employee schedule view as well as others. Creating a number of different views is a convenient way to view different task lists or schedules. Review Creating Multiple Views for more details on creating new views.