The Auto Send tool is able to send an email message to the shipping recipient that includes the order number, package tracking number, and a hyperlink to the shipper's website for customer shipping details. This information can be configured and automatically sent to the customer when a shipment is processed, without added time or effort by the shipper.
Complete the following steps to set up an Auto Send shipping email that contains package tracking details.
-
Select from the main EBMS menu to open the following list:
-
Click the New button to create a new Auto Send Mode and open the following dialog:
-
Each Auto Send Mode requires a unique Key Id. This Key ID should be a simple descriptive code that includes no spaces or symbols.
-
Select the Accounts Receivable as the Send Mode option since shipping information is associated with the sales order.
-
Enter a short Description of the Auto Send mode type. This description should clearly describe the mode process. Note that this text is used as the EBMS menu label. Click OK to continue.
-
Click the Send Mode Properties tab.
-
Enable the Show on Menu option to display this Accounts Receivable Auto Send mode on the EBMS > Sales menu. Disable this option if Auto Send is launched using the Task Scheduler App.
-
Click on the Edit Query button to select the group of sales orders or invoices to be sent as shown below:
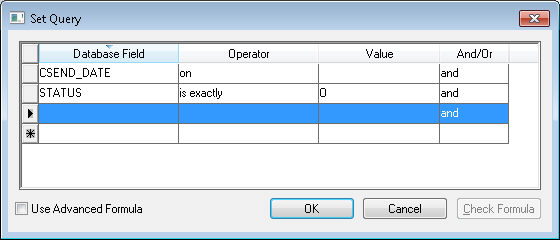
The query example shown above will send all sales invoices with a Status of 'O' (outstanding invoices) that have not been previously sent. Review Set Query Options for more details on creating query expressions. The Query setting can be kept blank if all sales orders are sent to the customer. Click the OK button to save. -
Enable the Send future-dated documents option to send all documents when they are created, even if they are dated in the future. Otherwise Auto Send will wait to send until the document date arrives to send the document.
-
Disable the Document will be printed if customer has no Auto E-mail/Fax entry option to ignore the tracking message if no customer email contact information is available.
-
Select Always for the Mark as sent after Send Now or Printing option to mark a document as sent after the Send Now Tool is used to auto send a document.
-
Select a sales order form into the Report Settings > Report 1 fielif a copy of the sales order should be attached to the email. Click the Send Mode Properties Advanced tab to configure the exported PDF Attachment Name.
-
Review Auto Send Additional Documents to include other reports to this email.
-
Disable the Attach a copy of the document when auto sending E-mails option unless a copy of the order is attached.
-
Click on the Contact Priorities tab as shown below:
-
Set the [Shipping tab E-Mail] option in the Title column to send the message to the email shown on the shipping tab of the sales order. Review Shipping and Tracking Packages for details on the content of the Shipping tab.
-
Click on the Send Mode Properties Advanced tab for additional settings:
-
Configure the Mark as unsent options to change the status after a document has already been sent.
-
Disable the For multiple sends to one contact, send one E-mail with multiple attachments option to send a separate email for each document or shipment.
-
Disable the Use Summary (after multiple sends, a summary E-mail is sent) option to ignore a summary email.
-
Set the PDF Attachment Name created by the reports configured in the Send Mode Properties (Report 1, Report 2, etc.). User-defined file names can be set for each of the corresponding reports set in the main property tab described previously in this section.
-
Click on the Send Mode Properties E-mail Settings tab as shown below:

The E-mail Settings determine the details of the e-mail document that will be automatically sent. -
The From Address should contain a valid email address. This address can be a noreply address if no response is desired from the Auto Send emails.
-
Enter an appropriate Subject line for the email broadcast.
-
Enter the appropriate Body Text using HTML or plain text syntax. The <TRACKING> placeholder is used to list all tracking numbers associated with the order as well as a hyperlink for the shipper if the email is formatted to allow a hyperlink. The keywords list located at the bottom of the dialog can be used within the e-mail body. Note that line break tags (<br>) may cause extra lines in the email.
Review Auto Send Sales Orders or Invoices for more details on the Accounts Receivable mode settings.