- EBMS Knowledge Base
- Sales
- CRM | Auto Send
-
Client Resources
-
EBMS Main Documentation
- Introduction
- Getting Started
- Getting Started | Initial Installation
- Getting Started | Company Setup
- Quick User Guide | Financial Staff | Accountant
- Quick User Guide | Financial Staff | Accountant | Accountants Journal
- Quick User Guide | Sales Staff
- Quick User Guide | General Staff
- Features
- Reports
- Security
- Server Manager
- Technical
- Technical | Data Import and Export Utility
- Technical | SQL Mirror
- Automotive
- Automotive | Parts Catalog
- Automotive | Pricing
- Automotive | Point of Sale
- Automotive | Product Application
- Automotive | Keystone Interface
- Metal Supply
- Fuel Sales
- Horticulture
- Horticulture | Farm Setup
- Horticulture | Processing Payroll
- Horticulture | Managing the Farm
-
Sales
- Introduction
- Customers
- Customers | Miscellaneous Customers
- Proposals
- Proposals | Processing Proposals
- Proposals | Sets and Templates
- MyProposals
- MyOrders
- Sales Orders
- Invoices
- Materials Lists
- Sales and Use Tax
- Sales and Use Tax | TaxJar
- CRM
- CRM | Auto Send
- Recurring Billing
- Credits
- Customer Payments
- Payment Card Processing
- Payment Card Processing | Gift Cards
- Payment Card Processing | Loyalty Cards
- Payment Card Processing | Verifone Gateway
- Freight and Shipping Tools
- General Ledger Transactions
- Point of Sale
- Point of Sale | Point of Sale Hardware
- Point of Sale | Xpress POS System
- Point of Sale | Advanced Tools
- Signature Capture
- Salesperson Commissions
-
Inventory
- Product Catalog
- Product Catalog | Using Product Codes for No Count Items
- Product Pricing
- Product Pricing | Special Pricing
- Tracking Counts
- Unit of Measure
- Purchasing
- Special Orders and Drop Shipped Items
- Receiving Product
- Barcodes
- MyInventory and Scanner
- Components (BOM) and Accessories
- Components (BOM) and Accessories | Component Formula Tool
- Made-to-Order Kitting
- Configure-to-Order Kitting
- Multiple Inventory Locations
- Multiple Inventory Locations | Creating Locations
- Multiple Inventory Locations | Using Multiple Locations
- Multiple Inventory Locations | Product Catalog Sync
- Multi-Vendor Catalog
- Serialized Items
- Serialized Items | Purchasing or Manufacturing an Item
- Serialized Items | Selling and/or Associating an item with a customer
- Lots
- Product Attributes
- Product Attributes | Selling and Purchasing Items with Attributes
- Product Attributes | Custom Attributes
- Mobile Scanner (Legacy)
-
Labor
- Getting Started
- Workers
- Taxes and Deductions
- Work Codes
- Time and Attendance
- Time and Attendance | Time Track App
- Processing Payroll
- Closing the Payroll Year
- Processing Payroll - Advanced
- Salaried Pay
- Piecework Pay
- Direct Deposit
- 3rd Party Payroll Service
- Subcontract Workers
- Flag Pay
- Prevailing Wages
- MyDispatch
- MyTasks
- MyTime
- MyTime | Communications
- MyTime | Setup
- Tasks
- Tasks | Getting Started
- Tasks | Creating Tasks
- Tasks | Scheduling Tasks
- Tasks | Customizing Task Views
- Tasks | Managing Tasks
-
Financials
- Introduction
- Fiscal Year
- Chart of Accounts
- Budget
- Financial Reporting
- Transactions and Journals
- Transactions and Journals | Journals
- Account Reconciliation
- 1099
- Departments and Profit Centers
- Fund Accounts
- Bank Accounts
- Bank Feed
- Vendors
- Vendors | Miscellaneous Vendors
- Purchase Orders
- Expense Invoices
- Vendor Payments
- AP Transactions
- Landed Cost
- Fixed Assets and Depreciation
- Fixed Assets and Depreciation | Fixed Assets
- Fixed Assets and Depreciation | Fixed Assets | Adding Assets
- Fixed Assets and Depreciation | Processing Depreciation
- Fixed Assets and Depreciation | Disposing Assets
- MyJobs
-
E-commerce
-
Rental
-
Job Costing
-
Manufacturing
Contact Priorities
Auto Send Contact Priorities settings identify the recipient or multiple recipients of an Auto Send document. The Contact Priorities are used to prioritize send options, as well as identify CC recipients.
Complete the following steps to configure contact priorities:
-
Open a Send Mode by selecting File > Auto Send Settings > Auto Send Modes tab. Select an Auto Send Mode to open the Send Mode Properties window. The Contact Priorities are found within the Contact Priorities tab on each Auto Send mode. Review Auto Send Overview for a list of Auto Send modes.
-
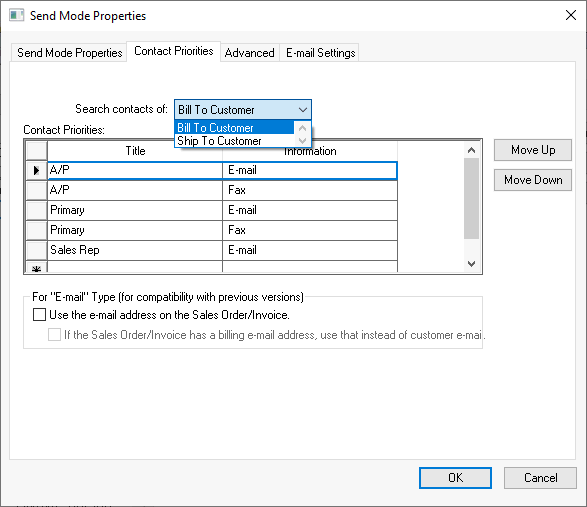
Click on the Contact Priorities tab as shown below:
-
Auto Send can be configured to access either the Bill To Customer or the Ship To Customer ID within an order or invoice. Select the appropriate contact list to search.
-
Select an available Title that should be searched within the account. The Title options are set within Contact Information section of the customer record General tab as shown below:
-
Select an Information option as listed below:
-
E-mail: The email is directed to the email contact. The system will send the document to a single email contact. The process will search for the first E-Mail type on the customer record and move to the next contact type with E-Mail as the Information type, but only if the original contact does not match the criteria. The exception to this rule is that the system will also send to CC E-mail addresses after the main email was sent.
-
CC E-mail: This option will send a carbon copy of the email. This send type can be listed anywhere in the priority list in order to be utilized, since all contacts with this Information setting will be sent the document.
-
Fax: Auto Send can be combined with an email-to-fax service to direct documents to a fax instead of e-mail.
-
-
Repeat the past few steps. Enter multiple Contact Priorities to send to multiple contacts or to use multiple Titles. Note the differing response to an E-mail contact versus the CC E-mail contact.
-
Set the priority order of the multiple contact priorities. The top slot is highest priority. In the above dialog, the recipient will be the A/P contact if the E-Mail contact type exists with the customer record. If there is no A/P contact with E-Mail as their Information type, the document will be sent via the Fax service option. Auto Send will go down the list in order until there is a Title and Information type that matches up with the customer record.
-
Disable Use the e-mail address on the Sales Order/Invoice to use the standard email selection process used by Auto Send. Enable this option to have the shipping software or user change the email address on the invoice.
Review Contact Management for details on contact settings.