The POS station dialog is launched as a separate program file rather than from the main EBMS menu. The POS station program should be configured to launch when the PC or POS station is powered up. Review the MS Windows OS manual for details on launching programs on startup.
Installing POS Station
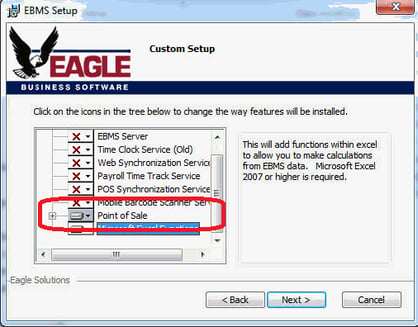
Complete the steps to install the XPress POS software on each POS station:
-
Launch the Setup.exe file from the ClientInstaller folder located on the server to launch the installation wizard.
-
Complete each wizard page until the following page appears:
-
Enable the Point of Sale option as shown above and click Next.
-
Complete the installation on each POS station.
Launch POS Station
The user should login with a specific user name and password to properly record totals and sales for specific cashiers or users. Note that a person can logout quickly and prompt a new log in by clicking on the Logout button on the top of the POS window as shown below:
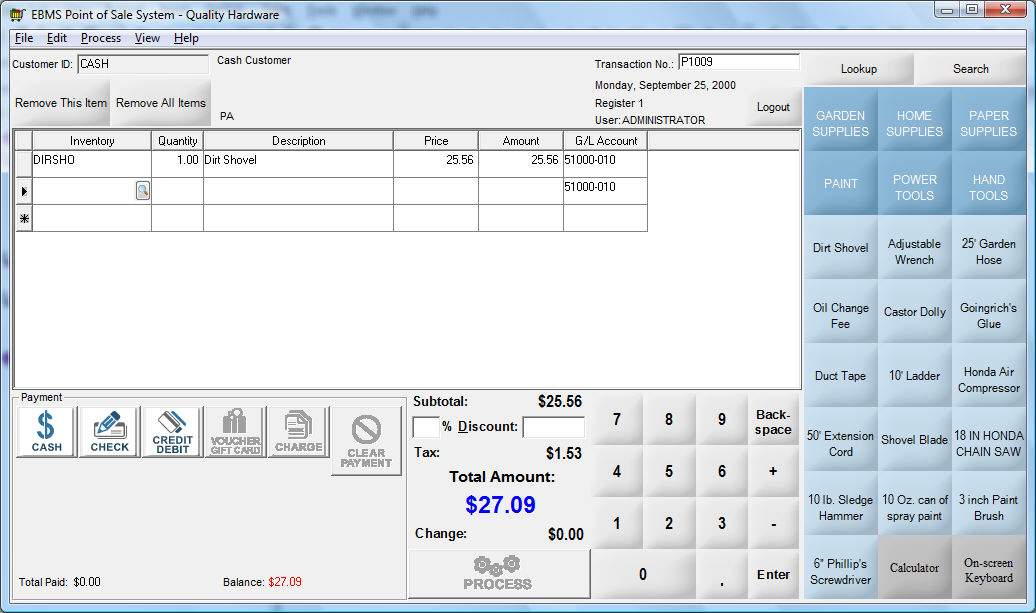
The Customer ID will need to be entered if a default Customer ID is not set within the POS station properties from Sales > Options > Point of Sale tab. Review Configure POS Station Profiles for details on entering a default customer.
The Search button located on the upper right corner of the dialog, will open the standard customer lookup dialog if the Customer ID entry is highlighted. Click on the Customer ID entry to highlight the customer code.
Adding Product
Click on the programmable keys to add products to the sales list or scan items with the POS bar code scanner. Review Scanning Barcodes for more details on scanning items.
Inventory items can also be typed into the system using a traditional keyboard or using the digital keyboard that is distributed with the MS Windows 7 or later OS. The product record can be opened by clicking on Lookup button located above the programmable button list. A standard search dialog can be opened by clicking on the Search button.
Changing Quantity
You can change the quantity of the items that were scanned or selected from a product button using the following methods:
-
Increase or decrease the quantity by clicking on the plus or minus buttons (+ or -) on the Window's numeric keypad. The +/- keys can be used immediately after the item is selected, or by highlighting a specific product and then clicking the +/- keys.
-
Click on the Quantity entry and key in the quantity using the numeric keypad on the screen or on a standard keyboard. Note that selecting the +/- key options will move highlight the Quantity column.
-
Set the Default Quantity within the programmable button dialog to default the Quantity when the programmable button is selected. The Quantity column will be highlighted within the POS window if the Default Quantity within the programmable button properties is set to zero.
-
The Quantity is incremented each time the same product bar code is scanned using a barcode scanner.
An inventory item can be removed from the sales list by highlighting the item and clicking the Remove This Item button. Click on the Remove All Items to clear the entire list.
Review [Inventory] Barcodes > Limit Over-Assignment to limit quantity shipped to the amount ordered. This feature is often necessary when using barcode scanners.
Processing Payments
Click on the appropriate Payment method using one of the payment buttons shown below:

Note that only the applicable payment buttons will be active and enabled. The Charge button may be disabled for cash customers. Review Payment Methods and Terms for details on the payment options including split tender details.
Click the Clear Payment button to clear a payment and choose a new payment type.
Click the Process button to complete the transaction.
WARNING when synchronizing data: It is important that sales invoices created by Xpress POS and synchronized to EBMS are not altered or deleted in the main EBMS data until the synchronization process is complete.