Sync Web Data using the EBMS Data Synchronization Service
The EBMS Data Synchronization Service facilitates the internet communication between EBMS on the local computer and the EBMS web server. This allows the content on the E-commerce website to be uploaded from EBMS. Web orders from the shopping cart are also downloaded into EBMS as sales orders. The communication is encrypted to ensure the security of the data.
At the time a customer or inventory item is changed in EBMS locally, it is then queued to be uploaded to the web. In the same way, at the time a customer account is created, or an order is placed, it is queued to be downloaded to the local EBMS software. Normally changes are synced every 20 seconds. Larger files, such as PDFs or images, can take longer to upload. Changes must be saved within EBMS before data is communicated to the web.
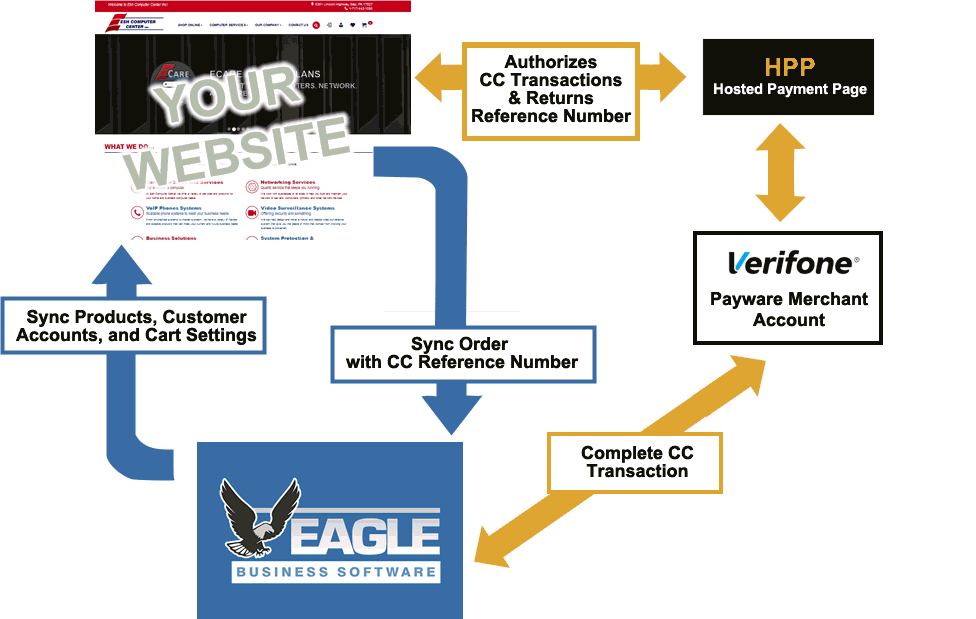
The sync tool uploads inventory item information, customer account data, shipping settings, and payment options. Review the following sections for more details on entering this information within EBMS:
-
Review the Listing Products on the Website section for more details on entering product details.
-
Review the Customer Portal Overview section for more information on price levels, terms, and login details.
-
Review the E-commerce Shipping Options section for shipping option details.
-
Review the E-commerce Payment Options section for payment option setting details.
The sync tool downloads the orders from the website shopping cart. Review the Processing Orders > Displaying and Printing New Orders section for details on viewing orders placed on the E-commerce website.
The Synchronizing data tool is not utilized if the EBMS E-commerce tools are interfaced with a 3rd party shopping cart. Review Integrate with Other E-commerce Solutions for more information.
Web Update Administrator
The synchronization tool is running in the background at all times on the server computer as the Data Synchronization Service.
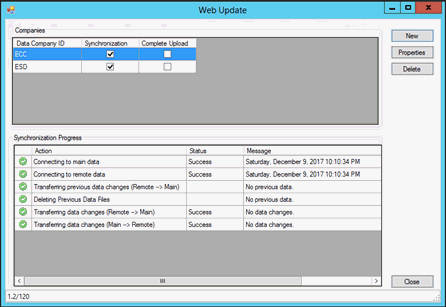
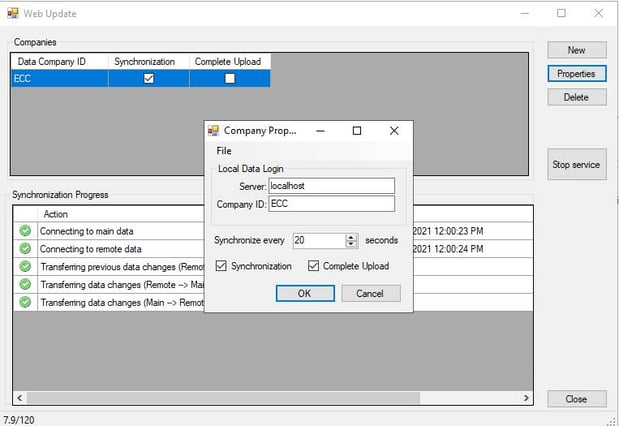
To view the status of the Data Synchronization Service, launch the Web Update Administration from C:\Program Files(x86)\EBMS\WebUpdateAdministrator.exe. The Synchronization progresses through each action, pushing and pulling changes to the server.
Sync Setup
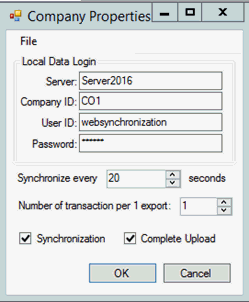
To set up the E-commerce website, the user will need to enter the sync properties. Select New to set up a new company or select a company and then select the Properties button.
-
The Server is the name of the EBMS server.
-
Company ID is the three-character unique ID assigned from the EBMS company administrator program.
-
User ID and Password is the user designated for the sync service. This is set up in EBMS under File > User Management. A new user must be created and designated for the web sync.
-
Synchronize every XX seconds checks for changes every specified time period. (20 seconds is the recommended time period.)
-
Enable Synchronization to turn the sync service on. This enables changes to be synced to and from the website.
-
Enable Complete Upload to push a fresh copy of the EBMS Data to the Web Server. See Complete Upload documentation at the end of this section.
Click OK to save changes.
Synchronization Progress
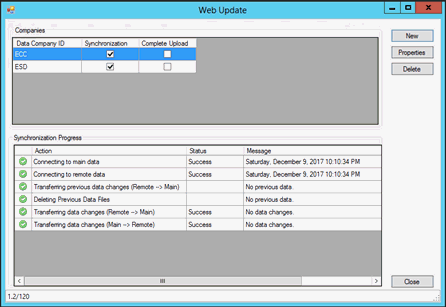
Each action, status, and message will be shown in the Synchronization Progress section. When the sync is successful the status of the Synchronization Progress is shown as all green.
If the sync service stops for any reason, a descriptive message will be displayed and EBMS support is automatically notified.
Resolving Conflicts
In the event the Synchronization Service cannot download a file due to a sync conflict, the Synchronization Status Debugger can be launched from the EBMS File menu to preview the data and resolve the conflict.
Within EBMS, select File > Synchronization Status from the header menu. Select a device and click Resolve Error button.
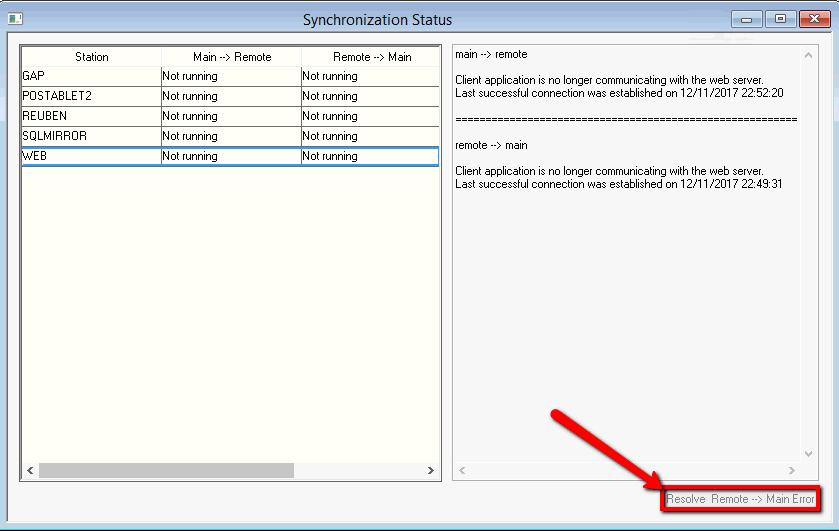
The dialog will step the user through the fields needed for the sales order entry and direct the user to the field producing the error. This allows the user to correct the field that is producing the error.
Contact Koble Systems support for assistance in resolving the error.
Complete Update
The longer complete date update process is required when the web synchronizing tool is first set up or if data is not properly synchronizing.
Complete the following steps to do a complete update from EBMS to the web:
-
Launch the Web Update Administrator utility from the main EBMS data server: (C:\Program Files (x86)\ebms\WebUpdateAdministrator.exe). Review the Web Update Administrator documentation at the beginning of this section.
-
Select the correct EBMS company data set and click Properties.
-
Enable the Complete Upload checkbox and click OK.
-
The complete upload should start within 30 seconds or so. The status will show within the Synchronization Progress pane.
After the complete upload is finished, the Complete Upload option is automatically turned off and the service only synchronizes changes again.