The Text Import/Export Mappings utility can convert a delimited text file such as a .TXT or a .CSV file into an EBMS file. Do NOT use a CSV UTF-8 file.
The utility allows the user to convert information, such as removing incompatible characters from part numbers, remove quotes and other characters from descriptions, or format numeric values. The utility also gives the user the ability to change the column or field names, remove unneeded columns, or preview information based on the current settings.
The configuring of the Import/Export Mappings must be completed whenever a new file format is downloaded from the information source or if columns of fields have been changed since a previous download. Note that the reconfiguring of this mapping is not required if the text file format has not changed.
Complete the following steps to enter the Import/Export Mappings properties or to review settings entered previously:
-
Open the Import/Export Mappings dialog by selecting File > Utilities > Text Import Export Mappings option from the main EBMS menu.
-
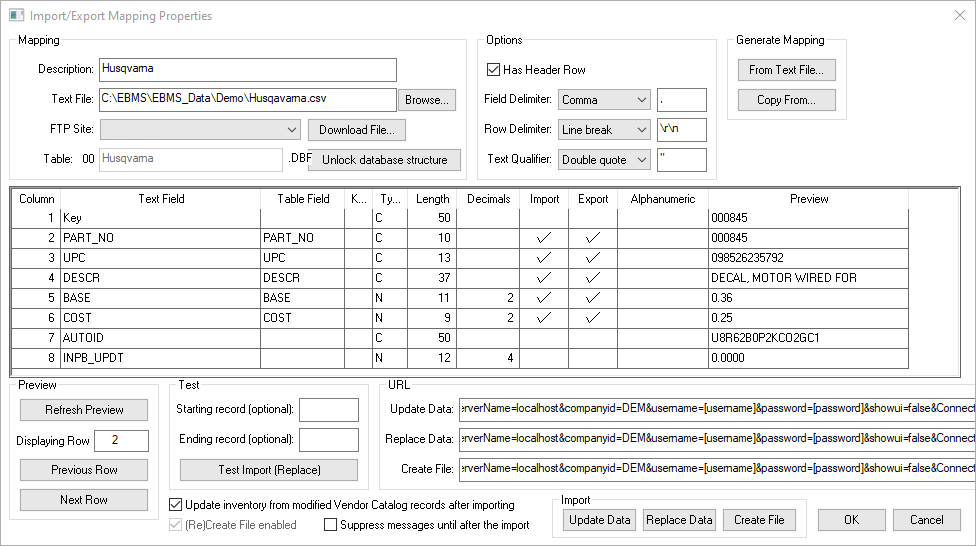
Enter a mapping Description as shown below:

-
Select the Text File that contains the information that will be converted to EBMS-compatible files. Click the Browse button to locate the delimited file such as a TXT or CSV file. Text files that are converted to EBMS using this utility should be located in a shared directory or FTP site.
NOTE: Do not name the downloaded file with a date since the file structure will be each time data is downloaded from the vendor. -
Set the optional FTP Site setting if the text file is located on the cloud. This option gives the vendor or source of the file the opportunity to regularly update the file using a shared cloud-based location. This setting is optional if the text file is located on the local network.
-
Click on the Download File… button to download a file from the FTP site.
-
The EBMS Table name will be labeled the same as the text file with a double 0 prefix. Note that the Table.DBF name can be changed. In the example below, the file name was changed from 2013 Husqvarna.csv to Husqvarna.DBF. This file will be located in the same directory as the other EBMS files.
-
The following mapping Options are set based on the formatting of the source Text File:
-
The Has Header Row setting should be enabled if the first row of the text file contains column headings. A file heading row is recommended.
-
Set the correct Field Delimiter. A CSV file is delimited using a comma and a typical TXT file is delimited with a tab. Alternative delimiters can be set by changing the Field Delimiter settings.
-
Set the appropriate Row Delimiter. A line break is a common delimiter within text files.
-
Set the Text Delimiter. Note that double quotes are standard text delimiters.
-
-
The most convenient way to map the Text Field with the EBMS Table Field is to click on the From Text File button. This process should only be used to map a new Import/Export Mapping Properties record. Note that the Generate Mapping buttons should not be used to map standard EBMS files such as the inventory file. The Copy From button can be used to copy a mapping file.
-
The Mapping detail consists of the following settings or options: Click on the Unlock Database Structure button located to the right of the EBMS database Table file name. Make the necessary changes.
Click on the Import (Replace) button. Note that the Import (Update) process cannot be launched after file structure details have been changed. Review the Importing Text Files into EBMS section for more details.
-
The Text File or column heading within text file will be populated with the text in the first row of the file if the Has header Row option is enabled. Disable the Has Header Row option if the Text File column labels appears as data.
-
The Table Field column lists the fields within the EBMS table. The Table Fields labels can be changed by the user as well as many of the other column values. Review EBMS Tables and Fields for information on identifying EBMS files and field names.
Note that some of the field labels, length, keys, and other details may not be changed after a file was already created (imported). Complete the following steps to change EBMS file structure after an import was already processed:
-
Configure a numeric Table Field with a value with 2 decimals should be set to a length of 12 (decimals + 10).
-
A character Table Field can have a value of 1 to 256. Making this field too small may cause data to be truncated.
-
A memo field can contain a length setting of 1 to 4 creating an actual field length of 100 minimum characters to 400 maximum characters.
-
-
Enable the Key column for any sorting file key column. This column should identify a unique key such as a part number or ID code. The import/export properties must have a least one key column identified to update a file rather than replacing it.
-
The field Type column identifies the type of EBMS data created. Enter one of the following options:
N: Numeric field with a max length of 20.
C: Character alphanumeric field with a max length of 256. Dates and logical data will be imported as a character type (C).
M: Memo field has a max length of 4 (x100) which translates to 400.
-
The Length column identifies the length of the field. Note that enlarging this field beyond the required characters will increase the size of the database file. See the max length of each field type listed above. Some recommended lengths:
-
-
The Decimals column identifies the number of decimal places within a Numeric field (Type N). This setting is not valid for Character and Memo fields (Types C or M).
-
The Import option should be enabled unless the specific text file column should be ignored.
-
The Export column option is used to identify the Export fields. Review the Export EBMS Data to a Text File section for more details on this option.
-
The Alphanumeric option is an import function when importing ID codes or part numbers that require only numbers and characters. If this option is enabled, the system will remove spaces and special characters. Review the results of the Alphanumeric option in the Preview column to the right of all the other columns.
-
The Preview column is used to display a preview of the data that is being imported into EBMS. Review the Testing or Previewing a Data Import section for more information on previewing data or testing a data import.
-
Review the Importing Text Files into EBMS section for details on launching the import process.