The EBMS system allows the user to calculate the prices for inventory items using formulas. These formulas can be calculated from cost or a base price. A variety of formula options are available. The formula feature can greatly enhance the challenges of maintaining pricing within different price levels and ever-changing costs or list pricing. The following formula calculations option are explained within this section:
Calculating Prices Automatically from Cost
Go to Inventory > Product Catalog and double-click on a product to open the product record. Once the product record is open, go to the Pricing tab.
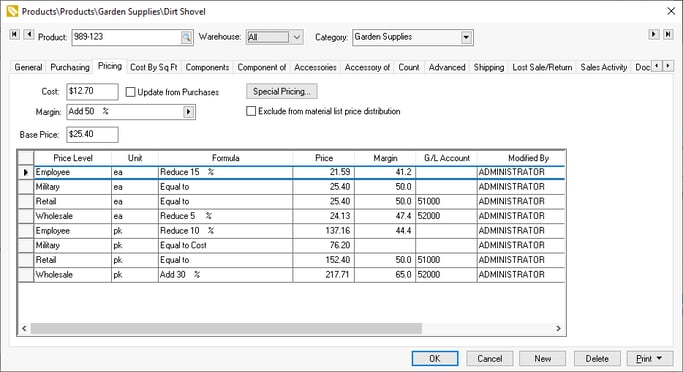
Select a Margin or Markup option to calculate the Base Price from the cost by adding a margin or markup to the cost. (Note: Only one option will be available on the Pricing tab. Set Margin or Markup by going to Inventory > Options > General tab and selecting one option from the Method to markup prices section.)
The Margin or Markup option can also be set to Equal to by clicking on the right arrow and selecting the Equal to option. Notice that the Base Price now equals the Cost amount. Most inventory price level prices are calculated from the Base Price.
The Cost value is updated each time an expense invoice is processed if the Update from Purchases option is enabled. The Cost can be updated from a purchase order by activating the Process > Update Product Costs from P.O. option within the purchase order menu. Note that this value includes any landed costs. Review Adjusting Landed Costs within a Purchase Order for information on adding costs to the purchase cost.
Enable the Exclude from material list price distribution on the product record Pricing tab to only use a fixed price within a materials list. Review Materials List Pricing for details on this option.
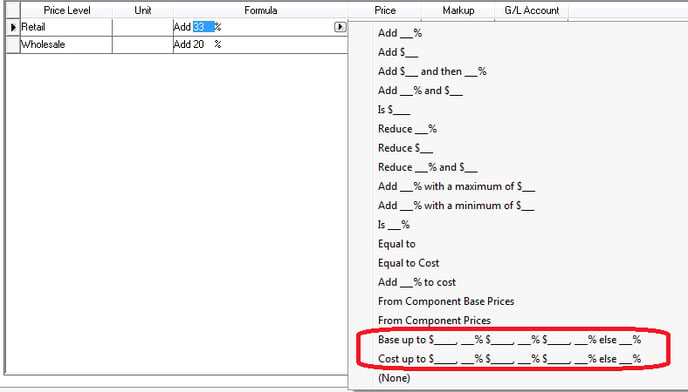
The next step is to set formulas for each price level. Select the price formula by choosing from one of the pricing options listed in the drop-down box below:
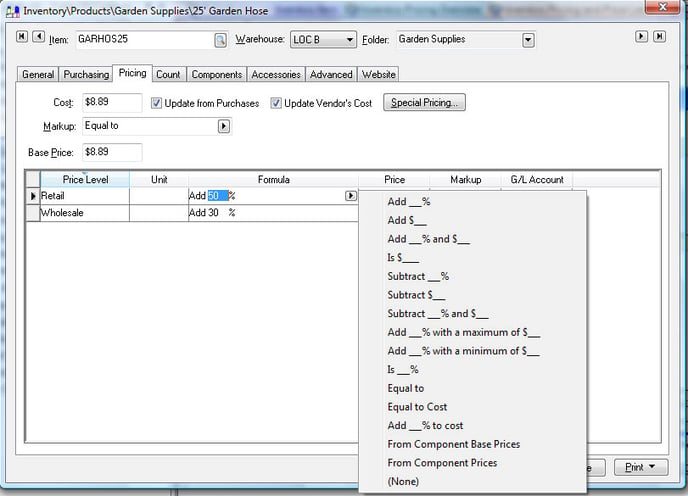
All options using a percentage will be affected by the Margin or Markup option you selected in Inventory > Options > General tab. The reason for this is that margin will apply the percentage you select to the cost and the percentage.
EXAMPLE: Quality Hardware chooses to markup hammer products by 50%. With the option set to Margin, if the cost of the hammer is $10.00, the price will be $20.00. If the option is set to Markup, the price will be $15.00.
The dollar-based options in the drop-down box above will not be affected by Margin or Markup.
-
Add $____ will add a set dollar amount to the base price to calculate the price level price.
-
If the Is ____ % option is set, the price will equal a specified percentage of the Base Price. For example, if the formula for a hammer that costs $10 is set to Is 50 % then the price will equal $5.00. Do not confuse this option with the Add functions used to mark up a price from the cost.
-
The Is $____ option will set the price and will not be affected by the Base Price or Cost. This option is used only if the user wishes to enter a specific price but have the system round the number using the standard rounding tables. See Rounding Calculated Prices for more details on rounding.
-
Set the option to (None) to enter a specific price without rounding. If the Formula column is set to (None), the amounts in the Price column can be manually entered.
-
Another option available to calculate prices from the cost is to mark up the base price from the cost. Instead of setting the Margin or Markup field to Equal to as described above, set the field to a price markup option similar to the pricing options explained above. For example, if a hammer costs $10.00 and the Margin/Markup field is set to Add 50%, the Base price will equal $15.00 or $20.00 based on the Margin or Markup option selected in the Inventory > Options > General tab.
-
Use the Add ___ % to Cost formula to calculate a specific Price Level from the Cost value.
This new Base Price may now equal the retail price. If so, set the retail price level to Equal to and the wholesale price formula to Add 10% to make the wholesale price 10% lower than the retail price.
It is important to realize that if the Margin or Markup field has a value, the prices may change each time the cost fluctuates. This is very convenient for small parts since the user does not need to manually update prices each time the cost changes, but it may not work well for larger whole goods items that are advertised for a specific price.
The system may create odd, detailed price amounts as the system formulates the price for each price level. For example, an item with a cost of $39.00 and a formula of Add 33% would have a result price of $51.87. The system can round this number in many different ways. For details on rounding prices, review the Rounding Calculated Prices section.
Calculating Prices from the Base Price
At times, it is desirable to set the Base Price to a list price or other user-defined price rather than calculating the Base Price.
Generating prices from vendor-supplied list prices or standard costs may be reasons to calculate the price level prices from the base price. This price may be manually entered by the user or imported using the Multi-Vendor Catalog.
One advantage of not calculating the base price from the cost is that the item prices will not change each time the cost changes, so prices will remain more stable over time. The disadvantage is that the user must manually review prices on a regular basis to make certain that desired profits are made.
Open an inventory item and click on the Pricing tab to open the following dialog:
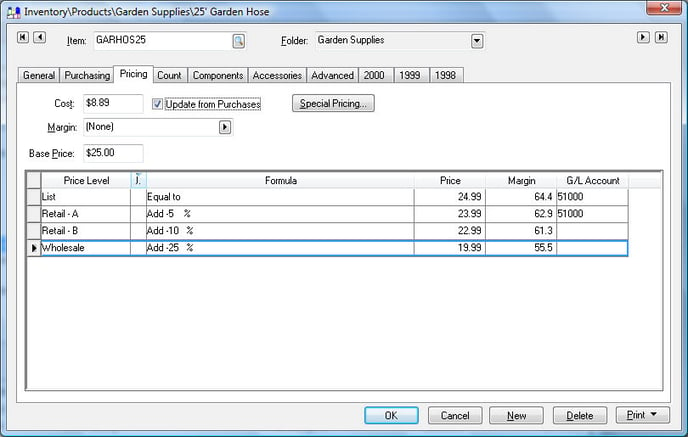
Set the Markup field to (None) as shown above. Notice that this allows the Base Price to be changed by the user. Since the Base Price reflects the list price, all the price level prices are calculated from the list price rather than cost.
Set individual price level prices by setting the appropriate formula. Set the price Formula to Equal to to make the price equal the base price. For example, if a vendor supplied the list price, set the Equal to formula to make a retail price level equal the list price. To discount a whole price level by 10% use the Add ___% option and enter a negative value into the formula (Add -10 %) to decrease the wholesale price by 10%. See the previous section for more details on formula options.
A specific price level can be calculated from the Cost by selecting a price level formula that is calculated from the Cost value.
The Base Price can be derived from the base price of all the components within an assembly. Review the Optional Component Pricing section for details.
The Base Price can also be copied from vendor-supplied data, if the vendor supplies the list price or cost in a file. Review the Multiple Vendor Catalog Overview section of this manual for more detail on updating the Base Price from a vendor file.
The system does contain a rounding feature to round calculated prices. For details on rounding, review the Rounding Calculated Prices section.
Use the Base Price vs. Cost Comparison report to compare the base price or list price with the cost to determine if the desired markup is enough to make a profit. Go to File > Reports > Inventory > Costs/Prices > Base Price vs Cost Comparison report.
Items within a specific base price range or a cost range
Note: This is an advanced feature that is only used when there are a large number of items within a folder group.
Complete the following steps to create price margins based on the Cost or Base Price of the item. This feature allows the user to increase the margin for lower cost items without setting margins individually or by the product group. The following steps need to be duplicated for each group that contains different sets of bracketed pricing.
-
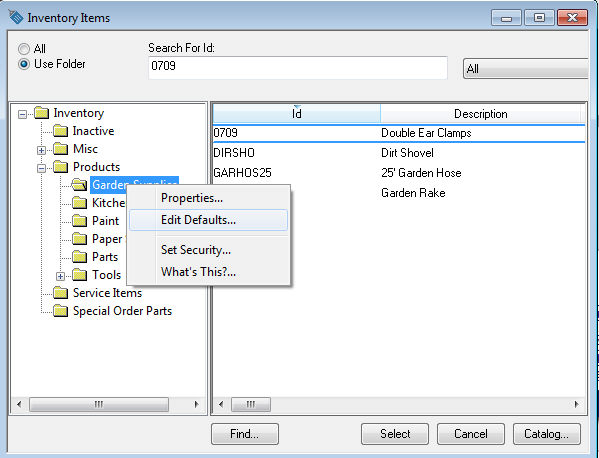
Select the folder that will inherit the specific group of bracketed pricing. For example, by selecting the top-level Inventory folder, the user will set all the inventory items with the same bracketed pricing. Select the Auto Accessories category to set the pricing for only the Auto Accessories group or select the product group or manufacturer subgroup. Right-click on folder group and select Edit Defaults from the context menu as shown below:
-
Select Pricing tab.
-
The first step is to determine if the price margin is calculated from the Cost or the Base Price of the item. Select the appropriate formula template.
-
Determine the margins percentages for up to four sets of value brackets as shown in the example. These formulas will look like "Base up to $__, __% $__, __% $__, __% else __%" or "Cost up to $__, __% $__, __% $__, __% else __%":
-
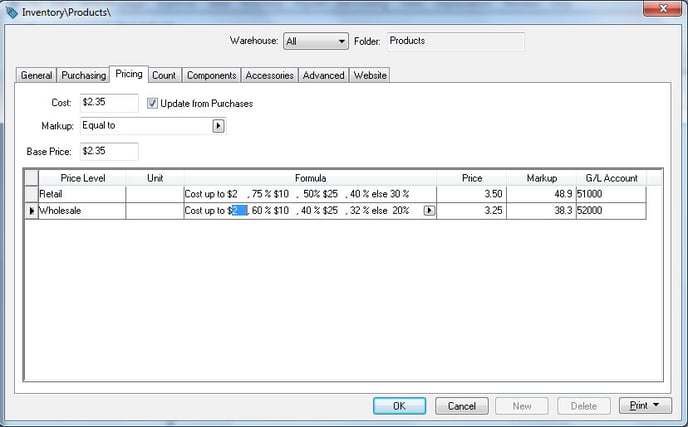
Review the following example that is based on the Cost of the inventory item. The Retail and Wholesale pricing are both based on bracketed formulas, but they are filled in with different values. In the example shown below, the Retail price is marked up by 75% if the Cost is less than $2. If the cost is $10, the price is marked up 50%, etc. If the Cost were greater than $100, the price would be marked up by 30%. This example also contains a rounding table, so the markup is not exactly 75%.
Entering in all the information, the filled-in bracketed formula for the Retail Price Level looks like this: Cost up to $2, 75% $10, 50% $25, 40% else 30%. The filled-in formula for Wholesale looks similar, but it contains different values: Cost up to $2, 60% $10, 40% $25, 32% else 20%.
-
A bracketed pricing formula can also be calculated on the Base Price, using the same formatting as the Cost example shown above, but using the "Base up to $__, __% $__, __% $__, __% else __%" formula.
For example, a filled-in formula of Base up to $2, 75% $10, 50% $25, 40% else 30% would mean that if the base price is up to $2, the markup is 75%. For a base price of $10, the markup is 50%, etc.
-
Manually setting pricing
At times, it may be most desirable to manually enter each price. This can be done for one or multiple inventory items. Open an individual inventory item by going to Inventory > Product Catalog to open an inventory record. The following window gives an example of setting manual pricing:
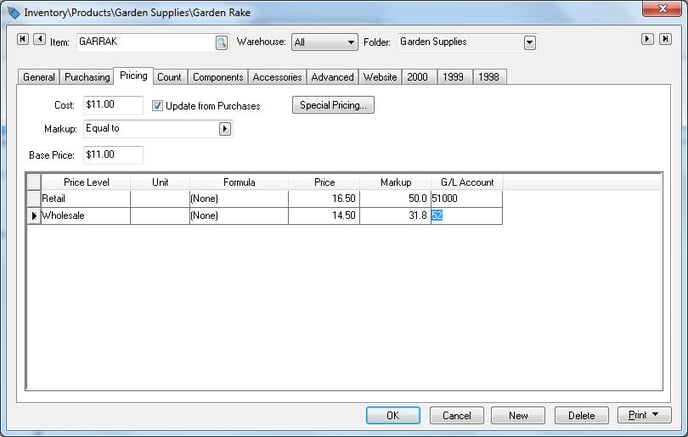
Set the price Formula to (None) to manually enter a price in the Price column. If the price Formula is set to any other option, the price column is calculated automatically, and this amount cannot be edited directly. The Is $_____ formula will accomplish the same results as the steps listed above, except that the value entered within the Is $____ is subject to the rounding function. Review the Rounding Calculated Prices section for more details.
The Margin/Markup field and the Base Price field have no effect when the prices are manually entered.