It is wise to set employee category folder defaults before Entering New Workers. Go to the Worker Categories tab.

Click to highlight the top root folder (named Workers in the example above) and click the Edit Defaults button on the right-hand side of the page.
The following window will appear:

The Workers default window appears very similar to an individual worker record, but it is used only for entering default values. Any data entered into any of the default entry fields will automatically appear in the next new worker record entered into EBMS. It is best practice to only use top-level defaults for very basic information.
EXAMPLE If you set the country entry field default to "USA" then you will not need to enter USA into that field when entering a new employee.
To set defaults for more specific category folders or subfolders, highlight the folder to edit and click Edit Defaults.
General Tab
From Labor > Labor Options > Worker Categories tab > Edit Defaults, most of the information on the General tab should remain blank with the following exceptions:
-
Set the labels under Contact Information to reflect the most common contact information that you obtain from your employees. Click on the right arrow button for each of the entry fields and you will be able to select a variety of labels. These contact options are Phone, Fax, E-Mail, Contact, Web Address.
For a label example, go to Phone and click the arrow button. From the list, select Mobile Phone or Home Phone to ensure all employees have their mobile or home phone number on file. Choose the option that makes the most sense for the company. For Fax and E-Mail contact, even if it seems redundant, add the Fax and E-Mail labels for ease in querying. -
Set the Workers' Comp. Classification to the most common workers' compensation classification used for new employees. Keep this field blank, if you do not wish to have this field default to a classification.
- Click OK to save changes.
Pay Tab
From Labor > Labor Options > Worker Categories tab > Edit Defaults, go to the Pay tab.

Pay Frequency should be set to the length of the normal payroll period, such as Weekly or Bi-Weekly.
The employee pay Method should reflect the primary payment method. Review the documentation for more details on this important setting:
-
Check: Configuring Payroll Forms
-
Direct Deposit: Direct Deposit > Worker Configuration
-
Payroll Service: 3rd Party Payroll Service
The Is subject to minimum wage option should be enabled under normal circumstances. This option is important if piecework payroll is being utilized.
Enter the Minimum Wage rate (usually the Federal minimum wage level). Review the Minimum Wage and Makeup Pay section for more details.
Select Hourly or Salary pay in the upper left-hand corner, whichever is the most common payment type for the business.
Pay Rates and Previous Pay values should be kept blank. Enter these fields at the employee level, not at the default level.
In the Pay Rates section, standard Pay Types should be listed within the default employee settings. Select the new Pay Type you wish to list on for all new employees. Perform the following steps to set up Pay Rates defaults in this table:
-
Click on the New Rate button to the right of the Pay Rates table. The following dialog will appear:

-
Select a Pay Type from the dropdown list. The user must create any new pay types in the before they show up on this options list. See the Pay Types section for details on how to create new pay types.
-
The Work Code field is normally kept blank for default settings unless a work code is always associated with this pay type. See the Work Codes section for details on the function of a work code.
-
The Rate Formula should be set to Equal to in the default screen if the pay type is hour-based. Select the formula template by clicking on the right arrow and choose one of the available templates.
-
Increment fields are only used for benefit pay types that are limited, such as vacation or sick days. Ignore the Increment and Hours Available field entries if they are not consistent for all employees.
-
Choose the Increment > Condition from one of the following options:
-
Each Timecard will increment the available benefit hours each time a timecard is processed.
-
Beginning of Year or Beginning of Anniversary Year option will be available based on the Reset Hours setting within the pay type settings. See the Pay Types section for details on changing this setting to the other option. Both options will increment the Amount once a year.
-
The Never option will not increment the Hours Available amount automatically. It will always require manual entry of hours.
-
The amount field reflects the amount that This Calendar Year is increased each time the Increment Condition is TRUE.
-
OK to save pay type changes. Repeat these steps for any additional default pay types.
From the Pay tab:
- Click the Properties button to edit or view existing Pay Types.
- Click the Delete button to remove a pay type. Pay Types should be deleted from the default list if the pay type is not standard.
The Direct Deposit Information option should be disabled in the default employee dialog. Direct Deposit options should be set on the employee record, whenever a new employee is added.
Personal Tab
Keep the Personal tab blank for Labor > Labor Options > Worker Categories > Edit Defaults, since this information should be set for each employee within the worker record.
Advanced Tab

- Set the Makeup Pay General Ledger account as an expense account to record any makeup pay that is paid to an employee. Makeup pay is added to an employee’s pay and must meet minimum wage requirements. Review the Minimum Wage and Makeup pay section for more details.
- Set the Payroll Payable General Ledger account, which requires an account with a Payroll Payable classification. If no account is available, go to Financials > Chart of Accounts to add a liability account with a Classification of Payroll Payable.
- Set the Default Tax Location of the company. Review the Taxes for Multiple Locations section for more details.
- Credit Workweek Amount is the minimum dollar amount an employee needs to work to become eligible for state benefits, such as Workers’ Compensation. This value should be set within the employee defaults before new employees are added. If this total changes for all employees, filter down default amounts to all existing employees.
- Set the standard Clock In/Out Parameters and Daily Hours for new employees. Keep these settings blank if settings vary for new employees. Review Worker Clock In/Out Parameters for more details on these settings.
Worker Taxes Tab

It is recommended that you list all common employee taxes and deductions, so they are defaulted whenever a new employee is added. If the employee tax and deductions are not set up, go to Labor > Taxes / Deductions and enter tax and deduction codes and rates before continuing with the following steps.
If any taxes or deductions listed in the Worker Taxes tab table are not used for an average employee, delete them by highlighting the tax or deduction and clicking the Delete button.
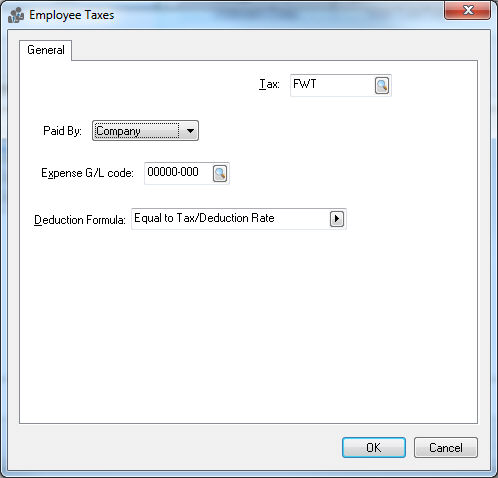
Add any new taxes and deductions by clicking New Tax. The following dialog will appear:

Select the Tax you wish to add by clicking on the magnifying glass icon.
To create a new tax or deduction, go to Labor > Taxes/Deductions > New button. The most common employee taxes are FWT, FICA, MED, a state withholding tax and possibly a local tax. Also, add any company-wide employee deduction. For more information on how to set up taxes, see Adding New Taxes and Deductions section.
All other fields in this dialog should be kept blank until setting up a new employee.
Company Taxes Tab

Set up the common company taxes, such as state unemployment (SUTA) and federal unemployment taxes (FUTA) and the company portions of FICA taxes and Medicare taxes.
If any taxes or deductions listed on the default Company Taxes tab that are not used for an average employee, delete them by highlighting the tax or deduction and clicking the Delete button.
Add any new taxes and deductions by clicking New Tax. The following dialog will appear:
Click on the magnifying glass icon to view the available taxes and select the Tax you wish to add. To create a new tax or deduction, go to .
All other fields in this dialog should be kept blank until adding a new employee, with the exception of Expense G/L code. Enter an expense General Ledger account to record company tax expenses for each tax list in the Company Taxes tab.
Messages Tab
This tab can be used to enter any global messages that appear when certain procedures are performed. Review Custom Messages for instructions to create messages.
App Settings
App settings that are globally set for a group of workers should be set from the defaults settings.
Review MyTime Desktop Settings for instructions to set the MyTime app settings.
Copy Default Values
If subfolders exist and you wish to copy the default values from the root folder into the subfolders, drill down the default value for each entry field in each tab.
Click the OK button to return to the Worker Categories tab.
Repeat the steps above if you wish to set different default settings for subfolders than the ones set for the root vendor folder.
For more details on individual fields, go to the Entering New Workers section.