The Send Now, Export Now, and Print Now tools allow the user to attach shortcut keys on the File menus of various EBMS documents, such as invoices, proposals, and other customer and vendor documents. These shortcuts allow the user to quickly email (Send Now), save (Export Now), or print (Print Now) user-configured forms or reports throughout EBMS.
-
The File menu within a sales document, expense document, or rental contract. within a sales order or sales invoice.
- The Invoice tab on the customer record. Review the following instructions found later in this section: Sending a Group of Documents.
-
Right-click on any task record within a task list or schedule: Review Managing Tasks > Email or Print Shortcuts for details on send now task shortcuts.
-
Right-click on the customer's payment list or a document's processed payment list
-
A customer statement can be sent individually using the Send Statement Now button. (Review Auto Send A/R Statements for more details on this option.)
Send Now Tool
The Auto Send Now tool enhances the ability to quickly email a document directly from the various documents listed above. A benefit of this feature (over the traditional Crystal Reports export) is that the system uses the settings within the account record to email the document and records the same date and time settings as the Auto Send process.
-
Select the from the main EBMS menu to open the following dialog:

- Enable the 'Export to File' button option to include an export option to the Send Now dialog. This option gives the user the ability to create the file and attach it to an email or other document without opening the email client.
-
Select the Sales Order Menu Options option by double-clicking on the Auto Send Mode record to attach documents to a sales order or invoice. The following Module Menu Settings dialog will open:

-
Highlight a report in the list and click Properties to select the form and set email settings.

-
Configure the following settings for each hot key shortcut:
-
The example above is to set up the Ctrl + 1 hot key. Choose an optional document for one or more hot key options. For example, select the Invoice (Plain Paper) option by clicking on the Browse button and selecting the invoice document from the Reports menu. Review Report Menu for more details on locating forms and reports. (Keep Report blank to not include a report attachment.)
- Keep the PDF Filename setting unless the attached file should be renamed to clarify the contents for the email recipient. Do not remove the order number contents between the '<' and '>' placeholders.
- Enter an optional Folder Path to include other reports to this email. Review Auto Send Additional Documents for configuration instructions.
-
Some documents have multiple accounts. For example, the sales order contains both a Bill To Contact and a Ship To Contact. Select the Default Contact to use when sending the email.
-
Enter the Email Subject and Email Body using HTML or plain text syntax. The keywords list located at the bottom of the dialog can be used within the email body. Use the < > brackets between accessible database fields. Review the database field option within the Set Query Options documentation for instructions to access technical database field information.
-
-
Open the sales order and invoice dialog and look under on the sales order menu:
-
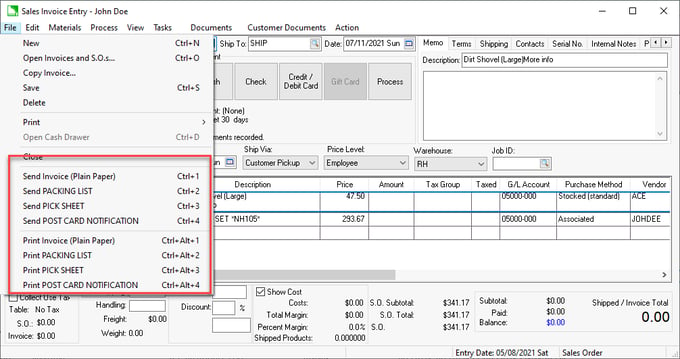
Notice that a pair of hot keys are added to the sales order's File menu next to the send options. The first set of Send hot keys is used to auto send forms and reports using Auto Send by using Ctrl + [number].
In this example, Ctrl + 1 will open a Send Now window pre-populated with the invoice (plain paper) information and attach the sales invoice. Auto Send will launch the following process using a quick hot key shortcut:

-
Click on the To, CC, or BCC buttons to populate contact information from the customer's contact list based on the Select Recipients setting.
-
The available send buttons depend on the send options configured in General Auto Send Setup Instructions. Note that some of the following buttons may be hidden. Use one of the following Send options to generate and send a report:
-
Send Now: This option will directly send the email using the default SMPT settings.
-
Send via Outlook (if classic client detected): This option allows the user to edit the email and send it using MS Outlook.
-
Send via Thunderbird (if client detected): This option allows the user to edit the email and send it using Thunderbird.
- Export to File: Exports the PDF file to the Auto Send directory, allowing the user to send the information using user-defined tools. This option will export the file without launching an email client. Use this option to send the file using a client that is not configured within EBMS.
- Print: See the following section for Print Now details.
-
Sending a Group of Documents
A batch of documents may want to be grouped into a single email. Complete the following steps to email, export, or print a group of documents for a single account.
- Open a selected customer record. Documents are grouped by customer.
- Click on the customer record Invoices tab.

- Select one or more invoices by checking the Select column.
- Click on the Send Selected button to Auto Send all the selected invoices in a single email.
- Click on the Printed Selected button or Export Selected button to process all the selected invoices for this customer.
- Repeat to send, print, or export another batch of invoices or orders.
Print Now Tool
The second set of hot keys is similar - it allows users to quickly print a form without prompts by using the Ctrl + Alt + [number]. In the example above, Ctrl + Alt + 1 will print Invoice (Plain Paper). This is an alternative print method to the menu on the invoice. The menu opens a print dialog and the short cut key (Ctrl + Alt + [number]) does not.
Review Printing a Report for steps to save default prompts for these reports.