Changing the customer identification code within EBMS takes a few quick steps. The Change ID process will maintain the history of the account. The Customer ID can be changed using one of the following processes:
-
Change an ID for a single customer: Right-click on the Customer ID field on a customer account record and select Change ID from the context menu. Type in a new ID to the Enter New Customer ID field and click OK. Review Changing IDs for more details.
-
Change IDs for a group of customers: Review the following instructions to batch change or merge a group of customers.
Two customer accounts can be merged into a single customer account without losing history. This process is ideal if the same customer was accidentally added to EBMS multiple times. Merging customers is preferred over making one of the customer accounts inactive, since merging consolidates the history from both accounts. The merge process can be completed using either of the following processes:
-
Merge one customer account into another: Right-click on the Customer ID field on the customer record and select Merge Customer Accounts from the context menu to bring up a Customer Merge window. Select the customer record to delete (Customer to delete) and the customer record to receive all the combined history (Customer receiving history). All customer history and activity will be transferred to the customer receiving history. The merge action cannot be reversed, so double check the IDs before clicking Merge.

- Merge a group of customers: Review the following instructions to batch change or merge a group of customers.
Batch Change/Merge Customer Accounts
An entire list of customer accounts can be changed using a batch process within EBMS. This utility uses a spreadsheet list of the old IDs and the new IDs and changes them as a batch.
Complete the following steps to batch change and/or merge Customer IDs:
-
Create parallel lists of customer IDs within a spreadsheet or CSV file. Create one list with the current customer id and a parallel list with the new IDs.
This spreadsheet or CSV file can be created manually or exported from EBMS. Export data from EBMS if the new ID is compiled using names or other info that is helpful within the spreadsheet. Review Exporting to CSV Files for more exporting details and options. -
Populate the New ID column, which will need to be created if the column does not already exist in the file, with one of the following types of customer IDs:
-
A new Customer ID, which will prompt a Change ID process. This process will replace the old ID with the new ID. All history will be maintained with the new ID code.
-
An existing Customer ID, which will prompt the Merge process. This process will merge the old ID history with the new or existing ID. The old customer ID information will be deleted, and all history will be changed to the new ID. Warning: This process cannot be reversed.
-
-
Make a backup copy of the EBMS data before continuing, if information is being merged.
-
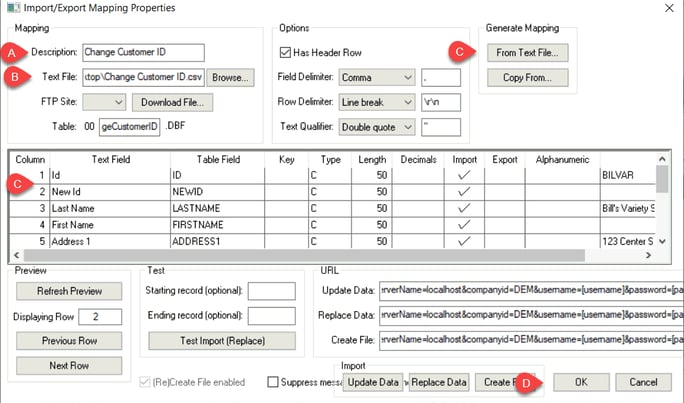
Map the ID columns using the utility as shown below:
-
Enter a Description to identify the change ID process.
-
Set the spreadsheet or CSV file as the Text File.
-
Click on the From Text File button to generate the mapping. The system should map both the original ID and the new ID properly without additional configuration. The other columns do not need to be mapped. Review Text Data Import and Export Utility for more details on this mapping utility.
-
Click OK to save the mapping. Do not use the Update Data, Replace Data, or Create Data buttons.
-
-
Select from the main EBMS menu.

-
Select the Mapping description file created in the previous step. (Note: If no mapping has been created, clicking on Change/Merge Customer ID's will prompt this message: "A change/merge import mapping is required to use this utility. Please create a mapping using File > Utilities > Text Import/Export Mappings.")
-
Select the Old ID Field setting that identifies the original ID.
-
Select the New ID Field that identifies the column that contains the new ID or the merge ID.
-
Disable the Perform a merge if new ID already exists only if no customer accounts should be merged. Enabling this option will merge any customer that already exists within the New ID Field column. Warning: A merge cannot be reversed.
-
Click OK to complete process.
Video: Changing IDs or Merging Accounts ERP Support Training