Search lists or lookup lists are a convenient way to search or manage a list of records such as your customers, vendors, products, invoices, workers, etc. The benefit of these lists is the ability to find information quickly by using the following lookup tools:
-
Search by category or the entire list: A search may be reduced if a category is selected on the left pane.
-
Sort the list by column: Sort by ID, Last Name, or some other column.
-
Use the Find button to quickly find a record based on various keywords. Review Find Button within a List Dialog for more details on this powerful search tool.
Lists can become very lengthy since EBMS does not restrict the number of items that can be entered, making it very important that users can access this information in a number of ways.
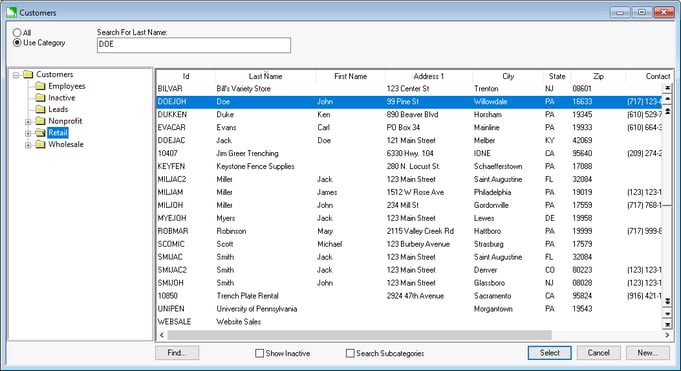
The image below is an example of the lookup:
 The search list box consists of:
List Heading
-
Select All to list all records or select a specific category folder, which will change the option to Use Category. (In the example above, the Retail category folder is selected, so search only covers the retail customers.)
-
The Search entry will search on the active column. The active column in the example above is Id. A column can be made active by clicking on the column title.
Category Pane
- Right-click on a category folder on the left-hand side of the page and select Properties from the context menu to set the category label as well as other category-based settings. Review Categories and Folder Groups for more details.
- Right-click on a category folder and select Edit Defaults from the context menu to set defaults and globally edit information. Review Edit Defaults, Filter Down Data, and Globally Change Data for instructions.
Information Pane
-
Column headers: Review Column Appearance for instructions to hide or change the size of columns.
-
Sort and query: The Information list can be sorted or queried using the list heading options, selecting a category, or by applying a query by clicking the Find button. The list will highlight the current selection.
-
Drag and drop: Information can be dragged from one folder to another by clicking on an information record, holding down the Shift key, and dragging it to another folder.
List footer
-
Click on the Find button to query the list either within All or within a selected category. The button label will change to Find Again to search for other information. An additional Stop Find button will appear to clear the find search and list all the records. Review Find Button within a List Dialog for more details.
-
Enable the Show Inactive to make inactive records visible within the list.
-
Enable the Search Subcategories to show records within the subfolders of the selected category.
-
To open a record from a search dialog, use one of these actions:
-
Highlight a line in the search table and click the Select button.
-
Double-click on a line in the table.
-
Highlight a line in the table and press <Enter> on the keyboard.
-
-
Press the Cancel button to exit the list without making a selection. Note that many lists can continue on the window for convenience while you select another list or window using menu or hot keys.
Example
The information in the sample list shown above can be displayed in:
-
A simple list format with all customers in a single list. This is accomplished by selecting All at the top of the page.
-
A hierarchical list by selecting Use Category at the top of the page. This feature allows you to view your information in a group method. See Folder lists in this section for more information.
-
The Search entry is used to conveniently position the list to the desired record. The search entry is labeled as Search For ID in our example and note that the information is sorted by the ID column. The search topic can be changed by clicking on the column heading. To search for last name, simply click on the Last Name column heading. (This would change search to Search For Last Name.)
As the user types in text, keystrokes will be displayed with a background of white while the system attempts to complete your code with the first matching ID code available. Note that the information bar moves to attempt to identify the specific information that you are searching. If you enter text that does not match any of the list information, it will be underlined in red.
-
If the All or Use Folder List option is set to All, the left pane has no effect on the information listed. If the option is set to Use Category, the system will only return information contained within the category folder. The user can also change the category folder selection by clicking the desired folder or by using the up and down arrows on your keyboard. A selected folder will be highlighted in a contrasting color. Note that a record (in our example, a customer) cannot be located in more than one folder. For additional information see the section on Categories and Folder Groups.
-
The Information Pane is where the actual information is listed. This list can be resized by adjusting the size of the folder pane and the information pane by dragging and holding on the center bar with the mouse. You can also enlarge the entire list box by dragging from the corners. (See Windows manual for more information on resizing windows.)
-
The information headers identify the contents of each column and are also used to resize and hide columns, or to sort information.
-
Columns can be resized by holding the mouse cursor between two column headers. When the cursor changes into a move cursor, hold down the left mouse button and move the line to the left or right to readjust column widths.
-
To hide or show specific columns in a lookup list, position the mouse cursor anywhere on the column headers and right-click. This will bring up a complete list of columns to show which ones are selected or hidden.
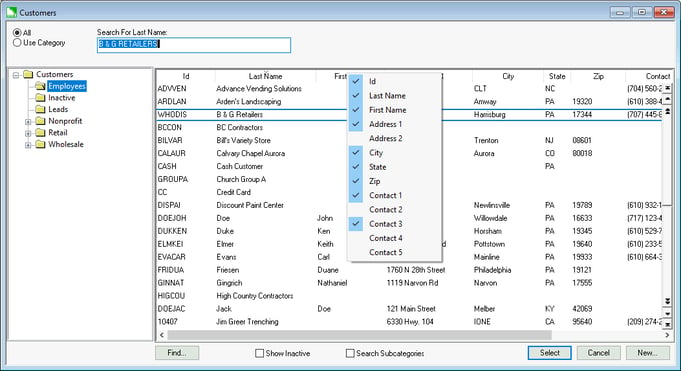
-
Hide a specific column by selecting any that are prefixed with a check mark or show any columns that are not prefixed with a check. This feature allows the user to show only the information that is relevant to the current user. These settings are stored by each user. Therefore, you could hide a specific column, but another user on another computer could show the same column.
-
To change the sort order of a list, click on the column title with your mouse. For example, if you want to sort by the Last Name, click on the Last Name header and the entire list will be re-sorted by the last name in ascending order. If you prefer to list the information in descending order, click on the column header a second time. Note that when after clicking on a specific column, the search entry label changes to reflect the current sort order.
-
The information list includes a selection bar that can be moved by clicking on a specific line with the mouse or using the arrow keys to move the list bar up and down. The page up and page down keys on the keyboard will move the entire list an entire page. A scroll bar will appear on the bottom of the list if the column widths are greater than the width of the pane. Note that list information can be moved up and down using the scroll bar to the right of the information pane.
-
The Tab key will tab between fields and buttons on the list box window, similar to the way it operates on dialog windows.
A number of search lists can be opened within the main EBMS desktop. Each list can be moved and re-sized within the desktop. All lists launched from the main menu will be minimized when the EBMS desktop is minimized. Open lists may be maintained when exiting EBMS, based on whether the Save settings on exit option found by going to the Review the EBMS System Options section of this documentation for more details.
Go to the for more details on configuring the lookup list windows each time EBMS is launched.
Training Resources:
Search Lists Feature Introduction 3 minutes